Loops in Arduino Programming
Repetition is a fundamental component of computer programming. Loops are the programming structure that implement repetition. There are two kinds of loops: for loops and while loops. Both for and while loops can be used in most situations where repetitions are needed. However, there are situations where a for loop is the most natural way to implement the logic, and there are other situations where a while loop is most natural.
This web page introduces the syntax and provides examples of for loops and while loops.
Table of contents
for Loops
A for loop is a natural fit when there is a known number of repetitions to be performed. For example, if you want to blink an LED three times, you would (most likely) put the on-off sequence necessary to blink the LED inside the body of a loop that repeats three times.
A generic for loop looks like this:
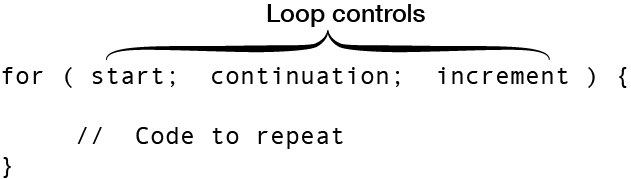
Immediately after the for keyword is a pair of parentheses that contain the three parts of the loop control. For a for loop, the loop controls manipulate a single variable called the loop counter.
- Start: Set the initial value of the loop counter
- Continuation: Check to see if the loop counter matches a stopping criterion
- Increment: The rule for changing the loop counter on each pass through the loop
The use of loop controls are easier to see with a specific example.
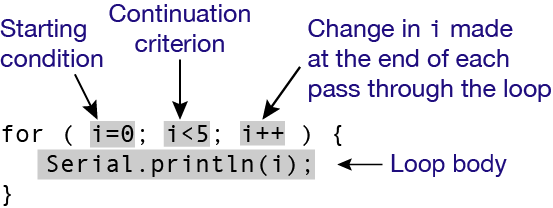
In this example, i is the loop counter.
More detailed notes on for loops are available in a separate document.
while Loops
A while loop is a natural way to repeat a task when the number of repetitions is not known in advance. For example, suppose you want create a system that can automatically fill a water tank. You have a sensor that measures the water level in the tank and a shutoff valve that can be controlled by an Arduino. In general, the initial water depth in the tank and the flow rate through the valve will depend on environmental conditions outside of your control. Therefore, you do not know in advance how long to keep the valve open. A while loop could be used to repeatedly measure the water level as the tank fills. When the desired water depth is reached, the while loop ends and the shutoff valve is closed.
More detailed notes on while loops are available in a separate document.
Also check out the Mike Likes Science YouTube Channel. Mike has an rap on while loops and a longer review video on while loops.