Read on-board Temperature with the BMP280
Table of contents
- Overview
- Install the BMP280 Library
- Upload the demoTemperature.ino sketch to the Feather nRF52840 Sense
- Viewing the Temperature Data
- Walk Through the Code
Overview
This web page demonstrates how to retrieve the temperature reading from the BMP280 sensor mounted on the Feather nRF52840 Sense. The BMP280 sensor measures temperature and barometric pressure. Because the BMP280 is mounted directly on the Feather nRF52840 the temperature reading is strongly influenced by the temperature of the board. The barometric pressure is not affected by proximity to the board.

Reading and processing the raw analog sensor data on an Arduino board is not necessary because the BMP280 chip is connected to the nRF52840 via an I2C digital interface. In the Arduino sketch, the temperature value is obtained by calling the readTemperature method for a BMP280 object. The value is communicated digitally over the I2C interface. The readPressure method performs the analogous function for the barometric pressure value measured by the BMP280 chip.
This web page provides a sample Arduino sketch for obtaining the temperature value measured by the BMP280. The same code should also work with an external BMP280 connected to an Arduino board via I2C. In other words, the code is independent of the physical wiring as long as the I2C connections are correct. The full capabilities of the BMP280 are described in the datasheet on the Adafruit website.
Adafruit provides a software library and instructions with examples for using the BMP280. The source code is available on github. BMP280 usage is also demonstrated in the sample code provided by Adafruit for the Feather nRF52840 Sense.
Install the BMP280 Library
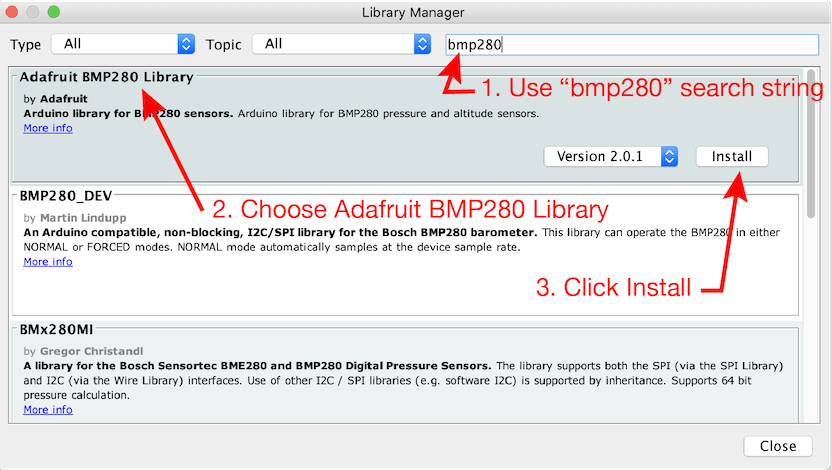
To write Arduino sketches that use the BMP280, you first need to install the Adafruit BMP280 Library. The following steps use the Arduino Library Manager and assume that you have properly configured the board support page.
From menu at the top of the Arduino IDE, select Sketch –> Include Library –> Manage Libraries…
- Enter “BMP280” in the search box to narrow the range of choices. Or, if you prefer, scroll through the entire list of libraries
- Choose the “Adafruit BMP280 Library” panel
- Click Install
Upload the demoTemperature.ino sketch to the Feather nRF52840 Sense
The demoTemperature.ino sketch demonstrates how to obtain the temperature reading from the BMP280.
Download the demoTemperature.ino sketch and upload it to your board. While uploading, the NeoPixel on the Feather nRF52840 glows green and then red. After the upload is complete you can open the Serial Monitor to see the temperature data from the sensor. Make sure the baud rate of the Serial Monitor is the same as the baud rate in the Serial.begin() command. In the demoTemperature.ino code (shown below) the baud rate is 9600.
//  File:  demoTemperature.ino
//
//  Read the built-in temperature sensor of an Adafruit Feather nRF52840 Sense
//  and print the temperature value
//
//  Gerald Recktenwald, gerry@pdx.edu,  11 Auguts 2020

#include <Adafruit_BMP280.h>  // BMP280 measures temperature and barometric pressure
Adafruit_BMP280 bmp280;       // Create a BMP280 object

// --------------------------------------------------------------
void setup() {
  Serial.begin(9600);  //  Initialize the serial object
  delay(2000);         //  Let the Serial object settle
  bmp280.begin();      //  Initialize the BMP280 sensor object
}

// --------------------------------------------------------------
void loop() {
  float Tval;
  Tval = bmp280.readTemperature();  //  Get the temperature (C)
  Serial.println(Tval);             //  Print the temperature value
  delay(25);                        //  Slow down so humans can read the Serial monitor
}
Viewing the Temperature Data
When connected to your computer the demoTemperature.ino sketch should produce a stream of temperature values that can be viewed with the Serial Monitor or the Serial Plotter in the Arduino IDE.
Walk Through the Code
The demoTemperature.ino code performs these main steps:
- Include the
Adafruit_BMP280.hlibrary - Create an
Adafruit_BMP280object. In this code the object is calledbmp280 - Start the BMP280 object
- Repeat the
loopfunction:- Read the temperature data
- Print the temperature data
We’ll examine each step in more detail.
Include the BMP280 Library
The first step is to include the Adafruit_BMP280.h library, which provides support for the BMP280 chip. You can read the code from the github repository.
#include <Adafruit_BMP280.h>
The demoTemperature.ino code uses only the temperature reading of the BMP280 chip.
Create an BMP280 Object
The next step is create or instantiate a BMP280 object, which is the mechanism to communicate with the BMP280 chip in the Arduino software environment.
Adafruit_BMP280 bmp280;
In this example the BMP280 object is called bmp280. An object is like a variable with properties for storing and retrieving data. You can use any valid variable name for the object name. The Adafruit_BMP280 bmp280 statement invokes the constructor for Adafruit_BMP280 objects. In this case the constructor does not require any input parameters. Therefore, bmp280 appears without any parenthesis.
Start the BMP280 Object
The BMP280 chip has internal hardware for converting raw temperature readings to digital values. Those digital values are communicated via I2C protocol from the BMP280 to the nRF52840. You can learn more about the I2C from Wikipedia, Adafruit, Sparkfun and elsewhere. The Sparkfun resource is probably the most accessible if you are new to I2C and digital communication.
In the start() function, the single line
bmp280.begin();
uses the .begin() method to create a new I2C connection between the nRF52840 and the BMP280.
Retrieve and Print temperature Values
In the loop() function, temperature readings are obtained from the BMP280 and stored in a local floating point variable, Tval. First, the Tval variable is declared
float Tval;
and then the current temperature reading on the BMP280 is retrieved and stored in Tval with
Tval = bmp280.readTemperature();
The value in Tval is sent back to the host computer with the Serial object.
  Serial.println(Tval);
  delay(25);
After printing, a short, 25 millisecond, delay is used to slow down the pace of readings. That delay is not necessary.