Functions in Arduino Programming
Functions are blocks or modules designed to perform a specific sub-task. A complete sketch can usually be organized into a set of sub-tasks in order to achieve an overall behavior.
On this page we start with some motivation for using functions. We then provide a concrete example of a function to read data from a sensor. By changing the function we can change the way that the sensor reading is performed without modifying how the reading value is used by the calling code. We then show the syntax used to create a function to perform a general user-defined task.
Additional notes on functions are available in a separate document.
Table of contents
- Motivation: Controlling an External System
- Organizing code into functions
- Example: Read a sensor
- Function Syntax
setupandloop
Motivation: Controlling an External System
Suppose your goal is to write an Arduino sketch to maintain the temperature of a water bath for a science experiment. You could organize the sketch into three sub-tasks: measure the water temperature, decide whether the temperature should increase, decrease or stay the same, and turn a heater if the temperature is too low. In this example each subtask could be performed by a block of code contained in a function.
As your sketch grows in complexity, it is almost always a good idea to use functions to make your code more modular, and therefore easier to maintain. In the water bath example above, you could modify the water temperature measurement, say by replacing the sensor, and the modificatoons would only need to affect the function that measures temperature. You may also find that functions developed in one application can be reused in other applications.
Organizing code into functions
You can write Arduino sketches without creating functions other than setup and loop. However, for any reasonably complex sketch, functions provide two key advantages: modularity and reusability. Functions allow tasks to be organized into modules that are isolated from each other except in ways that you explicitly allow. Experienced programmers know that the modularity afforded by functions helps them write code that is easier to read, write and maintain. Often a function developed for one application can be used in another application. By reusing the function, the overall effort is reduced.
Modularity and reuse enabled by functions also allow the programmer to think in bigger chunks. The following image is a conceptual representation of an Arduino sketch that can be decomposed into five distinct tasks. We suppose that each of the five task can be implemented into a discrete function. Two of the tasks are executed only once, and therefore are called from inside the setup function. The three remaining tasks are executed repeatedly on each pass through the loop function.
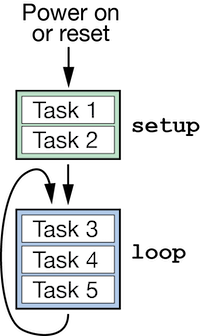
As suggested by the diagram, visualizing the sketch as a series of discrete tasks allows the overall concept of the program to be understood without getting lost in the details of each task. Of course, the programmer has to engage the details when writing each function for each task. However, if the functions are truly independent, the programmer can work on the details of each task which usually makes the programming easier. Furthermore, changes usually be made to the code of one of the functions without having to worry about direct effects on other functions.
At the beginning of any project it may not be obvious how to decompose a larger task into a set of more manageable subtasks. The decomposition skill grows with experience. As a beginner programmer, you can probably find example code, including functions, that can be adapted to your purpose. In those situations, try to retain the function-based modularity. In other words, avoid the tendency to copy all of the code into the body of the loop function.
Example: Read a sensor
Simple Read
Here is a bare bones function that uses the built-in analogRead function to return an integer value corresponding to the voltage on a pin with analog-to-digital capability.
int sensorInput(int channel) {
   int r = analogRead(channel);
   return(r);
}
This function would be used with the following line elsewhere in the Arduino sketch
int v = sensorInput(A3);
which uses sensorInput to read the value on pin A3.
The sensorInput function doesn’t really simplify the code because the single line
int v = analogRead(A3);
would just as easily obtain the same result.
Add Averaging
Consider a slightly more complicated example. Suppose to reduce the noise on an analog reading, you wanted to compute the average of several readings. The sensorInputAve function does the work
float sensorInputAve(int channel, int nreadings) {
   int i,r;
   float ave, sum;

   sum = 0.0;
   for ( i=1; i<=nreadings; i++ ) {
     r = analogRead(channel);
     sum += r
   }
   ave = sum/float(nreadings);
   return(ave);
}
With sensorInputAve available, you can replace
int v = sensorInput(A3);
with
float v = sensorInputAve(A3, 15);
in the main code and achieve a better result without littering the main code with the several lines required to compute the average. Note that the type of v has been changed from int to float to make it compatible with the value returned by sensorInputAve.
Also note that the channel number and number of readings to average are variables, not constants. This allows the function to be reused without needing to be changed. Consider the case where two sensors are used, say a temperature sensor and a light sensor. Those sensors would need to be on different channels and they might need different numbers of readings to obtain a good result. The following code segment illustrates how the sensorInputAve function could be reused in that situation.
int tempSensor = A2, lightSensor = A5;
int nTempAve = 15, nLightAve = 5;
float tempVal, lightVal;

tempVal  = sensorInputAve(tempSensor, nTempAve);
lightVal = sensorInputAve(lightSensor, nLightAve);
Notice how, in this made-up example, the names of variables are chosen to represent the values they store.
The preceding examples demonstrate some of the advantages of using functions
- Isolating blocks of code that perform detailed tasks, which
- Makes the main part of your code more compact and easier to read. Those advantages amount to the benefits of hiding details.
Other significant advantages of using functions are
- Reusing code
- Reducing the length of the main program, for example, if you had to read multiple sensors
- Providing a way to upgrade the code without (usually) disturbing the main code.
Settle and Slow Down
As an example of the benefits of upgrading, consider this modified version of the sensorInputAve function.
float sensorInputAveStable(int channel, int nreadings) {
   int i,r,waitTime=10;
   float ave, sum;

   r = analogRead(channel);    // Throw away 1st reading to allow channel to settle
   sum = 0.0;
   for ( i=1; i<=nreadings; i++ ) {
     wait(waitTime);           // Add slight delay to slow down reading rate
     r = analogRead(channel);
     sum += r
   }
   ave = sum/float(nreadings);
   return(ave);
}
This function adds two features that, in some situations, increases the stability of an analog input reading. Before any readings are kept, the function makes a reading that might cause the analog channel to settle at a more stable value. Then, inside the loop, a slight delay – in this case 10 milliseconds – is introduced to spread the readings out over a longer period of time. This might be useful if the signal were fluctuating slowly.
Whether or not the changes introduced in sensorInputAveStable make a difference in a particular application, the point of the example is to show that the body of the function can be improved without necessarily affecting the way that function is called. To take advantage of the changes, the user would replace
float v = sensorInputAve(A3,15);
with
float v = sensorInputAveStable(A3,15);
in the calling code. Of course, we could also have just changed the code in sensorInputAve and then no change to the calling code would be necessary.
Function Syntax
Functions must have the following components
- Type
- Name
Functions can also have the following useful, but optional, components
- Input arguments
- Return values
The following image shows the four component types for the sensorInputAve function.
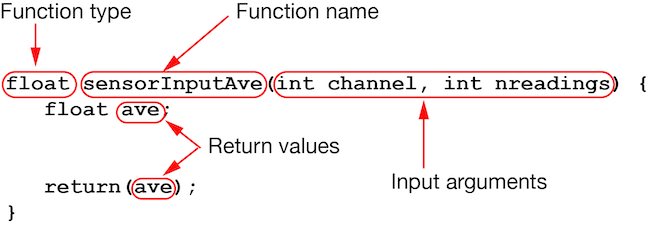
Function Type and Name
The first line of a function must contain the type and name of the function. The function type specifies the class of variable that is returned when the function ends. Some common function types are void, int and float.
You can make up the function name subject to the following rules
- The function name must begin with a letter either lower case (a-z) or capital (A-Z) or an underscore
_. Examples are
int foo()
int FOo()
int _ffoo()
After the first character you can have any combination of letters, numbers or underscores, but no spaces
Immediately following the function name you must have an open and closing set of parenthesis for the input parameters.
Be careful to not choose a name for a function that is already defined in the Arduino IDE. For example, you should not create a function with the name cos because cos is the name of the built-in function for computing the cosine of an angle.
Input Parameters
Input parameters are optional. You could have a function with no inputs such as the always present setup and loop functions in an Arduino sketch. Here is a somewhat silly example of a function with no input parameters
void hello() {
   Serial.println("Hello!");
}
If your function has input parameters you must give each parameter a type and a name. In the following example, the input arguments are v1 and v2, and both are of type int.
int add_two(int v1, int v2) {
   int r = v1 + v2;
   return(r);
}
Suppose instead we wanted to add two floating point values. We would need to change the input parameter types and return types. Here is a function that adds two floats and returns the result as a float.
float add_twof(float v1, float v2) {
   float r = v1 + v2;
   return(r);
}
Return Values
In the preceding example, add_two, the function type is int, which means that when the function ends, an integer value is returned to the line where the function was called. Similarly, the add_twof function returns a floating point value.
Local Variables and Scope
Notice that add_two and add_twof functions have an internal variable r. In add_two, r is an int and in add_twof, r is a float. There is no conflict in having r in two places with two different types because the r variables is internal to the separate functions. We say that r is a local variable.
The input variables and local variables iin a function are said to be contained within the scope of that function. Having this limited scope is a great advantage because we can use simple and natural names inside a function without worrying whether those same names are used elsewhere in the sketch.
setup and loop
All Arduino sketches must have a setup function and a loop function. Both setup and loop are void functions, meaning that they return no values. Also, both setup and loop have no input arguments.
The setup and loop function are also special because they are called by a main program that we do not see or interact with directly from the Arduino IDE. The following image represents how the hidden main program calls setup and loop.
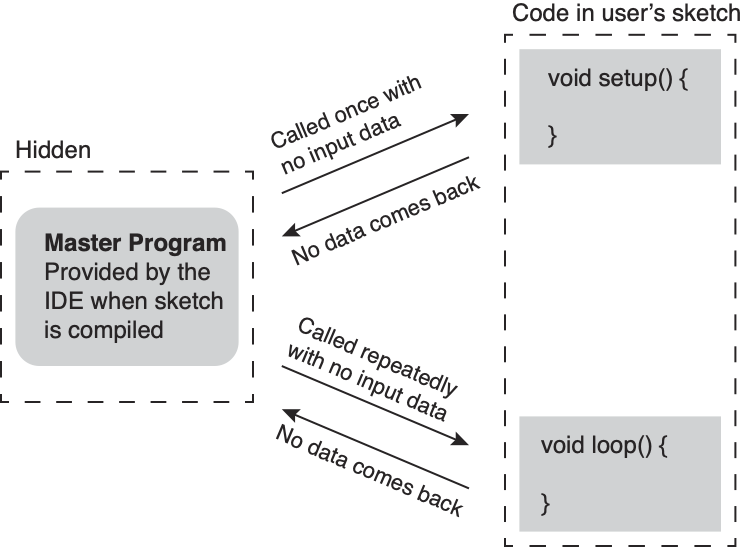
Since setup and loop are void functions with no input arguments, the only way to communicate data into and between these functions is with global variables.