Using the SGP30 Qwiic Breakout from SparkFun
Table of contents
- Overview
- STEMMA QT Connections
- Install the SparkFun SGP30 Library
- Run the
Example1_BasicReadings.inosketch from the SparkFun Library
Overview
The SGP30 is a sensor from Sensiron that provides measurements to indicate CO2 and TVOC (Total Volatile Organic Compounds) in the air around the sensor.
The SparkFun breakout board has a Qwiic connector for convenient solderless connection via I2C.

STEMMA QT Connections
The SGP30 has two STEMMA QT (Qwiic) connectors, which allows daisy-chaining with other devices
Connect the STEMMA QT connector to the Breadboard
The wires of the STEMMA QT connector have four colors, which correspond to the I2C communication protocol. Insert the male end of the STEMMA QT cable into the sockets adjacent to the pins on the Feather with the labels corresponding to the following color scheme.
Black:   GND
Red:     3V
Yellow:  SCL
Blue:    SDA
The SCL and SDA labels are for “clock” and “data”, respectively.
The following images shows the Feather nRF52840 Sense connected to a SparkFun SGP30 breakout board and an Adafruit 128 x 32 micro OLED board. Only the Feather (with header pins) and one of the STEMMA QT connectors use the breadboard. The SGP30 and the OLED are resting on the breadboard. (The breadboard pins on the SGP30 and the OLED are only used to hold those items in place. The pins are not electrically connected.)
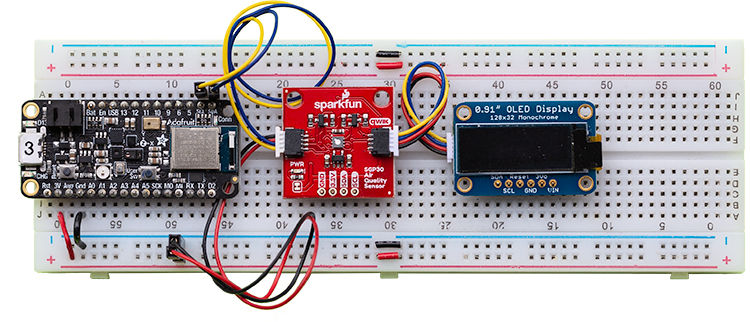
The STEMMA QT cable is inserted into the socket of the micro OLED board, and the exposed pins on the opposite end of the STEMMA QT cable are inserted into the breadboard in sockets adjacent to the SCL and SDA pins on the Feather and to the power and ground rail on the side of the breadboard.
Install the SparkFun SGP30 Library
To use the SparkFun SGP30 breakout board, you first need to install the SparkFun SGP30 Arduino Library. The following steps with the Library Manager assume that you have properly configured the board support via the Arduino IDE Preferences.
From menu at the top of the Arduino IDE, select Sketch –> Include Library –> Manage Libraries…
- Enter “sgp30” in the search box to narrow the range of choices. Or, if you prefer, scroll through the entire list of libraries (not recommended).
- Choose the “SparkFun SGP30 Arduino Library” panel, which will cause the Install button to become visible.
- Click Install.

Run the Example1_BasicReadings.ino sketch from the SparkFun Library
The SparkFun SGP30 Arduino library includes example sketches to demonstrate features of the SGP30.
Using the menus at the top of the Arduino IDE, select File –> Examples –> SparkFun SGP30 Arduino Library –> Example1_BasicReadings. Upload that sketch to the Feather board.
If you have connected the STEMMA QT cable to the correct pins on the breadboard, the Example1_BasicReadings.ino should run and display eCO2 and eVOC readings in the Serial Monitor.