Blink the On-Board NeoPixel
Table of contents
- Overview
- Install the NeoPixel Library
- A Note on Example Codes
- Open the blinkNeoPixel.ino sketch
- Walk Through the Code
Overview
As indicated in the following diagram, the Feather nRF52840 Sense has two fixed-color LEDs and one programmable NeoPixel. A yellow (fixed-color) LED labeled CHG glows when a battery connected to the Feather Senses is being charged, or when the Feather communicating with a host computer over the USB cable.
A red (fixed-color) LED is connected to digital pin D13. This is the LED referred to by the pre-defined LED_BUILTIN variable in the Arduino IDE, and it is the LED that flashes when the Blink sketch is running.
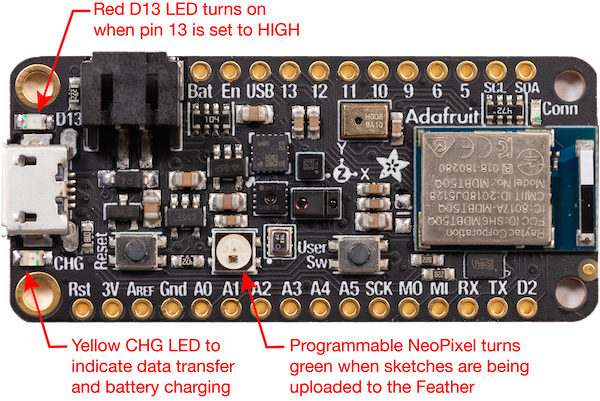
Blinking the NeoPixel requires more code than blinking the LED on D13 because the NeoPixel has much more capability than a fixed-color LED. Each NeoPixel has a driver chip that separately controls three smaller LEDs: one red, one green and one blue.
What is a NeoPixel?
A simple LED is a passive (non-programmable) component with positive and negative terminals. Applying a voltage with the correct polarity to those terminals causes the LED to glow.
NeoPixel is an Adafruit brand that describes a family of programmable LED. Refer to Adafruit’s NeoPixel Uberguide for details. NeoPixels exist as single chips or as combinations of chips. The Adafruit NeoPixel library makes it easy to control individual NeoPixels and NeoPixels in strips, rings, small arrays, large arrays, or bulk spools.
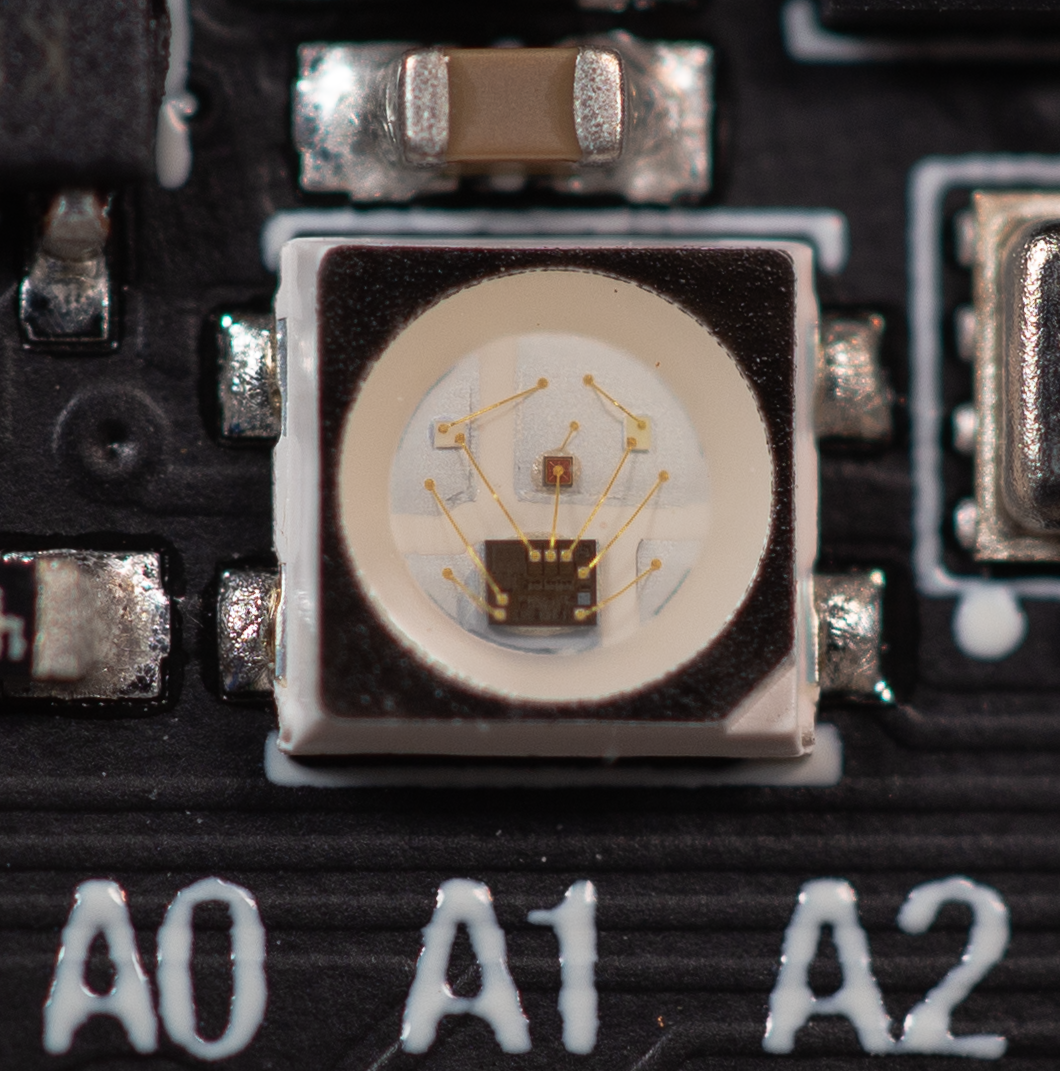
The following photograph is a close-up of the NeoPixel on the Feather nRF52840 Sense when the NeoPixel is off.
![]()
Each NeoPixel has three LEDs – red, green and blue – that can be turned on separately. The following sequence of four images show a NeoPixel illuminating the red, green and blue LEDs individually, and all three at the same intensity, which produces a white light at a sufficient distance from the NeoPixel. Notice that each color comes from a separate LED source on the NeoPixel.
![]()
![]()
![]()
![]()
The Adafruit NeoPixel library provides an object-oriented interface for communicating with one or more NeoPixels. Using the library involves these concepts in your Arduino sketch
- including the library,
- creating a NeoPixel object,
- manipulating the object with its methods.
On this web page we demonstrate how to use the Adafruit NeoPixel library to control the single, built-in NeoPixel on the Feather nRF52840 Sense. A more complex example that uses Bluetooth LE is available as an example from the Bluefruit nRF52 Library: File –> Examples –> Adafruit Bluefruit nRF52 Libraries –> Peripheral –> neopixel.
Install the NeoPixel Library
To use the NeoPixel, you first need to install the Adafruit NeoPixel Library. The following steps with the Library Manager assume that you have properly configured the board support page.
From menu at the top of the Arduino IDE, select Sketch –> Include Library –> Manage Libraries…
- Enter “neopixel” in the search box to narrow the range of choices. Or, if you prefer, scroll through the entire list of libraries
- Choose the “Adafruit NeoPixel” panel
- Click Install
Note that the current version of the NeoPixel library is likely to be greater than the version identified in the following image. In general, use the latest version of the library.
![]()
A Note on Example Codes
Vendors such as Adafruit and SparkFun provide software libraries for the hardware they sell. Each library has one or more example sketches that show how to use the features of the hardware. Usually we recommend running the example sketches to prove that your Arduino IDE is configured properly and that the hardware is connected properly.
The Feather nRF52840 Sense board support package and the NeoPixel library have example sketches that demonstrate features of the Feather and the on-board NeoPixel. However, these examples are rather complex. One of the goals of this web site is to show you how to use individual features of the Feather nRF52840 Sense in the simplest and most direct way. Therefore, we provide some example sketches that are simpler than those included in the vendor libraries.
Open the blinkNeoPixel.ino sketch
The blinkNeoPixel.ino sketch has a simplified code to blink the NeoPixel on the Feather nRF52840 board. The more complex neopixel.ino sketch included in the Adafruit nRF52 library uses an external Bluetooth app (say, on a phone or tablet) to control the color of the NeoPixel.
Download blinkNeoPixel.ino and upload it to your board. While uploading the NeoPixel should glow green and then red to indicate that communication with your computer is working properly. After the upload is complete, the NeoPixel should blink a reddish purple color. You can change the color by adjusting the values of r, g and b in the range 0 to 255 for each.
In the next section the details of the code are explained.
//  File:  blinkNeoPixel.ino
//
//  Blink the single built-in NeoPixel on a Feather nRF42840.
//  This code is a highly stripped down and simplified version of
//  neopixel.ino from the Adafruit Bluefruit nRF52 Library example

#include <Adafruit_NeoPixel.h>    //  Library that provides NeoPixel functions

// -- Create a NeoPixel object called onePixel that addresses 1 pixel in pin 8
Adafruit_NeoPixel onePixel = Adafruit_NeoPixel(1, 8, NEO_GRB + NEO_KHZ800);

void setup()  {
  onePixel.begin();             // Start the NeoPixel object
  onePixel.clear();             // Set NeoPixel color to black (0,0,0)
  onePixel.setBrightness(20);   // Affects all subsequent settings
  onePixel.show();              // Update the pixel state
}

void loop()  {

  int r=200, g=0, b=100;    //  Red, green and blue intensity to display

  onePixel.setPixelColor(0, r, g, b);   //  Set pixel 0 to (r,g,b) color value
  onePixel.show();                      //  Update pixel state
  delay(1000);

  // onePixel.setPixelColor(0, 0, 0, 0);  //  same effect as clear()
  onePixel.clear();                       //  Set pixel to black (0,0,0)
  onePixel.show();                        //  Update pixel state
  delay(1000);
}
Walk Through the Code
The blinkNeoPixel.ino code has these main components
- Include the
Adafruit_NeoPixel.hlibrary - Create an
Adafruit_NeoPixelobject. In this code the object is calledonePixel - Start the NeoPixel object and set its initial state to off
- Repeat the
loopfunction:- Turn the NeoPixel on to the desired values of red, blue and green
- Wait 1 second
- Turn the NeoPixel off
- Wait 1 second
We’ll examine each of these in more detail.
Include the NeoPixel Library
The first step is to include the Adafruit_NeoPixel.h library, which has the functions to support all of Adafruit’s NeoPixel products. You can read the code from the github repository
#include <Adafruit_NeoPixel.h>
Create a NeoPixel Object
The next step is create or instantiate a NeoPixel object
Adafruit_NeoPixel onePixel = Adafruit_NeoPixel(1, 8, NEO_GRB + NEO_KHZ800);
In this example the NeoPixel object is called onePixel. You can use any valid variable name, but you should avoid the plain pixel name since that is a reserved word, used by other code (not by the Adafruit NeoPixel library, it turns out). You can tell pixel is a reserved word because it is highlighted orange in the Adafruit IDE.
The Adafruit_NeoPixel(1, 8, NEO_GRB + NEO_KHZ800) expression is call to a class constructor for NeoPixel objects. Using the constructor creates an object (in this case onePixel) that has the properties specified by the input to the constructor. The four inputs to the constructor are
nthe number of pixels. In this case,n = 1since there is only one on-board NeoPixelpthe pin number. In this casep = 8, which is the pin reserved for the on-board NeoPixel for the Feather nRF52840 Sensetpixel type, which is specified using predefined constants in the NeoPixel library. TheNEO_GRB + NEO_KHZ800expression creates an RGB NeoPixel type that is operating at 800 kHz.
You can find the documentation for the constructor by reading the Adafruit_NeoPixel.cpp code on the github repository.
Prepare the NeoPixel Object for Use
The code in the setup function prepares the NeoPixel for use:
  onePixel.begin();
  onePixel.clear();
  onePixel.setBrightness(20);
  onePixel.show();
The onePixel.begin() statement tells the onePixel object to perform startup tasks. The .begin() part of the statement is a call to the begin method that is part of the onePixel object. This method syntax is used in most Arduino libraries and is a feature of the C++ language used in the Arduino IDE.
Note: The
Serial.begin(9600)statement that is common to many Arduino sketches invokes the.begin(9600)method of theSerialobject with an input value of 9600. The.begin()method for a NeoPixel object does not take any input values.
The next three statements make sure the NeoPixel is in the correct state before the code in loop is executed.
  onePixel.clear();
  onePixel.setBrightness(20);
  onePixel.show();
onePixel.clear() makes sure that the red, blue and green values for the NeoPixel are all set to zero. Note that the clear method by itself will not cause the NeoPixel to turn off. clear() just sets the brightness values stored in the memory of the NeoPixel object to zero. The onePixel.show() statement causes the detailed work of communicating with the NeoPixel’s internal chip to occur.
It’s possible to run the sketch without running the .clear(), .setBrightness(20); and .show() methods. These statements cause the NeoPixel to start in the predictable state of being fully off.
In some situations, say after uploading a new sketch or pushing the reset button, the NeoPixel may be left on from a previous sketch that was interrupted. The driver chip on the NeoPixel retains its previous state, and if that state was on with some settings of the red, blue and green LEDs, then that state will continue until it is overridden. Invoking the .clear() and .show() methods at the start of the sketch makes sure that the NeoPixel is completely off.
Blink the NeoPixel
The loop function is repeated indefinitely. The basic operations are
- Turn the NeoPixel on to the desired values of red, blue and green
- Wait 1 second
- Turn the NeoPixel off
- Wait 1 second
The NeoPixel is turned on with
onePixel.setPixelColor(0, r, g, b);
onePixel.show();
where r, g and b are 8-bit integers indicating the intensity of the red, green and blue LEDs in the NeoPixel. The first argument to setPixelColor is 0, which is the index of the NeoPixel on the Feather nRF52840 Sense.
The NeoPixel is turned off with
onePixel.clear();
onePixel.show();
Notice that in both the on and off sequences of code, the .show() method is necessary to make the change happen.