Detect light intensity
Table of contents
- Overview
- Install the APDS9960 Library
- Run the
color_sensor.inosketch from the Adafruit Library - Run the
ambientLight.inosketch - Further Reading
Overview
This web page demonstrates how to retrieve the ambient light readings from the APDS9960 sensor mounted on the Feather nRF52840 Sense. A separate web page describes the use of the APDS9960 as a proximity sensor.
The location of the sensor on the Feather nRF52840 Sense board is shown in the image below.
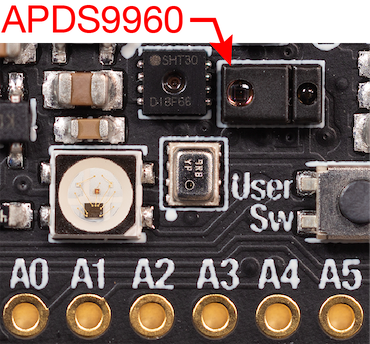
The APDS9960 has its internal processing and communication hardware. Proximity, gesture, ambient light and light color readings are sent to the host Arduino program via a I2C digital interface. Since the APDS9960 is mounted directly on the Feather nRF52840 Sense, no additional wiring is needed.
Adafruit provides a software library and instructions with examples for using the APDS9960. The source code is available on github. The color_sensor sketch in the Adafruit APDS9960 Library shows how to read light levels from the sensor. That sketch was used as a starting point for the simpler sketch presented below.
APDS9960 usage is also demonstrated in the sample code provided by Adafruit for the Feather nRF52840 Sense.
Install the APDS9960 Library
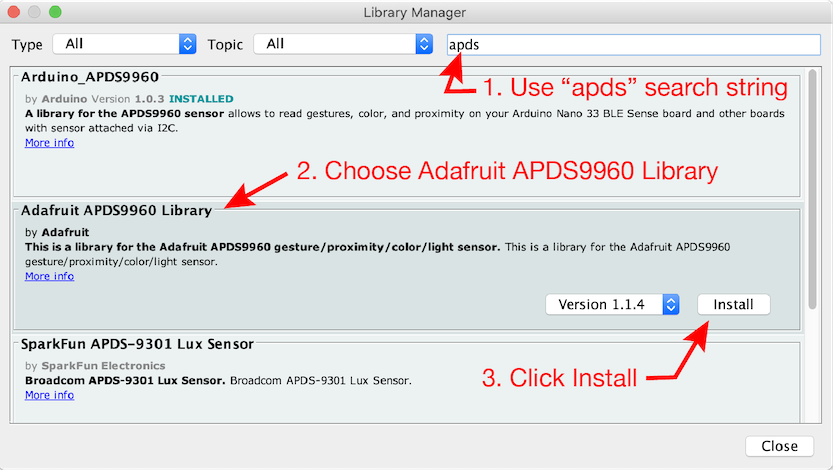
To write Arduino sketches that use the APDS9960, you first need to install the Adafruit APDS9960 Library. The following steps use the Arduino Library Manager and assume that you have properly configured the board support page.
From menu at the top of the Arduino IDE, select Sketch –> Include Library –> Manage Libraries…
- Enter “9960” in the search box to narrow the range of choices. Or, if you prefer, scroll through the entire list of libraries
- Choose the “Adafruit APDS9960 Library” panel
- Click Install
Run the color_sensor.ino sketch from the Adafruit Library
The Adafruit APDS9960 library includes three example sketches to demonstrate features of the APDS9960 sensor. The color_sensor.ino sketch shows how to extract red, blue and green readings from the sensor. The gesture_sensor.ino sketch reads the left-right, up-down and near-far motions of objects above the sensor. The proximity_sensor.ino sketch prints the raw proximity output. We will discuss the proximity_sensor sketch and then develop a modified version that smooths out the readings with a running average.
To run the color_sensor sketch, open it from the Example folder. From the File menu of the Arduino IDE, select Examples –> Adafruit APDX9960 Library –> color_sensor. The code for the color_sensor.ino sketch should appear in a new text window of the Arduino IDE.
Upload the color_sensor sketch and open the Serial Monitor to see the continuous stream of readings from the sensor. Expose the Feather nRF52840 Sense board to different light levels, for example by turning it toward a window or desk lamp or covering the board with your hand to see the output change. When the color_sensor sketch is running, the output of the Serial Monitor should be something like the following
red: 82 green: 63 blue: 41 clear: 191

red: 83 green: 63 blue: 42 clear: 192

red: 83 green: 63 blue: 41 clear: 192

red: 8 green: 5 blue: 4 clear: 14

red: 3 green: 2 blue: 2 clear: 4

red: 4 green: 3 blue: 2 clear: 7

red: 82 green: 63 blue: 41 clear: 191

red: 83 green: 63 blue: 41 clear: 192

red: 82 green: 63 blue: 41 clear: 191
Run the ambientLight.ino sketch
The ambientLight sketch is a variation on the color_sensor sketch from the Adafuit Library.
Download the ambientLight.ino sketch and upload it to your board. While uploading, the NeoPixel on the Feather nRF52840 glows green and then red. After the upload is complete you can open the Serial Monitor to see the ambient light data from the sensor. Make sure the baud rate of the Serial Monitor is the same as the baud rate in the Serial.begin() command. In the ambientLight code (shown below) the baud rate is 115200.
//  File:  ambientLight.ino
//
//  Read the clear channel of the on-board APDS 9960 light sensor
//  and print the reading to the Serial object for display in the
//  Serial Monitor or Serial Plotter
//
//  Derived from the color_sensor.ino sketch in the Examples library
//  by Adafruit.  See http://www.adafruit.com/products/3595

#include "Adafruit_APDS9960.h"   //  Use the Adafruit Library for APDS9960
Adafruit_APDS9960 apds;          //  Create a global object called apds

// ----------------------------------------------------------------------------
void setup() {
  Serial.begin(115200);          //  Open Serial object for messages and data
  delay(3000);                   //  Wait for USB connection
  setupAPDSambientLight();       //  Configure APDS9960 to read ambient light
}

// ----------------------------------------------------------------------------
void loop() {
  int level;                     //  Value of clear channel from APDS 9960

  level = readAmbientLight();    //  Get the ambient light level
  Serial.println(level);
  delay(50);
}

// ----------------------------------------------------------------------------
//  Configure the APDS9960 sensor to read ambient light levels, not gestures.
//
void setupAPDSambientLight() {

  // -- Check to see that the sensor is connected
  if ( !apds.begin() ) {
    Serial.println("Failed to initialize device! Please check your wiring.");
  }
  else {
    Serial.println("Device initialized!");
  }
  apds.enableColor(true);  //  Enable color sensing
}

// ----------------------------------------------------------------------------
//  Read the light sensors on the APDS 9960.  Return the level of the clear
//  channel as an indicator of the ambient light level.  Note that the Adafruit
//  APDS9960 Library does not have a method for reading only the clear channel.
//  In the interest of simplicity, we use the available methods in the library
//  and incurr the small extra overhead of reading the R, G, B and clear channels
//  when we only need the value from the clear channel
//
int readAmbientLight() {

  uint16_t r, g, b, c;   //  Variables to store color data returned by APDS

  while( !apds.colorDataReady() ) {  // Wait for color data to be ready
    delay(5);
  }
  apds.getColorData(&r, &g, &b, &c);  //  Retrieve the color data

  return(c);  //  Only the clear channel matters for this application
}
Viewing the Ambient Light Data
When connected to your computer the ambientLight sketch should produce a column of values related to the clear channel light reading from the APDS9960 sensor. The output from ambientLight can be viewed with the Serial Monitor or the Serial Plotter in the Arduino IDE.
Walk Through the Code
The ambientLight.ino sketch performs these main steps:
- Include the
Adafruit_APDS9960.hlibrary - Create an
Adafruit_APDS9960object. In this code the object is calledapds - Configure and start the
apdsobject- Enable the color sensing mode
- Repeat the
loopfunction:- Call the
readAmbientLightfunction to obtain the clear channel reading - Print the value returned by
readAmbientLight
- Call the
We’ll examine each step in more detail.
Include the APDS9960 Library
The first step is to include the Adafruit_APDS9960.h library, which provides support for the APDS9960 chip. You can read the code from the github repository.
#include <Adafruit_APDS9960.h>
The ambientLight.ino sketch uses only the light level readings of the APDS9960 chip.
Create an APDS9960 Object
The next step is create or instantiate a APDS9960 object, which is the mechanism to communicate with the APDS9960 chip in the Arduino software environment.
Adafruit_APDS9960 apds;
In this example the APDS9960 object is called apds. An object is like a variable with properties for storing and retrieving data. You can use any valid variable name for the object name. The Adafruit_APDS9960 apds statement invokes the constructor for Adafruit_APDS9960 objects. In this case the constructor does not require any input parameters. Therefore, apds appears without any parenthesis.
Configure and Start the APDS9960 Object
The APDS9960 chip has internal hardware to support several types of measurements. When configured for ambient light sensing, the chip makes four sensor readings, one each for the red, green, blue and clear channels of the light spectrum. In mounting the APDS9960 on the Feather board, Adafruit has connected this signal line from the APDS9960 to pin 3 on the nRF5280 microcontroller. The Adafruit library handles the low level details.
The code to start and configure the APDS9960 for ambient light readings is contained in the setupAPDSambientLight function.
void setupAPDSambientLight() {
  if ( !apds.begin() ) {
    Serial.println("failed to initialize device! Please check your wiring.");
  }
  else {
    Serial.println("Device initialized!");
  }
  apds.enableColor(true);  //  Enable color sensing
}
The block of code beginning with if ( !apds.begin() ) { tries to start the apds object with the .begin() method. The ! in front of apds.begin() negates the value returned by apds.begin(). Therefore, if apds.begin() returns 0, then !apds.begin() will evaluate as TRUE.
The last line of code in setupAPDSambientLight prepares the apds object for reading color light data. The apds.enableColor(true) statement is straightforward – it tells the apds object to set the APDS9960 into light sensing mode.
Read and print the clear channel values from the light sensor
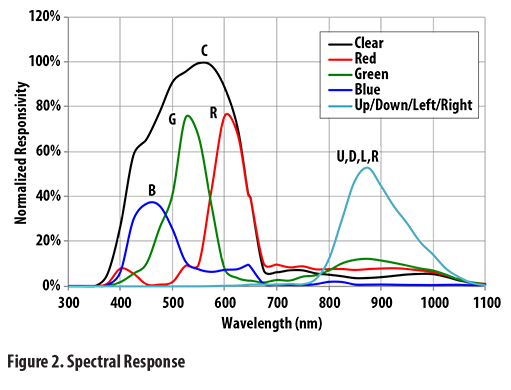
The APDS9960 has three sensors to read the ambient light levels. These sensors have filters that allow red, green or blue light to pass through the sensing element. This gives the APDS9960 the ability to detect relative amounts of red, green and blue light. More precisely, the filters allow light within wavelength bands corresponding to visible red, green and blue light to be detected.
The following plot from the APDS9960 datasheet shows the spectral response of the R, G and B sensor sites on the APDS9960. The clear channel signal appears to be the sum of the R, G and B channels. (The datasheet does not say how the clear signal (C) is measured and there is no mention of a fourth sensor site.)
The readAmbientLight function simplifies the clear channel reading by providing a wrapper around the getColorData method in the Adafruit APDS9960 library. The code in the loop function to read and print the clear channel reading to the Serial Monitor is simple:
  int level;                  //  Value of clear channel from APDS 9960

  level = readAmbientLight();     //  Get the ambient light level
  Serial.println(level);
Retrieve the light sensor values
The readAmbientLight() function repackages the code for reading the color data from the color_sensor.ino example. Only the clear channel reading is returned. The red, green and blue channels are obtained from the sensor, but ignored.
int readAmbientLight() {

  uint16_t r, g, b, c;   //  Variables to store color data returned by APDS

  while( !apds.colorDataReady() ) {  // Wait for color data to be ready
    delay(5);
  }
  apds.getColorData(&r, &g, &b, &c);  //  Retrieve the color data

  return(c);  //  Only the clear channel matters for this application
}