-
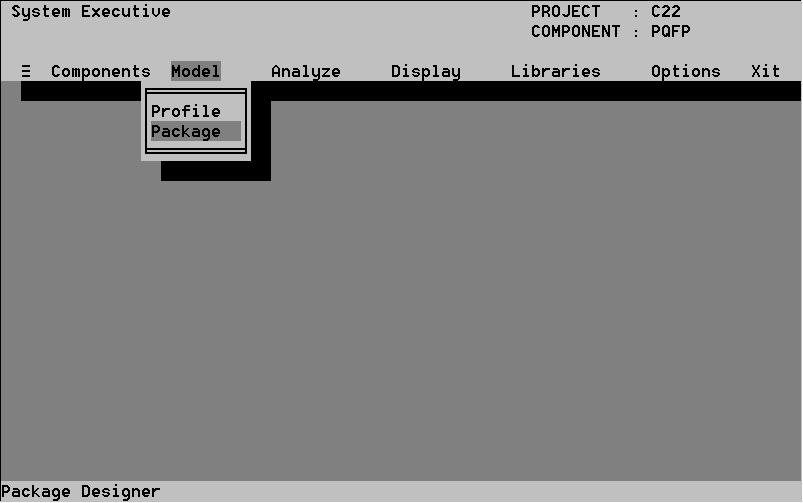
Select the Package option. The Package graphical interface
appears (see Figure 17).
 Figure 17. The Package graphical interface
The Package graphical interface is divided into four quadrants. The
drawings are not true third-angle projections and have been scaled to maximize
the size of the graphics and improve visibility. The length dimensions
are always drawn along the x-axis and the width dimensions along the y-axis.
-
The top left quadrant can be toggled to present views of the top,
x, and y sections and is view-only.
-
The bottom left quadrant can be toggled to present views of the
top, x, and y sections and is view-only. To toggle, select the quadrant
title field and press Enter.
-
The top right quadrant presents a window in which you assign or
edit package parameters or designs.
-
The bottom right quadrant presents a window in which you can choose
among a range of values for some parameters.
The Package screen also contains three options:
-
Design Aids helps you to choose an interconnect, substrate, and
mounting technology and package type.
-
Zoom enables you to view enlarged views.
-
Save enables you to save your design.
6.3.1 The Design Aids Option
Interconnection, substrate, and mounting and package technology selection
is a complex process involving many tradeoffs. No one technology addresses
all the requirements for any application. The Design Aids option
provides a starting point for selecting the technologies that best meet
your operating criteria by enabling you to compare the limiting characteristics
of each technology. You can then choose a technology, or refer to other
information provided in the display, such as technology cost or availability,
to help narrow your choices. After you choose the technologies, you will
input them in other Design options as you design the package. You should
understand that Design Aids merely lists your choicesyou do not assign
them in this option, but in the other Design options. If you already
know which technologies you will use, go to the Constraints option,
Section 6.3.4.1, and start designing. Design Aids contains three
commands:
-
Inner-interconnect helps you to choose an interconnect technology.
-
Substrate helps you to choose a substrate technology.
-
Mounting Technology and Package Type helps you to choose mounting
and package technologies.
6.3.1.1 The Inner-interconnect Command
Inner-interconnect refers to the interconnects connecting the die(s)
to the package.
-
Select the Inner-interconnect command from the Design Aids
menu. The window in Figure 18 appears. It is divided into four sections:
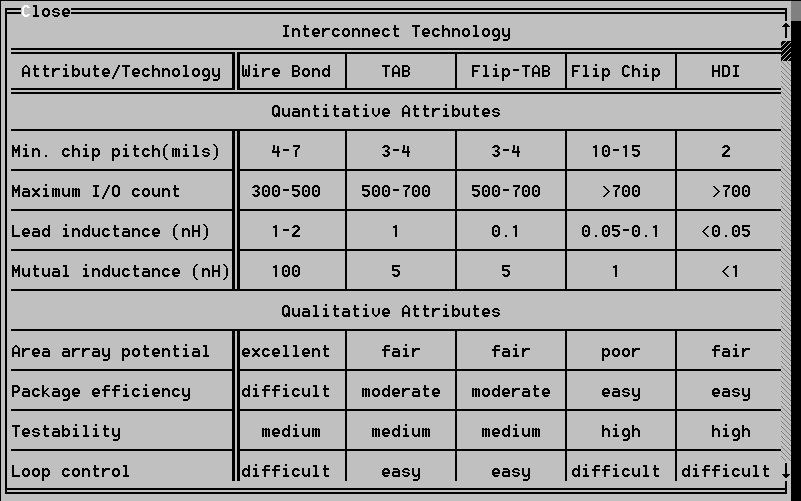 Figure 18. The Inner-interconnect command
-
The Interconnect Technology section lists the five interconnect
technologies available: wirebond, TAB, flip-TAB, flip-chip, and HDI. These
fields are not selectable.
-
The quantitative attributes section lists the technologies quantitative
characteristics. These fields are selectable.
-
The information section provides information to help you choose
technologies. You must scroll down to view all the data. These fields are
not selectable.
Go to the end of this section to read definitions of the field catagories.
-
Select attribute values in the qualitative and quantitative fields
that meet your minimum design criteria. Upon selection, the values are
highlighted in blue. As you select attribute
values, all interconnect technologies meeting them are highlighted in yellow.
Because CADMP-II highlights all technologies that accommodate a value range,
some ranges are valid for more than one technology. For example, if the
minimum chip pitch can be 10-15, all five technologies are highlighted
when you select the 10-15 field. Or, if your lowest maximum I/O count can
be 700, three technologies are highlighted if you select a value 700 or
lower. Selecting a value a technology cannot meet unhighlights it. For
example, in Figure 19, three technologies are unhighlighted be cause they
cannot support a >700 maximum I/O count. You can sometimes unhighlight
a value and a technology you are not interested in by selecting its range.
For example, in Figure 20, selecting the 5 value for mutual inductance
unhighlighted the Wire Bond technology. Most technology choices are eliminated
as you finish choosing attribute values.
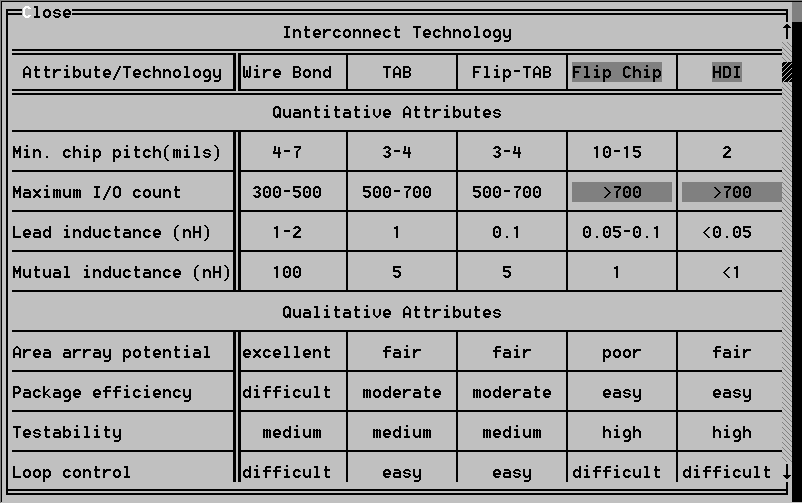 Figure 19. Technologies unhighlighted in range
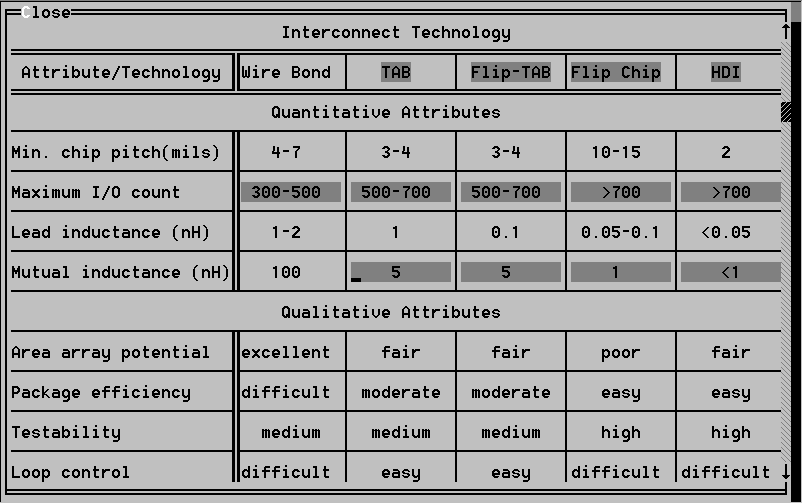 Figure 20. Unhighlighting single range
-
Often, no technologies meet all attribute requirements, and the ones that
best meet them are listed. View the Information section to help narrow
the choices. Make a note of your choice, which you will input in the Design
options.
6.3.1.2 The Substrate Command
-
Select the Substrate command from the Design Aids menu. The
window in Figure 22 appears. It does not contain a qualitative attributes
category but otherwise operates as described in Section 6.3.1.1.
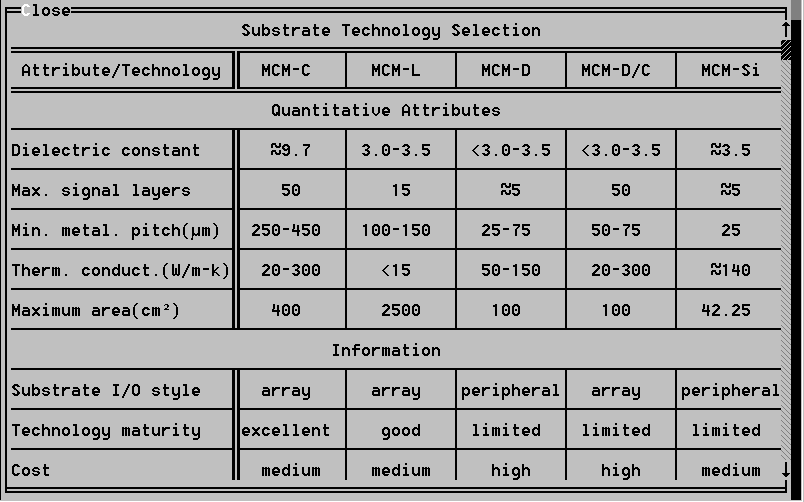 Figure 22. The Substrate command
6.3.1.3 The
Mounting Technology and Package Type Command
-
Select the Mounting Tech. and Pack. Type command from the Design Aids menu.
The window in Figure 23 appears and operates as in Section 6.3.1.1. The
top header lists two mounting technology categories: insertion
mounts and surface mounts. Insertion mounts include SIP(Single
In-line Package), DIP (Dual In-line Package), and PGA (Pin Grid Array)
packages. Surface mounts include SO (Small Outline) and FP (Flat Pack)
packages. The package names are at the bottom of the window in blue.
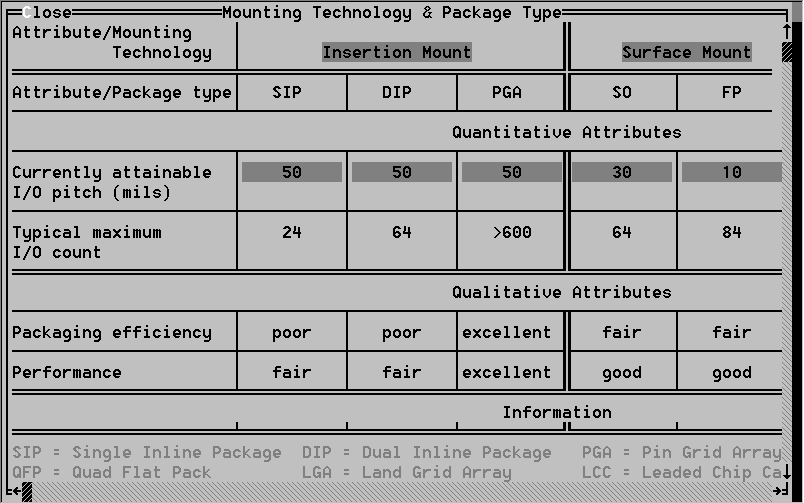 Figure 23. Mounting Tech. and Pack. Type command