An FLTK Window


This tutorial will show you how to open an FLTK window.  We will build on the project from the previous tutorial so please complete it first if you haven't already.
Before we start, please first download a proper FLTK library according to the vesion of VS you use. We support VS 2019 for this class and provide a pre-built FLTK library fltk-1.3.5-vs2019 for Windows 10.

  1. Add a Window Class
  2. Modify Main
  3. Add Include and Library Paths
  4. Project Settings
  5. Build and Run the Program
Lets get started.


Step 1:  Add a Window Class


We need to add a class to project which will control our FLTK window.  We begin by adding two new files to the project.  We want to add a new source file or C++ File (.cpp) in VS called MyWindow.cpp and a new header file or Header File(.h) in VS called MyWindow.h.  These files can be added just like main.cpp was in the previous tutorial.

We now need to add the code for this class.  First the header file MyWindow.h:

#ifndef MY_WINDOW_H
#define MY_WINDOW_H

#include <Fl/Fl_Window.h>

class MyWindow : public Fl_Window
{
   public:
      MyWindow(int width, int height, const char* title);
      virtual ~MyWindow();
};

#endif


Lets look at this for a second.  It defines a class called MyWindow which is derived from the FLTK base window class Fl_Window.  The file Fl_Window.h was included to get the definition of this class.  Notice how the Fl directory is prepended to this file.  All FLTK files should be prepended with Fl when they are included.  Our window class has only a constructor (which takes three arguments) and a destructor.  The underlying FLTK window class is going to do all the rest for us.

The code for the source file MyWindow.cpp contains the implementations of the constructor and destructor.

#include "MyWindow.h"

MyWindow::MyWindow(int width, int height, const char* title) : Fl_Window(width, height, title)
{}

MyWindow::~MyWindow()
{}

The constructor just passes its arguments to the constructor of the base class, the FLTK class Fl_window.  The destructor doesn't do anything yet but we'll need it later so we might as well make it now.


Step 2:  Modify Main


Now that we have a window class we need to modify our main function to make use of it.  Here's the updated contents of main.cpp.

#include <Fl/Fl.h>
#include "MyWindow.h"

int main(int argc, char** args)
{
   MyWindow myWindow(400, 400, "CS447 Tutorial");
   myWindow.show();

   Fl::run();

   return 0;
}

This new version of main creates an instance of our window class with a size of 400x400 pixels and a title of "CS447 Tutorial".  FLTK windows are not visible until they are shown.  This allows you to create a window, set various attributes and then display the window.  If it was visible initially the user might see the attributes of the window changing as you initialized them.  So to make our window visible we call its show() method.  This is one of the many method MyWindow inherited from the base class Fl_Window.

Now we tell our window to show itself we have only one step remaining.  We must tell the FLTK system to start processing events.  FLTK is an event driven system, meaning it responds to user inputs.  FLTK will not do anything until we tell it to start the event processing loop.  We do this my calling Fl::run() which was included from the file Fl.h.


Step 3:  Add Include and Library Paths


We've now got all the code we need and we almost ready to build our project but first we must tell VS where to find the FLTK files that we are using.  We must tell it where to find the header files (*.h) that we've included in our project, such as Fl.h.  It also need to know where to find the FLTK library that we've built for you.

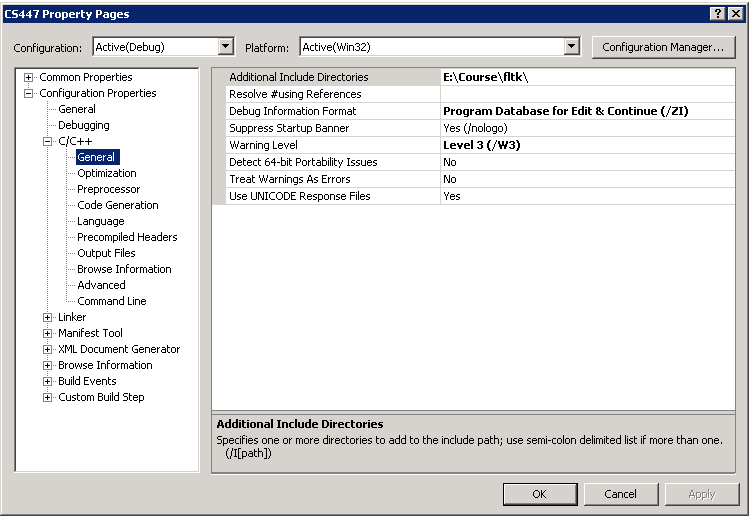
Choose Project -> Properties from the VS menus and you should get the dialog to the right.   In the left hand pane go to Configuration Properties -> C/C++ ->General, then choose Additional Include Directories. Suppose you've placed a copy of all FLTK in E:\code\fltk.  So select this folder as shown in the dialog.

Click OK.


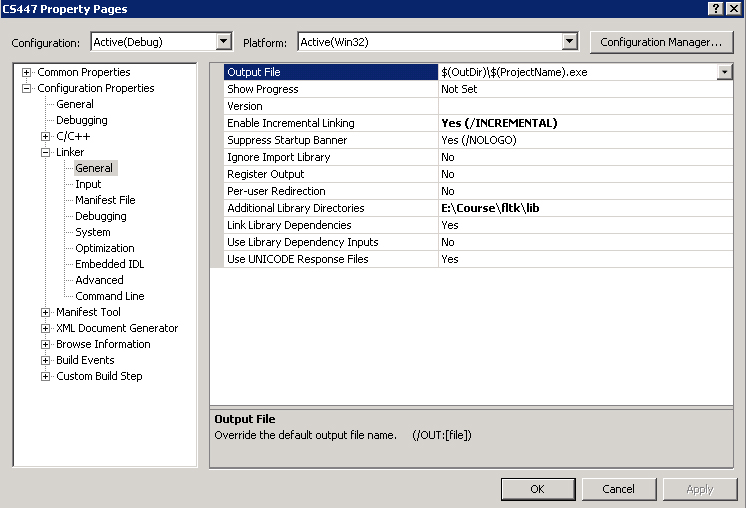
We now need to tell VS where to find the pre-built fltk libraries. Similarly, choose Project -> Properties from the VS menus and you should get the dialog to the right.   In the left hand pane go to Configuration Properties -> Linker ->General, then choose Additional Libary Directories. Input E:\code\fltk\lib, supposing you placed a copy of FLTK there.

Click OK.


Step 4:  Project Settings


Now that VS knows where to find the FLTK library we need to tell it which libraries we're interested in.  

Similarly, choose Project -> Properties from the VS menus and you should get the dialog to the right.   In the left hand pane go to Configuration Properties -> Linker ->Input, then choose Additional Dependencies. Input fltkdlld.lib, which is the FLTK debug dll library file that this project uses.

Click OK.


We now show the setting for the FLTK library. The FLTK library uses a debug version of the C runtime from a dll (dynamically linked library). We need to make sure our project's settings match FLTK.

Go to the Project Property page in the same way as Step 3, and choose C/C++ -> Code Generation from the left hand pane and set the Runtime Library to Multi-threaded Debug DLL (/MDd).

Click OK.


VS needs to know where to find the FLTK dll files.

Go to the Project Property page in the same way as Step 3, and choose Debugging from the left hand pane. Suppose you placed a copy of FLTK at E:\Course\fltk. So set the Working Directory as E:\Course\fltk\lib which contains the FLTK dll files.

Click OK.


Step 5:  Build and Run the Program


We build our program just like before.  Choose Build -> Build Solution.  Your project should build with no errors (you can safely ignore the warnings).  If you have some errors see where they are and find the difference between your code and the code supplied with this tutorial.  Fix the errors and try again.

One its built you can run it via Debug -> Start Without Debugging.  You should get a gray window like this one.  What's that?  All this for a gray window?  Don't worry we'll actually start doing something with our window in the next tutorial.


Source code for this tutorial.

Go to the programming tutorials page.