Volume 2, Chapter 7: Fitting the Bridge and the Nut
The
bridge and the nut are the places that support the strings and transmit the
sound. [ If (the strings) are not
off the wood, then there will not be any sounds. Both (bridges) must be done right and then the (required) sounds
will come in response.] They also
have a function of making the fingering easier. The bridge is tall and half sunken into the face. The nut is low and slightly rises above the
face. The three kinds of sounds; that
is, san (散) (lit., scattered), fan (泛) (lit., floating), and shih (實) (lit., full) all depend on this.[1] The ancient method was said to be: “In front a finger could not be fitted in;
in back a piece of paper could not be fitted in.”. This is to say that the strings should be low. It also implies the way for making the
fingering true and the musical response correct. “In front a finger could not be fitted in” refers to the bridge. The string route from the tail to the first
hui should be perfectly straight. [ Use
a long, extremely straight measuring stick and put it on the surface over each
string route. Check and make sure that
it is perfectly straight without any high or low places.] Altogether the bridge on the left and right
is 25/100’s of an inch higher than this.
From the first hui to the bridge, the surface becomes gradually
lower. It should not be straight with
the rest (from the nut to the first
hui). This gradual lowering should make
it approximately 2/10’s of an inch or even a little lower. Height and depth are all reckoned from the
straight string route (from the nut to
the first hui).
So in so
much as the bridge is 25/100’s of an inch higher (from the straight plane of
the playing section), we can see then that it is half an inch high in all. This is the secret method of melding and
inserting the bridge into the face.
Few have the ability to understand its secrets. If one does not cause the plane of the face
to gradually slope down and if one does not make the whole even with the
bridge, which is 25/100’s of an inch taller than the fingering spots, [ up
from the first hui and down from the bridge.] then if it is too close to
the face, this will cause the fingers to strike the face. If one should make the bridge half an inch
taller (than the string route plane), then the left hand, when it presses the
strings above the seventh hui, will meet resistance and this will cause one to
spend too much effort (in pressing the strings down). So do it according to the method in order to bring about the best
results.
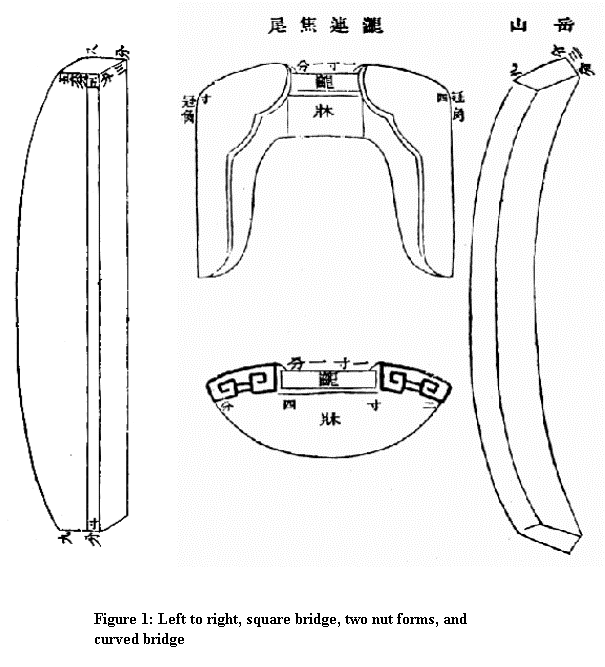
The width
of the bridge should be from 3-5/10’s of an inch. At first the height should be about 9/10’s of an inch, then set
it into the face about 3/10’s of an inch.
[ Set it in the face 3/10’s
of an inch then 6/10’s will be exposed.
After it has been fixed up, there will only be half an inch left.] As for its length, it should be equal
with that of the face. In some cases
the two sides can be made 2/10’s of an inch or so shorter. The bottom (of the bridge) can have two forms,
curved or straight. If it is curved, it
should be just like the form for the top.
If it is straight, it should be like a straight line. Cut open a slot in the face of the ch’in and
insert the bridge.
The inside of the slot
should be made according to whether the base is curved or straight, in order to
match. Stick it down so that there is
no space between it and the wood. This
is best.[2] Now as for the inside and outside of the
bridge, [ towards the hui is inside,
towards the forehead is outside.] although the form is the same,
nevertheless the inner side should be a tenth of an inch or so higher than the
outside. The outside is lower than the
inside. On the outside the jung-k’ou (絨扣) (yarn fasteners) are very near the bridge, and this is why
it should be a little lower. So then
the yarn fasteners are very close to the bridge and the sound will thus be more
substantial.
“In the
back a piece of paper could not be fitted in” refers to the nut. This is to say reckoning up from the
straight, flat string route the height of the nut should be only 5/100’s of an
inch or so. If it is taller, then the
strings will not be close to the wood and the sound will not be
transmitted. Fingering will also be
difficult. If it is too low, then the
strings will not be far enough away from the surface and the sound will be
deadened. But the nut should certainly
be low so one should take being low and at the same time not blocking the
transmission of the sound as a mean. As
for the form of the nut’s base, in some cases it may be connected with the tail
which is inlaid,[3] or made into
a half moon, or into straight crosswise forms.
Although these are different, the nut must still be uniform (in measurement). So then make the mouth of the nut, which
should be 5/100’s of an inch tall on the top of the nut’s base.[4] The nut’s base should be completely even
with the surface of the ch’in. It
should only be 2-3/100’s of an inch thick.
When the face is finished, then the bridge and nut should be made
according to the specifications and put where they belong. First it is necessary to cut open the ch’in,
so that they will tally and fit closely, but do not glue them yet. One must wait temporarily for the phase of
putting on the lacquer-powder mixture, which should be approximately 1/10th
of an inch thick. This is because in
order to facilitate smoothing the lacquer-powder mixture, these parts (bridge
and nut) should be removable. Hence
they do not present obstacles (to putting on the power/lacquer mixture). Moreover one need not wait for the smoothing
phase to be finished, just wait until after the top and bottom have been put
together and then take the bridge and nut and glue them on. Then work on fixing up the seams. See below for details.
As for
making the forms for the face of the nut and bridge, first take the bridge and
put it on the top of the ch’in. [ Do
not glue it on yet.] Use a long,
straight ruler that has already been made.
As for the top (of the ruler), its thin side should be 25/100’s of an
inch thick. [ One side is thick, one
side is thin. The thin side should be extremely thin.][5]
Mount a pin on the head so that it sticks out about 1/10th of an
inch or so. The method involves taking
the ruler’s thin and straight side and then laying it on the face in the upper
octave region (hui ten to twelve), and then moving it over from the first
string area to the seventh string area, causing the pin to make a mark on the
inner face of the bridge. Thus the form
takes on the curved shape of the face.
So then according to this form, fix it up and it will be good. The face of the bridge from the first string
to the seventh string has to be made so that it follows the form of the ch’in’s
face. So then the bridge and the face
will match up. The seven strings can
then be put on the bridge. If this
(procedure) is done correctly then the fingering will be easy for both hands. The bridge will be in harmony with the
string route and there will be no need to expend excess effort. The music will respond and come forth.
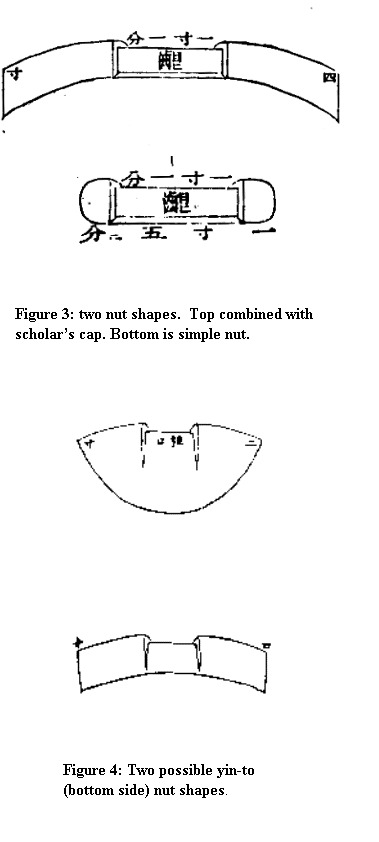
As for
the mouth of the nut, it is very low.
It should be slightly higher in the middle. [ This is where the fourth string is put.] On the left and right it should be slightly
lower. [ That is, the places for the
first and seventh strings.]
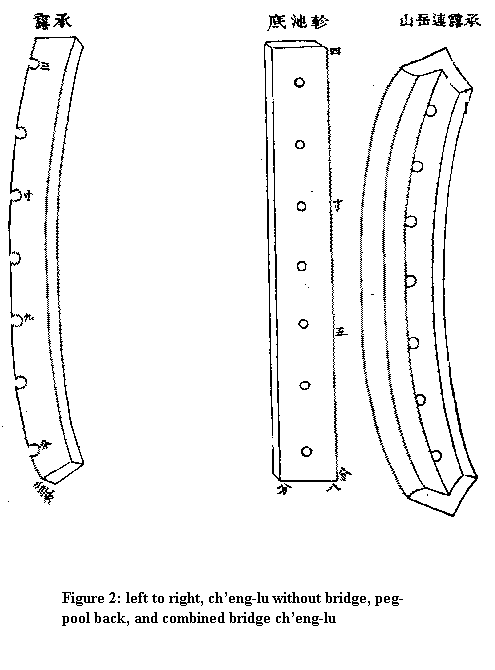
The
ch’eng-lu (承露) is near the bridge. Sometimes it may be one piece of wood with
the bridge; sometimes it may be separate.
In form it should resemble the bridge.
In length it should be the same as the bridge. It should be 4/10’s of an inch in breadth and 2/10’s of an inch
in thickness. It should be 5/100’s of
an inch higher than the surface of the forehead. And thus it should be 2-3/10’s of an inch or so lower than the
top of the outer side of the bridge. In
the center of the ch’eng-lu, near the bridge, bore a small hole about the size
of a small pea, which is for the yarn fastener of the fourth string. Now on the left and right, each separated by
about 65/100’s of an inch, bore three holes for the string fasteners one through
seven. Altogether then there will be
seven holes.
From the
first to the seventh holes, the length should be 3 and 9/10’s inches in
all. If it is too wide, the (fingering
techniques of) kou (句) and t’o (托) will not be accomplished easily.[6] If too narrow, then the techniques of kou
and t’iao (挑) will not be easy to do.[7] The holes must be close to the bridge and
only slightly apart from it, otherwise the fasteners will not be close enough
(to the bridge) and the sound of the strings will be unclear. But if one should drill next to the bridge,
then there is a possibility of doing damage to the outer side of the
bridge. The method here involves
taking a piece of wood and putting it in between the bridge and drill, so then
there will be no damage to the bridge.
When the seven string-eyes of the ch’eng-lu have been made, then put it
on the forehead of the ch’in. Now drill
down from each of the holes. The holes
must be extremely straight without the least curvature, so that the fasteners
can go straight through and so that the twisting action will not be
hampered. Now within the holes use a
fine, small file and file the holes smooth so that there are not any
obstructions.
Now as
for the chen-ch’ih-ti (軫池底) (peg pool back), it should be
made out of hard wood and installed so that there will not be any damage to the
bottom from the twisting of the pegs.
When one has drilled through the seven holes, then take the peg pool
back, which should be 2/10’s of an inch in thickness, and put it on the bottom
under the holes. Now take the drill and
again put it in through the holes, drilling through the peg pool back. Consider these seven holes as the crosswise
centerline for the peg pool. Also take
the fourth hole for a center straight line.
Now accordingly take the peg pool back, which should be made 4 and
5/10’s inches in length, and 8/10’s of an inch in width and put it on the
bottom. Now take bamboo tallies, stick
them into the string holes, and fasten the back onto the bottom. Then draw around the four sides in order to
make the peg pool. Chisel out a space
in the bottom for the peg pool. Then
mount the peg pool back. The seven
holes above and below should now be straight and should tally without any
obliqueness.
The
shape of the yin-t’o (齦託) (lit., “gums supporter”) is like
that of a half moon. It should be
approximately two inches or more in breadth.
It should be 2-3/10’s of an inch thick.
Its mouth is in amidst the strings.[8] It should be slightly narrower than the nut
by about 1/10th of an inch or more.
It is not any taller (than the nut).
This mouth receives the strings from the han-hsuan, so it must not have
any sharp places and should be made slightly rounded in order to protect the
strings.
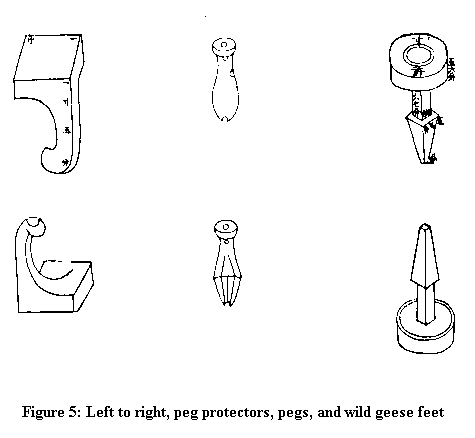
The wild
duck feet (雁足) are one inch square. They should be an inch and a half tall. They should be made according to the form of
the bottom. As for their four sides,
one should be along the front of the forehead, one should be on the left or
right accordingly, and two should be on the bottom. They should match up smoothly without any differences in order
to insure a refined appearance.
The
tuning pegs (軫) should be 8-9/10’s of an inch
long. The pattern for a peg should be
considered as having an upper and a lower part. In all cases they should be rounded. In some cases the upper part is round and the lower 5-6/10’s of
an inch is angular, which makes the tuning much easier. The top is round like a plate. The diameter here should be 4/10’s of an
inch and about 1/10th of an inch or more high. (In other words) the circumference of the
face of the top is taller than the center, so it is like a nest. Thus it will turn and will not go back. Otherwise it might slip and would not stay
put. It is necessary to open a hole in
the center of the top about the size of a green pea. This hole should go straight through. Now underneath the plate shape on the outside, make a neck. It should be slightly smaller (around) than
the top. On the side open a small hole,
which should go through to the center of the top. Now down from this neck hole about 3/10’s of an inch on the right
side, open another hole, which should obliquely go through to the center
hole. The yarn fasteners are put
through these holes. All of the pegs
then have straight, vertical center holes, which allow the fasteners to not
only go through without any obstacle, but also produce a beautiful refined
symmetry. This (idea) is the wisdom of
later people.
The wild
geese feet are made round like chessmen.
The diameter should be an inch or more.
They should be 5-6/10’s of an inch tall. In the center is a pillar, which should have squared sides measuring
about 4-5/10’s of an inch each. It
should be about 1 and 2-3/10’s inches high.
The base of the pillar is stuck about 4-5/10’s of an inch into the
bottom of the ch’in. The strings are
wrapped around the part that is exposed.
This section should be slightly smaller than the base. In some cases they are round, but they
should be made square in order to ensure that when the strings are wrapped
around, the strings will not slip.