By May 22 11:59 PM on May 25, 2018, each team will submit a second draft of the text and images
for a web page that describes the team's project. The second draft should have
more information than in the first draft, especially in the Outcomes section.
An edited version of the markdown file for your team project was returned as part of the feedback on the first draft. Create your final draft by editing and then uploading that document.
Please refer to the detailed written instructions on this document that was distributed in class. In particular
- Pay attention to file names (see below)
- Upload plain text files, not RTF files, and not MS Word documents.
- Upload separate files, not a single zip archive.
- Do not change the YAML header in the edited markdown file returned to your D2L dropbox.
Instructions for File Names and Types
File Names for Upload
Since your files will be stored on a server with all of the files from other
projects, it is extremely important that your files have a unique name. In other
words, do not use generic names like Picture1.jpg or team.md.
The file names used in the template (distributed in Lecture 03) are placeholders
with generic names chosen to keep the exposition simple.
To aid in sorting and managing these files, all of the files (.md, .jpg, .png, .pdf,. . . ) use a prefix derived from your project name. For example,
| Use this | Not this | |
|---|---|---|
| streimer_team.jpg | team.jpg | |
| streimer_assembly_model.jpg | assembly.jpg | |
| streimer_speed_plot.png | plot.png | |
Other rules for file names
- File names must not contain spaces
- Markdown files must have .md extension
- Graphics files can be JPEG (.jpg) or PNG (.png)
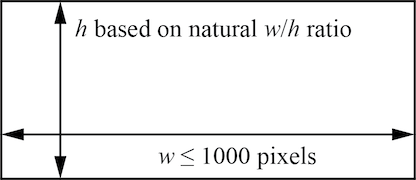
- Graphics files should have a horizontal dimension no wider than 1000 pixels. Figure 1. shows the graphics dimensions.
Uploading image files
For the final version, you must upload pictures to D2L. Linking to external files is unreliable – some sites do not appear to allow images to be loaded. This may be a server configuration, but I have spent too much time tracking down the problem without success.
The exception is videos. Any videos should be hosted on an external site such as YouTube
Use of the <figcaption> tag
Immediately following an image, you should use a <figcaption> tag to create
a caption for that image. A caption is helpful
in integrating images with text, as discussed below.
Here is an example of using the <figcaption> tag with the center format,
which is appropriate for narrow (one-line) captions. Preceding an image with
the {:.center} directive causes the image to be centered on the page, which
is a useful format for narrow images.
{:.center}

<figcaption class="center">
Figure 2: A man thinking about equations.
</figcaption>
The preceding code produces the image and caption shown in Figure 2. The content of the image is used for demonstration purposes only.

If the caption text spans multiple lines, use the "widehanging" class as in the
following example. First, we show the markdown code, and then the results in
Figure 3, below.
{:.center}

<figcaption class="widehanging">
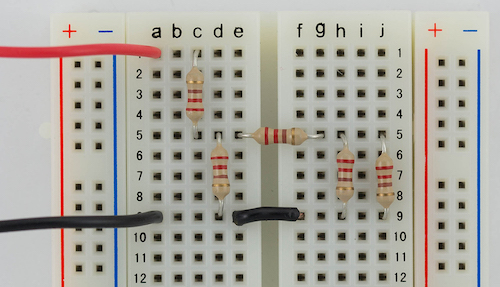
Figure 3: A bread board circuit of identical resistors arranged in
series and parallel. This example shows a multiline caption that uses
the `widehanging` class to create an indentation of the second and
subsequent lines. The alignment between lines is not perfect since there
is no natural way to specify a hanging indent in CSS-formatted HTML.
</figcaption>
For the purpose of this assignment, do not worry about centering or the syntax of figure captions. The important points to remember are (1) make sure your images have a maximum horizontal dimension of 1000 pixels, (2) provide caption text.
Comments on Content
General Considerations
Assume the audience is one of the following
- A potential sponsor who is thinking about a project for next year
- An employer who wants to see your skills and achievements
- A Junior who wants to learn about Capstone
- A program evaluator who wants to understand how our students perform as Seniors
To speak to this audience, you should write in clear, active and direct prose. Provide details, but be succinct. Do not assume that the reader is familiar with your project or with the Capstone course sequence and requirements.
Use photos, CAD drawings, tables and plots to explain your design and support your claims about the performance. Provide captions to the photos, CAD drawings, tables and plots.
Integrating Images with the Text
The images should be described or otherwise integrated into the text. Do not leave it to the reader to figure out what the plots mean and how that information is relevant to the design. Yes, the reader can do that (sort of), but that shouldn't be the reader's job. Be helpful to your reader. Otherwise the reader will give up and ignore your web page (or writing, in general).
One way to integrate images with the text is to provide a descriptive caption. You should also reference the image in the narrative text, and use the image to amplify and support the information presented in the text.
Team membership
The goal of listing team members is so that you can refer potential employers and friends and family to this public display of your work. If you do not want your name or photo on the project web page, you can opt-out.
For a team photo, it makes sense to list team members in order that they appear in the photo. Instead of a bulleted list, you can use a caption format to list the folks in the picture.
Outcomes
The Outcomes section should demonstrate, to the extent possible at the time of the web page submission, the final results of your project.
Be specific. What are the key features of your design? What performance metrics have been met or exceeded? Did you reach your design goals? Have you met the Customer/Market Requirements?
Provide concise evidence in the form of plots, tables and/or photos. You can show intermediate results, such as early design concepts, especially if those intermediate results help to explain the final design. It may also be helpful to show how (and whether) subsystems contribute to meeting performance metrics.