SGP30 Air Quality Sensor
The SGP30 is a sensor from Sensiron that provides measurements to indicate CO2 and TVOC (Total Volatile Organic Compounds) in the air around the sensor.
- Overview
- Connect the STEMMA QT connector to the Breadboard
- Install the Adafruit SGP30 Library
- Run the
sgp30test.inosketch from the Adafruit Library - Run the
SGP30plot.inoSketch - Object-Oriented Interface to the Sensor
- Burn in the SGP30 Sensor
Overview
The SGP30 is a sensor from Sensiron that provides measurements to indicate CO2 and TVOC (Total Volatile Organic Compounds) in the air around the sensor.
The Adafruit breakout board has a STEMMA/QT or Qwiic connector for convenient solderless connection via I2C. The STEMMA/QT connectors allow daisy-chaining with other devices.
Connect the STEMMA QT connector to the Breadboard
The following image idendifies the I2C pads on the Circuit Playground Express (CPX). The CPX board does not have a STEMMA/QT connector.
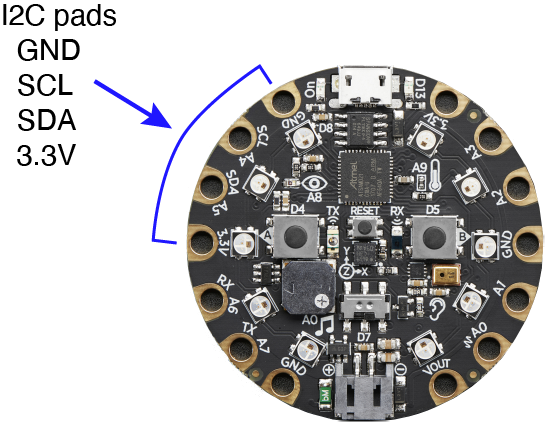
Use the STEMMA/QT connector with alligator clips create the STEMMA/QT chain from the pads on the CPX. The colors of the alligator clips match the I2C pads on the CPX according to the following scheme.
Black:   GND
Red:     3V
Yellow:  SCL
Blue:    SDA
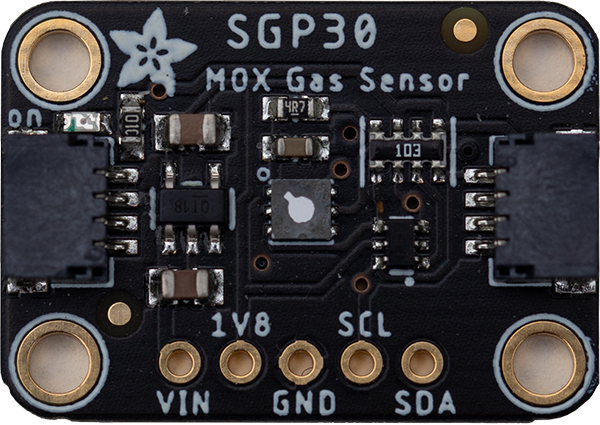
The STEMMA QT cable is inserted into the socket of the SGP30 breakout board.
Be careful when plugging STEMMA/QT (Qwiic) plugs into the socket of the SGP30! Consult this page for help in aligning the plug and socket.
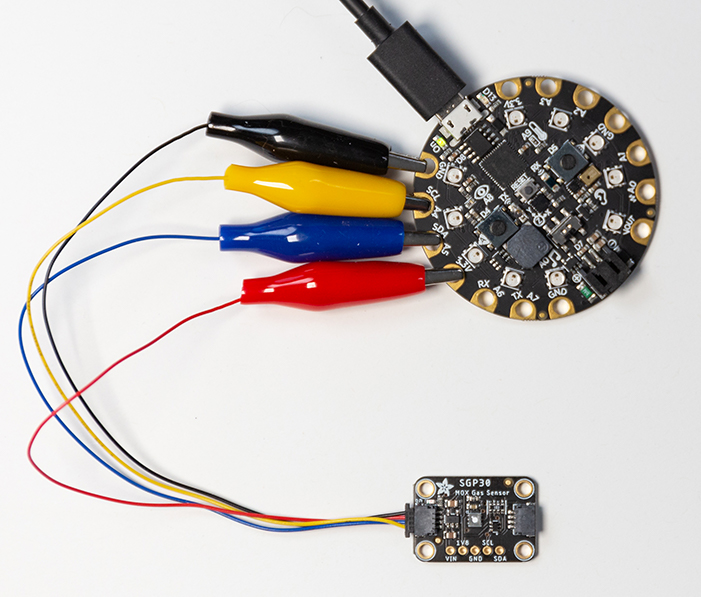
The following image shows the completed physical I2C connection between the CPX and the SGP30.
Install the Adafruit SGP30 Library
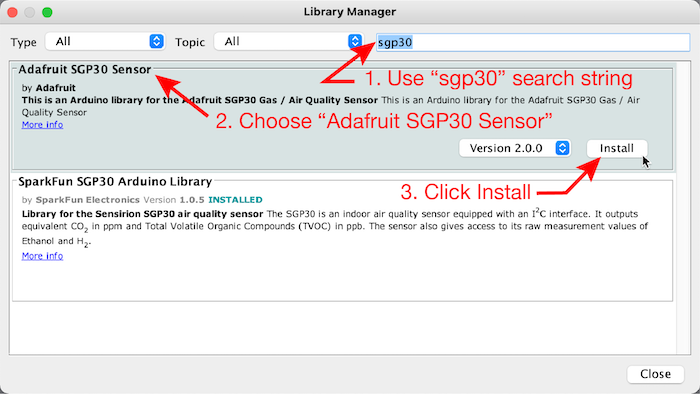
To use the Adafruit SGP30 breakout board, you first need to install the SparkFun SGP30 Arduino Library.
From menu at the top of the Arduino IDE, select Sketch –> Include Library –> Manage Libraries…
- Enter “sgp30” in the search box to narrow the range of choices. Or, if you prefer, scroll through the entire list of libraries (not recommended).
- Choose the “Adafruit SGP30 Sensor” panel, which will cause the Install button to become visible.
- Click Install.
Run the sgp30test.ino sketch from the Adafruit Library
The Arduino SGP30 sensor library includes the sgp30test.ino sketch to demonstrate features of the SGP30. Using the menus at the top of the Arduino IDE, select File –> Examples –> Adafruit SGP30 Sensor –> sgp30test. Upload that sketch to the Feather board.
If you have connected the STEMMA QT cable to the correct pins on the breadboard, the sgp30test.ino should run and display eCO2 and eVOC readings in the Serial Monitor along with raw H2 and raw ethanol readings.
Run the SGP30plot.ino Sketch
The SGP30plot.ino sketch has sends just the numerical readings of TVOC and eCO2 to the Serial Monitor. To create a real time plot of the readings, close the Serial Monitor and open the Serial Plotter from the Tools menu. The SGP30plot.ino sketch can also work with the Serial Monitor.
Download the SGP30plot.ino sketch.
Object-Oriented Interface to the Sensor
The Adafruit library for the SGP30 uses an object-oriented interface to the sensor. We will walk through the SGP30plot.ino sketch to see how that object-oriented interface works. You may want to download the SGP30plot.ino sketch and follow along with the code in the Arduino IDE.
Creating the sgp object
In the header section of SGP30plot.ino the Adafruit library is included and an instance of the Adafruit_SGP30 object called sgp is created.
#include "Adafruit_SGP30.h"      //  Library to support use of sensor
Adafruit_SGP30 sgp;              //  Create an Adafruit_SGP30 object called "sgp"
sgp is an object, which is like a variable with lots of extra features. Adafruit_SGP30 is the class of object. The object class is somewhat analogous to a type, e.g. int and float, but much more flexible. Classes are defined by programmers, not like the types that are defined by the language. The Adafruit_SGP30 object class is defined in the Adafruit_SGP30.h header file, which you can find in the libraries folder (look under Documents and Arduino) on your computer after you install the library. The source code for the library is also on the Adafruit GitHub repository.
The definition of the Adafruit_SGP30 class includes a list of methods and members. A method is analogous a C function that is attached to an object. A member is a variable that is attached to the object. An object can have many methods and many members. You interact with objects by invoking methods (think calling functions) or retrieving member values.
Starting the sgp object
In the setup function for SGP30plot.ino you will find these lines
  if (! sgp.begin()){
    Serial.println("Sensor not found :(");
    while (1);
  }
The sgp.begin() expression invokes the begin() method for the sgp object. The method returns true if the sensor was successful in starting, false otherwise. The test in the while loop will be true when the sensor fails to start because !sgp.begin() is true when sgp.begin() is false. If the sensor fails to start, a message is printed and an infinite loop is created with while (1) because 1 is equivalent to true and the value 1 never changes.
Making a measurement
CO2 and VOC readings are made in the loop function of SGP30plot.ino.
The sgp object has a two-step process for obtaining the readings of CO2 and VOC. The first step is to make the measurement with the following code block.
  if (! sgp.IAQmeasure()) {               //  make a new measurement
    Serial.println("Measurement failed");
    return;                               //  skip reading on failure to make measurement
  }
The sgp.IAQmeasure() expression invokes the IAQmeasure() method for the sgp object. The IAQmeasure() method performs tasks necessary to make the readings and store the values in the sgp object. The readings are not returned by the IAQmeasure() method. Instead, IAQmeasure() returns a true value if the readings were successful and false if the readings could not be completed.
If !sgp.IAQmeaure() is true, the Measurement failed message is sent to the Serial Monitor and the return statment causes the loop function to immediately return control to the calling function. The return statement allows the sketch to keep running because as soon as loop ends it is started again by the main program that runs the sketch. Refer to this page for a brief discussion of how the setup and loop functions are called by a main program supplied by the Arduino IDE.
After the IAQmeasure() method makes the measurements, the values of CO2 and VOC are returned by looking at the values stored in the TVOC and eCO2 members. Those values are copied into local values with the following statements
  TVOC = sgp.TVOC;
  eCO2 = sgp.eCO2;
Burn in the SGP30 Sensor
We have found that the SGP30 sensor produces more reliable readings after an initial “burn in” period. This burn in only needs to performed once.
To burn in your sensor, run a sketch that makes eCO2 and TVOC readings continuously for several hours. Either the sgp30test or SGP30plot sketch will work. Let one of those two sketches run several hours – overnight is a fine.
After the sensor is burned in, you should also wait about 15 seconds after restarting a sketch or supplying power to the CPX before using the readings.