OpenGL in FLTK


We're now going to look at adding OpenGL drawing to our window. Because we will be doing our drawing with FLTK we won't need the targa code from the last tutorial (until we get to texturing that is) so the easiest thing to do is to grab a copy of the solution to the second tutorial and we'll start from there.  This tutorial will assume you start with a fresh copy of the solution to the second tutorial so you'll have to adjust accordingly if this is not the case.
  1. Change Base Window Type
  2. Add a Draw Method
  3. Add View Transformation
  4. Add Geometry
  5. Add OpenGL Libraries
  6. Build and Run the Program
Lets get started.


Step 1:  Change Base Window Type


In the previous tutorials we used the base window type of Fl_Window which did much of the work for us.  Now we wish to create an OpenGL window.  FLTK conveniently provides a base window class for OpenGL windows that will again do most of the work for us.  This base class is call Fl_Gl_Window.

To use this OpenGL window base class we need to change our MyWindow class to derive from Fl_Gl_Window rather than Fl_Window.  Open MyWindow.h and change the two occurrences of Fl_Window to Fl_Gl_Window.

#include <Fl/Fl_Window.h>           ->       #include <Fl\Fl_Gl_Window.h>

class MyWindow : public Fl_Window   ->       class MyWindow : public Fl_Gl_Window

We also need to replace the single Fl_Window in MyWindow.cpp (in the constructor initialization list) with Fl_Gl_Window.

Fl_Window(width, height, title)     ->       Fl_Gl_Window(width, height, title)


MyWindow now derives from Fl_Gl_Window and inherits all the OpenGL functionality we need.  The first of these methods that we need is called mode()mode() allows us to set what kind of OpenGL window we want.  What color depth, what kind of buffering, do we want a depth buffer, etc.  With an added call to mode() and Fl_Window replaced the MyWindow constructor now looks like this:


MyWindow::MyWindow(int width, int height, const char* title) : Fl_Gl_Window(width, height, title)
{
   mode(FL_RGB | FL_ALPHA | FL_DEPTH | FL_DOUBLE);
}


Step 2:  Add a Draw Method


Our window is now an OpenGL window so its time to make use of it.  The first step is to add some code to draw into our window.  We need this code to get called every time the window gets refreshed so we'll use the FLTK method draw() again.  We'll start by adding the declaration for our drawing method and why we're at it we're going to need an initialization function for OpenGL so we'll go ahead and declare it, too.  Add these two lines to MyWindow.h:

      void InitializeGL();
      virtual void draw();


We need to add the definitions of these methods to MyWindow.cpp.

void MyWindow::InitializeGL()
{
   glClearColor(.1f, .1f, .1f, 1);
   glEnable(GL_DEPTH_TEST);
}


void MyWindow::draw()
{
   static bool firstTime = true;
   if (firstTime)
   {
      InitializeGL();
      firstTime = false;
   }// if

   glClear(GL_COLOR_BUFFER_BIT | GL_DEPTH_BUFFER_BIT);      // clear the color and depth buffer

   // view transformations

   // draw something
}


We also need to include another header which contains the declarations of OpenGL functions we'll need.  Add these lines to the top of MyWindow.cpp.

#include <Fl/Gl.h>
#include <Gl/Glu.h>

Lets take a look at what we have here.  Our draw() method will get called every time the window gets redrawn on the monitor.  The first time its called we call InitializeGL().  Some OpenGL state can't be set until we have a valid rendering context which we're not guaranteed to have until draw is called the first time.  Hence we do all our OpenGL setup in response to the first draw() call.  Right now the OpenGL setup consists of setting the background color to a dark grey and turning the depth test on.

On each iteration the draw method clears the color and depth buffers.  We just need to add some transformation code and actually send some geometry to OpenGL and we're all set.


Step 3:  Add View Transformation

We need to setup some transformations to allow us to view our scene.  Add the following code to the draw() method under view transformations.

   // view transformations
   glMatrixMode(GL_PROJECTION);
   glLoadIdentity();
   glFrustum(-1, 1, -1, 1, 1, 100);
   glMatrixMode(GL_MODELVIEW);
   glLoadIdentity();
   gluLookAt(0, 0, 3, 0, 0, 0, 0, 1, 0);


We call glFrustum to setup our viewing frustum and gluLookAt to place our virtual camera.  glFrustum takes the the clip planes (top, bottom, left, right, near, far) and sets an appropriate projection matrix.  gluLookAt is a function from the OpenGL Utility Toolkit that aids in placing our camera.  It takes the camera position (0, 0, 3) in our case, the gaze point for the camera (we use the origin), and the up direction of the camera (we've chosen the position y axis).

We're ready to view our scene but there's nothing to view yet.  Let's fix that.


Step 4:  Add Geometry

Ok we're finally ready to send some geometry to OpenGL.  We're going to make a handy little method that draws a cube which we can then call whenever we are in need of such geometry.  We need to add a method declaration to MyWindow.h

      void DrawCube();

and its definition to MyWindow.cpp.

void MyWindow::DrawCube()
{
   glBegin(GL_QUADS);
      // front
      glColor3f(1, 0, 0);
      glVertex3f(-1, 1, 1);
      glVertex3f(-1, -1, 1);
      glVertex3f(1, -1, 1);
      glVertex3f(1, 1, 1);

      // back
      glColor3f(0, 1, 0);
      glVertex3f(-1, 1, -1);
      glVertex3f(1, 1, -1);
      glVertex3f(1, -1, -1);
      glVertex3f(-1, -1, -1);

      // top
      glColor3f(0, 0, 1);
      glVertex3f(-1, 1, -1);
      glVertex3f(-1, 1, 1);
      glVertex3f(1, 1, 1);
      glVertex3f(1, 1, -1);

      // bottom
      glColor3f(1, 1, 0);
      glVertex3f(-1, -1, -1);
      glVertex3f(1, -1, -1);
      glVertex3f(1, -1, 1);
      glVertex3f(-1, -1, 1);

      // left
      glColor3f(0, 1, 1);
      glVertex3f(-1, 1, -1);
      glVertex3f(-1, -1, -1);
      glVertex3f(-1, -1, 1);
      glVertex3f(-1, 1, 1);

      // right
      glColor3f(1, 0, 1);
      glVertex3f(1, 1, 1);
      glVertex3f(1, -1, 1);
      glVertex3f(1, -1, -1);
      glVertex3f(1, 1, -1);
   glEnd();
}


This code draws a single quad for each of the six faces of the cube in a unique color.  Let's add a call to this function after the draw something comment in draw().

   // draw something
   DrawCube();


  Ok we've got an OpenGL window, a view transformation, and some geometry code.  We're almost there.


Step 5:  Add OpenGL Libraries


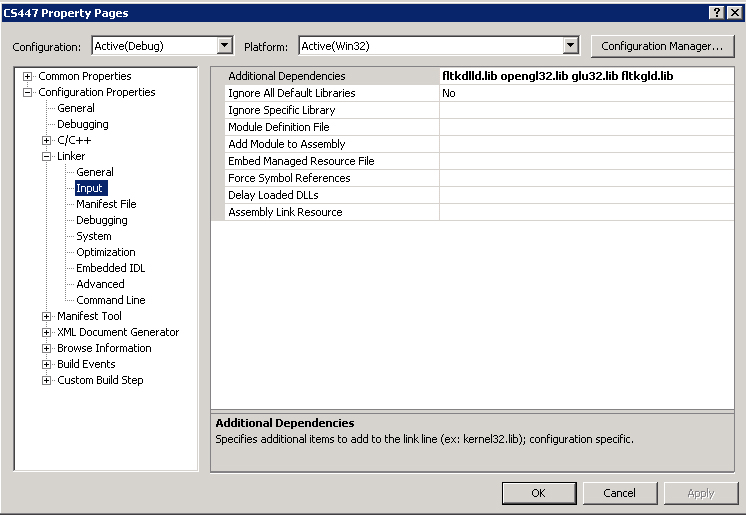
The use of FLTK required us to add some libraries to our project.  We're going to have to do the same to get OpenGL working.  We'll need to add these libraries just like before.  Open the Class View window, right click our project (CS447) and select Properties.  Select Linker -> Input from the left pane and add opengl32.lib, glu32.lib, and fltkgld.lib to the Additional Dependencies.  Again make sure all libraries are separated by whitespace.  Click OK and we should be set.


Step 6:  Build and Run the Program


Choose Build -> Build Solution to compile and link the program and Debug -> Start Without Debugging to run it.

You should see an OpenGL window just like this.  We can only see the front face of the cube from this camera position but we'll get that cube rotating in the next tutorial.


Source code for this tutorial.

Go to the previous tutorial.
Go to the next tutorial.