VM Setup without paying for virtualization software
- Requirements
- Common tools
- FreeBSD VM Installation, Step by Step
- Ubuntu 24.04 VM Installation
- Quality of Life improvement
Requirements
You will need at least 50GB or so of free space on your hard drive for this class. We won’t likely use it all, but it needs to be there.
Common tools
Setting up a VM is relatively straightforward. While you could spend lots of money to get a commercial hypervisor like Parallels Desktop or VMware, that’s…ridiculous. Sure, they can do some fancy stuff, but we are sticking with open source solutions! Plus, they cost lots of money, and that’s just wrong.
So, what can we use? Well, there’s VirtualBox. It’s free, it’s open source, and it’s pretty easy to use. It’s also a Universal app, so it runs on both Intel and Apple Silicon Macs, as well as Intel and ARM Windows builds. More importantly, it provides an easy-to-use networking setup, contrary to tools like qemu or libvirt. You can download it from here.
Instead of installing pfSense or opnsense, just install FreeBSD, which is what pfSense runs on anyway. This is actually better, because we get to run on a more up-to-date platform, and we aren’t missing a bunch of useful tools like the pfSense folks. Plus, we get to learn how to do things the hard way, which is always fun, right?
FreeBSD VM Installation, Step by Step
OK, you have VirtualBox installed, and you’re ready to create your VM. How? Time for a little show and tell! Please only use the line appropriate for your architecture.
-
Download your image:
$ curl -LO https://download.freebsd.org/ftp/releases/ISO-IMAGES/14.3/FreeBSD-14.3-RELEASE-arm64-aarch64-disc1.iso.xz
$ curl -LO https://download.freebsd.org/ftp/releases/ISO-IMAGES/14.3/FreeBSD-14.3-RELEASE-amd64-disc1.iso.xz
You will only need one of these, depending on your architecture. If you have an Apple Silicon Mac, use the ARM64 image. If you have an Intel Mac, use the AMD64 image. Same with Windows, if you are running on Intel, use the AMD64 image. If you are running on ARM, use the ARM64 image.
-
Uncompress your image:
$ xz --decompress --verbose FreeBSD-*-RELEASE-arm64-aarch64-dvd1.iso.xz -
Checksum your image:
$ sha256sum --tag FreeBSD-*-RELEASE-arm64-aarch64-dvd1.iso
SHA256 (FreeBSD-14.3-RELEASE-arm64-aarch64-disc1.iso) = 5dc944961a58d7951f53b8e2d4a4590b60185ba9db83b1e145218550aa2617d1

$ sha256sum --tag FreeBSD-14.3-RELEASE-amd64-dvd1.iso
SHA256 (FreeBSD-14.3-RELEASE-amd64-disc1.iso) = f564822bc72d420d1e1a6faacb72f6056d828fcf539dfafd52e08503ef5fab68
If you don’t have
sha256suminstalled, you can useshasum -a 256instead, though it’s a perl script, so takes a bit longer. -
Create a new VM in VirtualBox:
-
We can create a new VM by clicking the
Newbutton on the top of the VirtualBox window. This one: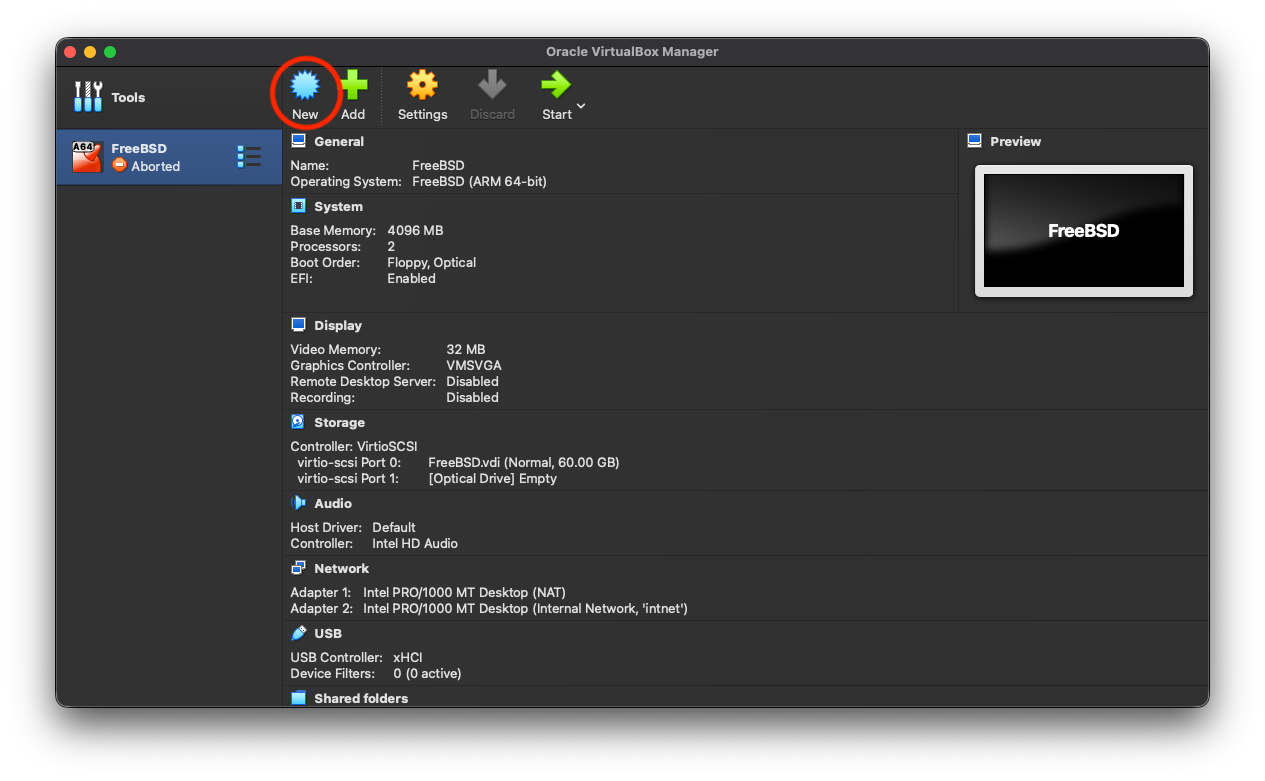
-
In the “Create Virtual Machine” dialog, give your VM a name (I called mine
FreeBSD), and select the type asBSD, the subtype asFreeBSDand the version asFreeBSD (<arch> 64-bit),<arch>being eitherARMoramd64depending on your architecture.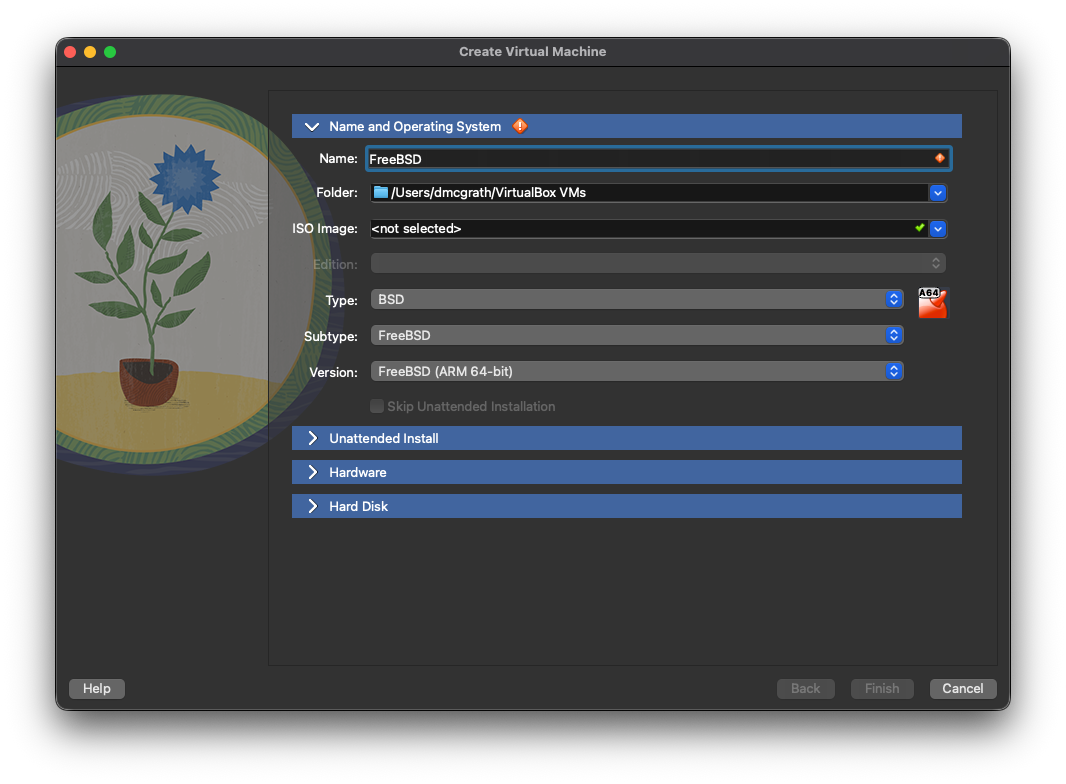
-
Use the
ISO Imagedropdown to select the location where you downloaded the image, and select the ISO that you uncompressed. -
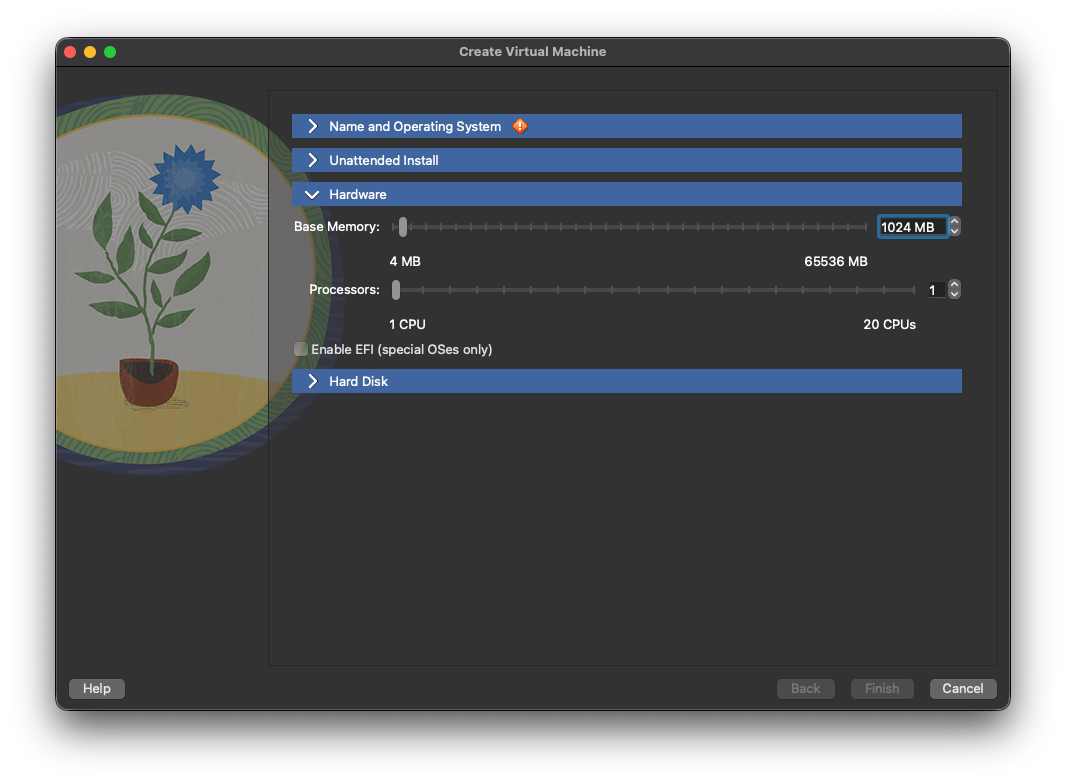
Click Hardware (or Next on Windows), then set the Base Memory and the Processor settings.
-
I would suggest you give your VM at least 4GB of memory, since it’s going to be the primary external interface to your work environment for this class.
-
Make sure the
Enable EFIis checked. This is important, as FreeBSD requires EFI to boot on Apple Silicon Macs. Given that it boots on EFI just fine everywhere else, we might as well enable it everywhere. So check that box!
-
-
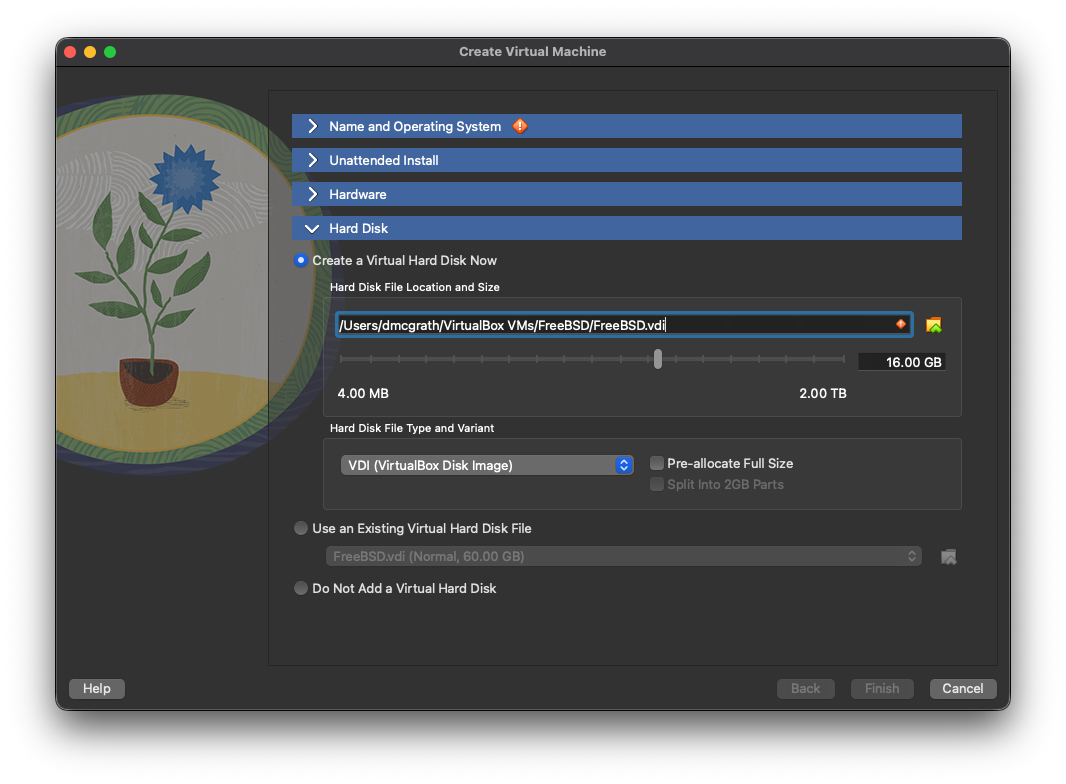
Click on the Hard Disk section, and select “Create a virtual hard disk now”. Click Create.
- For storage, 64GB should be plenty. We can resize later as needed. Click continue.
- Do not preallocate the disk space unless you have copious amounts of free space on the host.
-
Click the Finish button.
-
You are back to the main window of VirtualBox. Click the settings button for the VM you just created. It looks like a gear icon.
-
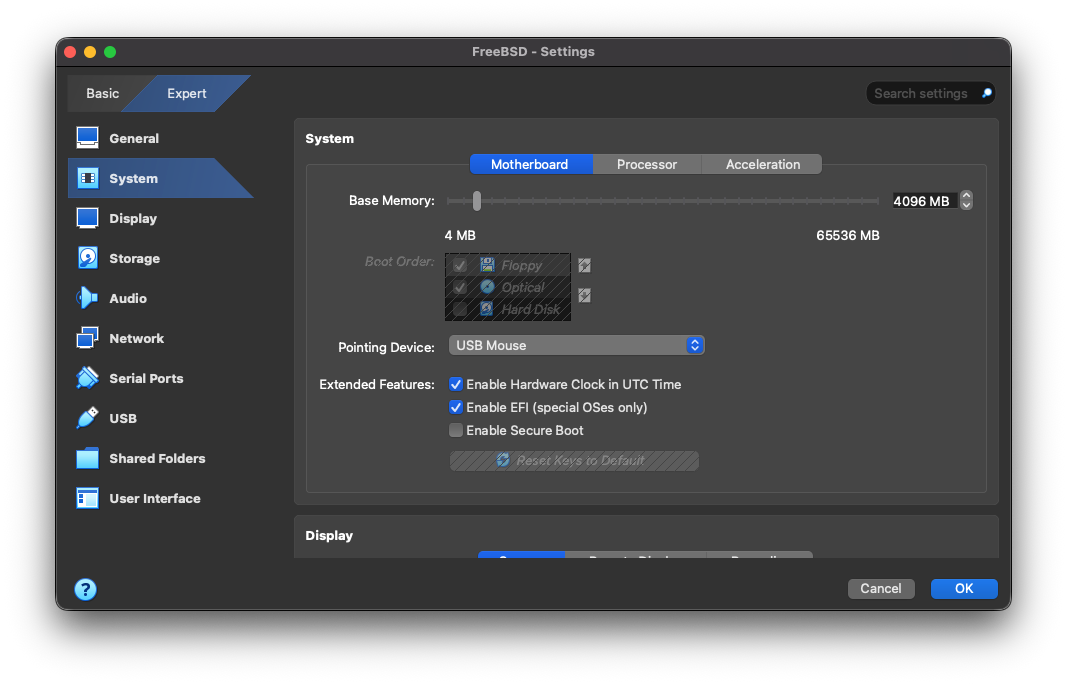
Make sure “Expert” is selected in the upper left.
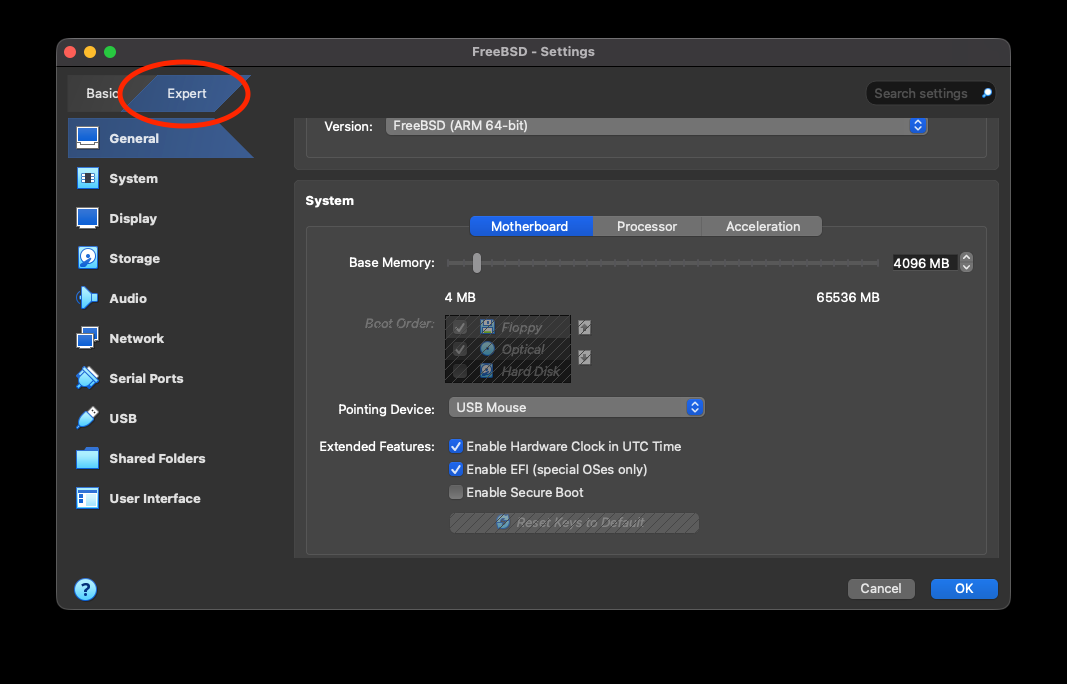
- Select “System” in the left pane, and then select the “Motherboard” tab. Make sure the “Enable EFI (special OSes only)” box is checked. Also ensure “Enable Hardware Clock in UTC Time” is checked.
- Select “Network” in the left pane, and then select the “Adapter 1” tab. Make sure the “Enable Network Adapter” box is checked, and set the “Attached to” dropdown to “NAT”. Click OK.
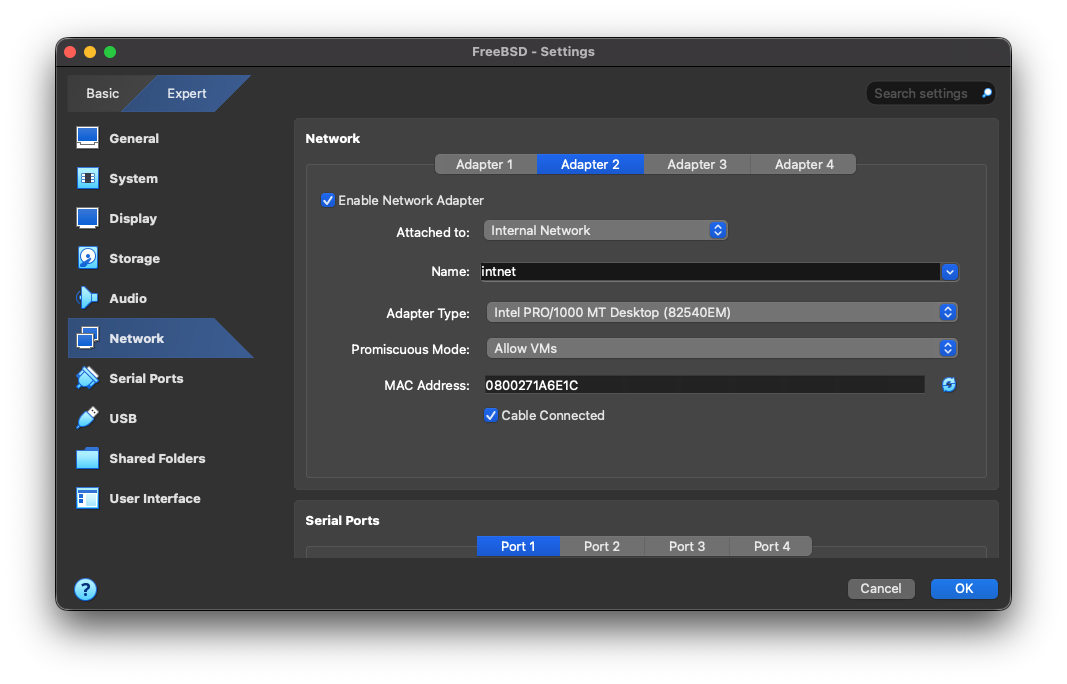
- Select the “Adapter 2” tab, and check the “Enable Network Adapter” box. Set the “Attached to” dropdown to “Internal Network” with a name of
intnet. This will allow the FreeBSD VM to act as a gateway for the Ubuntu VM we will create later. Click OK.
- Once the VM boots, you’ll be presented with a menu. Just hit enter. Most of the defaults are what you want them to be. Some specific things to look out for:
- The default keyboard layout is US. If you want something else, you’ll need to select it.
- Pick a hostname that you can live with.
- You want to use Auto (UFS) Guided for your disk configuration. Accept its suggestions.
- Enter a root password and remember it! Store it securely, preferably in a password manager.
- Setup “em0” to use DHCP. IPv6 isn’t necessary.
- For Timezone selection, you want option 2, then option 49 (hit 5 twice then up arrow), then option 21 (hit 2 twice then down arrow). This assumes you want to use US Pacific Time. If you want something else, you’ll need to figure out the appropriate option.
- Create yourself a local user when the opportunity presents itself. You’ll need to remember this password as well. Ensure that you add yourself to the
wheelgroup, so you can usesudolater. If you forget to add yourself to thewheelgroup, you can always add yourself later by running
-
$ pw group mod wheel -m <username>
where <username> is your username on the FreeBSD system.
Once you have the freeBSD machine up and running, you need to install a couple packages, then run a script to set up the networking and other services. Run
$ sudo pkg install -y sudo curl
This installs the sudo package, which allows you to run commands as the root user, and curl, which is a tool for downloading files from the internet. Configure sudo by running
$ sudo visudo
Uncomment the line that says # %wheel ALL=(ALL) ALL to allow members of the wheel group to use sudo. Save and exit the editor. This is raw vi, so you will need to move to the beginning of the line, then press d, right-arrow to delete the # character, then again to delete the space, then hit Shift-z+Shift-z to save and exit.
Once the above is done, logout of the root account, and into your user account. You will use this script(see script for direct download instructions) to do some of what we get from pfSense.
$ curl -LO https://web.cecs.pdx.edu/~dmcgrath/courses/freebsd_setup.sh
$ #edit the script to set your git username and email
$ chmod +x freebsd_setup.sh
$ ./freebsd_setup.sh
DO NOT RUN THIS SCRIPT MORE THAN ONCE OR AS ROOT!
You didn’t think I was actually going to make you do all of that by hand, did you? That’s just cruel. And part of what you get to do if you take my network security class. So, you know, you can do it then. But not now. Now, you get to use the script. And you’ll be happy about it.
After the script runs, you will have a FreeBSD VM that is set up to act as a gateway for your Ubuntu VM. It will also have a DHCP server, DNS server, and firewall configured. You can use this VM to access the internet from your Ubuntu VM, and to run various tools and services. You are welcome to modify the script to install whatever additional tools you might want on the BSD system. This is a set that works with the environment I suggest you use, and what I will support.
There’s one caveat to the above. If you really don’t want to use NAT on the VM, you could instead set the networking mode of the first networking device to “Bridged (Advanced)” and bridge it to a physical NIC on your Mac. This is useful in situations where you want the VM to be a networking peer to your host system, but since you likely don’t have multiple physical NICs on your laptop, we aren’t really going to cover this much in practice. I will be talking about it in class, though.
Ubuntu 24.04 VM Installation
With the above VM instructions, you should be able to install any additional VMs that you need. In our case, we want to use an Ubuntu 24.04 VM to run our tools and services. So, let’s do that.
For ARM systems, use Ubuntu Server for ARM. For Intel systems, use Ubuntu Server for AMD64. Make sure to verify the checksums!
Once you have the ISO downloaded, create a new VM and install Ubuntu. The only setting within the VM configuration you need to worry about is to change the Network Mode to “Internal Network” on the single NIC you need for this VM. This will allow the Ubuntu VM to use the FreeBSD VM as its gateway to the outside world. You can then use the FreeBSD VM as a bastion host to access the Ubuntu VM.
As for the installer itself, you’re welcome to just accept the defaults, or change to your liking. Beyond timezone settings, I’d mostly leave it alone. You can always change things later.
Once up and running, you will run a similar setup script to the one you ran on the FreeBSD VM. This will install the necessary tools and services for the class. You can find the script here. Download it, make it executable, and run it:
$ curl -LO https://web.cecs.pdx.edu/~dmcgrath/courses/secdevops/setup.sh
$ chmod +x setup.sh
$ #edit the script to set your git username and email
$ ./setup.sh
We will configure this further in class.
Quality of Life improvement
The default terminal interface in VirtualBox is truly terrible. It isn’t the worst, but it’s within spitting distance. So, let’s fix that.
In the main VirtualBox UI, select the FreeBSD VM, and click the “Settings” button. Then, select the “Networking” tab. For Adapter 1, click on the “Port Forwarding” button. This will allow you to forward ports from the host to the VM, which is useful for accessing services running on the VM from the host. Create a new rule with the following settings:
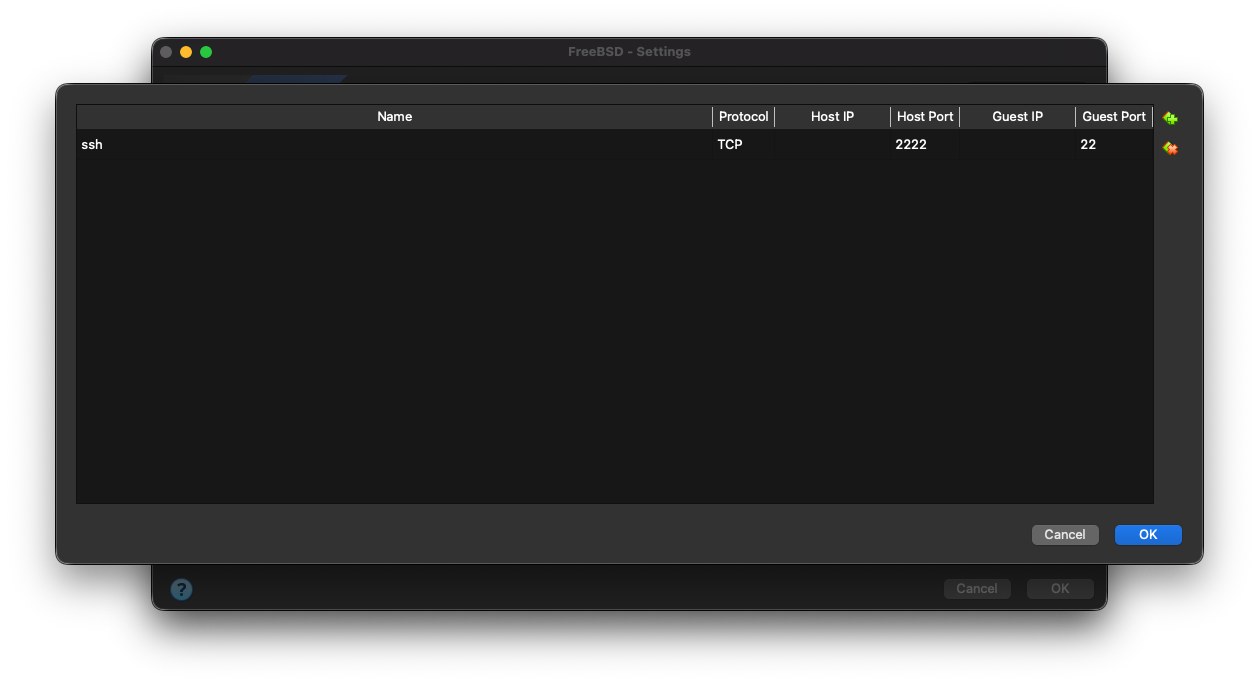
- Name: SSH
- Protocol: TCP
- Host IP:
<leave blank> - Host Port: 2222
- Guest IP:
<leave blank> - Guest Port: 22
Now you can SSH into the FreeBSD VM from your host machine using the following command:
$ ssh -p 2222 <username>@localhost
and move files with scp like this:
$ scp -P 2222 <local_file> <username>@localhost:<remote_path>
Notice the port specification flag is different!