Lab 2
Due Date: 2025-10-29 23:59:59
Introduction
This lab is to provide verification that all of your hardware works and can be used for the remainder of the term. Also, passive reconnaissance techniques will be used to gather information about a target device.
Tasks
- Airlift FeatherWing: Ensure that the sample code provided in the Adafruit documentation works. Document this in your
lab2.mdfile. You will need to install the necessary CircuitPython libraries. You can find these on the CircuitPython Library Bundle page. Make sure to get the version that matches your CircuitPython version. You will also need to edit the sample code to reflect that you are using a featherwing. The code itself provides comments on what to change. Pick one of the three examples provided and get it working. - OLED Featherwing: nsure that the sample code provided in the Adafruit documentation works. Document this in your
lab2.mdfile. - Combine all three examples in such a way that the OLED displays the IP address assigned to the Airlift FeatherWing when it connects to WiFi, as well as the status of the LoRA radio (waiting for packets, how many packets received, etc.). Document this in your
lab2.mdfile. Things to note:- When you combine the code, make sure to properly initialize all of the hardware. This differs slightly from the Adafruit examples linked in previous lab.
-
Here is the code to initialize the RFM95 radio on your Feather board and ESP32 SPI control for the Airlift FeatherWing. Note that we can use the same
spiobject for both the RFM95 and ESP32 since they are on the same SPI bus, but they need separate Chip Select and Reset pins.RFM_CSandRFM_RSTare defined in theboardmodule for the Feather RP2040 with RFM95 board, while the ESP32 is on a featherwing, so we need to define those pins manually.RADIO_FREQ_MHZ = 915.0 # Define Chip Select and Reset pins for the RFM radio module. CS = digitalio.DigitalInOut(board.RFM_CS) RESET = digitalio.DigitalInOut(board.RFM_RST) # Define pins for ESP32 SPI control: esp32_cs = DigitalInOut(board.D13) esp32_ready = DigitalInOut(board.D11) esp32_reset = DigitalInOut(board.D12) spi = busio.SPI(board.SCK, board.MOSI, board.MISO) # Initialise RFM95 radio and ESP32 radio esp = adafruit_esp32spi.ESP_SPIcontrol(spi, esp32_cs, esp32_ready, esp32_reset) rfm95 = adafruit_rfm9x.RFM9x(spi, CS, RESET, RADIO_FREQ_MHZ) -
For updating the OLED display, you’ll need to create a label, as such:
splash = displayio.Group()
display.root_group = splash

color_bitmap = displayio.Bitmap(WIDTH, HEIGHT, 1)
color_palette = displayio.Palette(1)
color_palette[0] = 0xFFFFFF  # White

# Draw some label text
name_text = "Connecting to WiFi..."
name_text_area = label.Label(terminalio.FONT, text=name_text, color=0xFFFFFF, x=8, y=8)
splash.append(name_text_area)
# skipping code

#the screen can hold 4 lines of text at this scale
lines = []
lines.append("IP: " + str(esp.ipv4_address))
lines.append("Waiting for packets...")
lines.append("")
lines.append("")

while True:
    name_text_area.text = "\n".join(lines)
-
Passive reconnaissance: Take a gander at the images collected below. Identify as much information as you can about the target device. Document your findings in your
lab2.mdfile.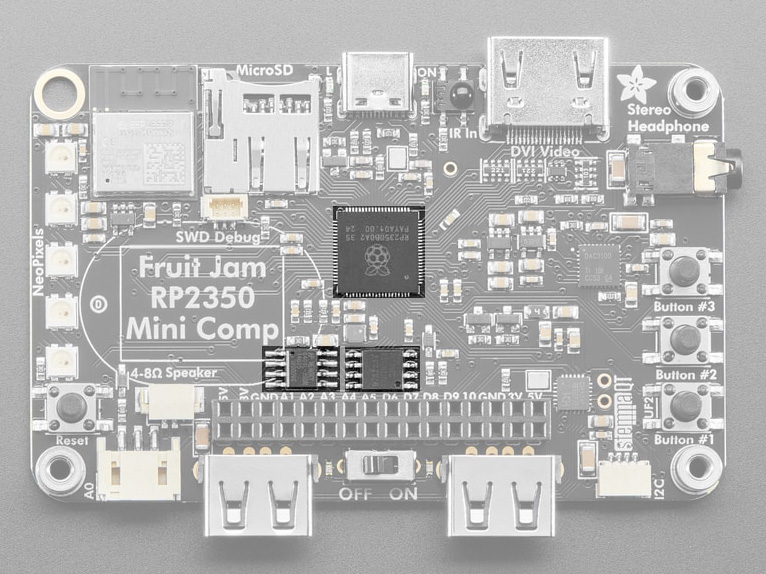
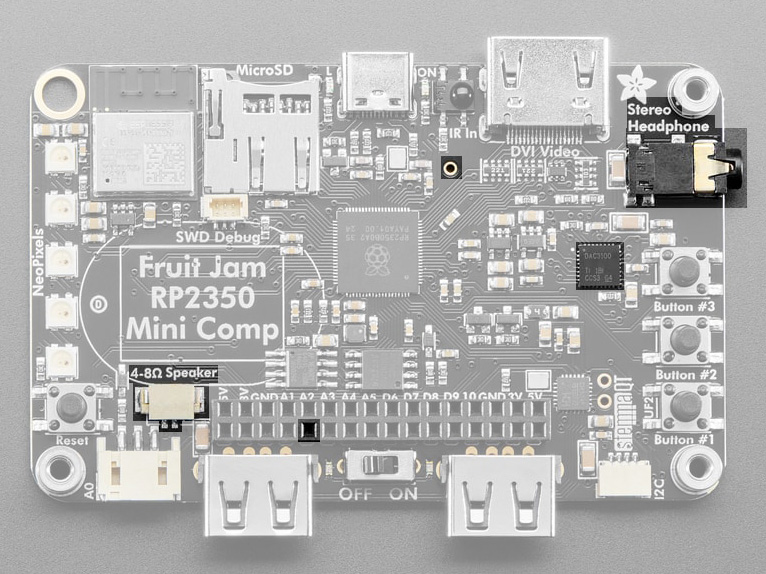
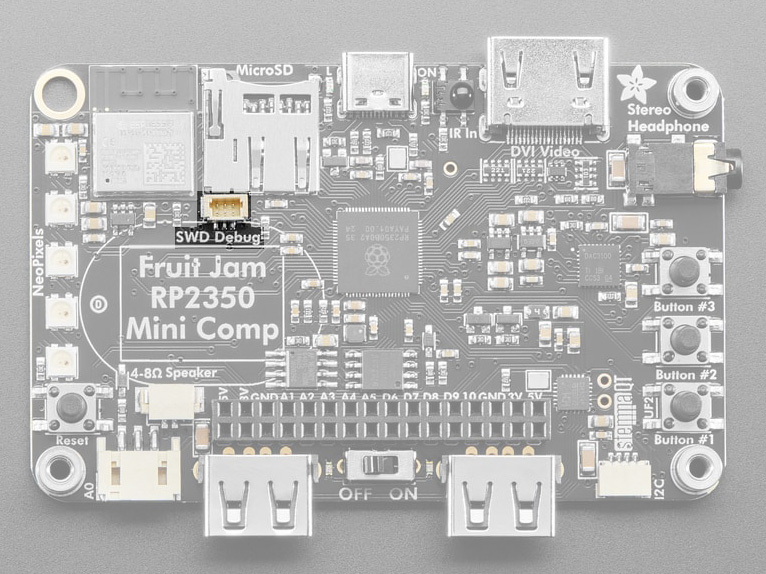
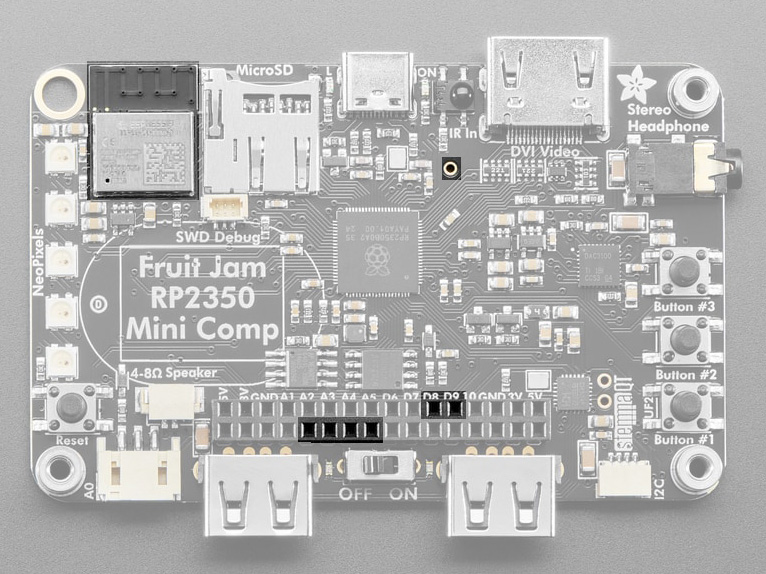

The final two images are of the same part. You may find it useful to look at both. Also, looking at the images in a larger format may help.
Also, it’s obvious what the board is. But I still want you to go through and document all the information you can glean from the images. This includes identifying components, part numbers, manufacturers, etc. The more detail the better. Also links to datasheets, FCC pages, or component product pages would be useful. It might seem silly, since we know what the board is, but this is a useful skill to practice.
Submission
Once you have completed the above, you should have a markdown file in your repo called lab2/lab2.md that contains all the requested information. Commit and push this to your repo. Also commit and include the requested screenshots. Once you have done this, you can consider the assignment submitted.