VM Setup on macOS without paying for virtualization software
Requirements
You will need at least 100GB or so of free space on your hard drive for this class. We won’t likely use it all, but it needs to be there.
Common tools
Setting up a VM on macOS is relatively straightforward. While you could spend lots of money to get a commercial hypervisor like Parallels Desktop or VMware Fusion, that’s…ridiculous. Sure, they can do some fancy stuff, but we are sticking with open source or free solutions! Plus, they cost lots of money, and that’s just wrong.
So, what can we use? Well, there’s the option of VirtualBox. You are welcome to use Oracle tools if you’re ok with that. I’m not. Instead, I’ll use the Universal Turing Machine (UTM) software. It’s free, it’s open source, and it’s pretty easy to use. It’s also a Universal app, so it runs on both Intel and Apple Silicon Macs. More importantly, it provides an easy-to-use wrapper around the QEMU hypervisor, which is what I’ll be using to run our VMs.
Alternatively, if you’re a brew user, you can use
$ brew install --cask utm
to get UTM installed. If you’re really feeling like you want to do things “The Linux Way”, you can install libvirt and virt-manager via brew, and use that to manage your VMs. I’m not going to cover that here, but it’s an option.
Or, you can go full masochist and use qemu directly. I’m not going to cover that here, either. And if you think it makes sense, why are you here? Go away. Or better yet, talk to me about becoming a TA.
Kali VM Installation, Step by Step
OK, you have UTM installed, and you’re ready to create your VM. How? Time for a little show and tell! Please only use the line appropriate for your architecture.
-
Download your image.
current/always points at the newest release, so this stays correct as Kali rolls forward — pick the line for your architecture. Apple Silicon isarm64; Intel Macs areamd64:$ curl -LO https://cdimage.kali.org/current/kali-linux-2026.2-installer-arm64.iso # Apple Silicon $ curl -LO https://cdimage.kali.org/current/kali-linux-2026.2-installer-amd64.iso # IntelIf that 404s, the release has moved on. Check https://cdimage.kali.org/current/ for the current filename rather than guessing at the version number.
-
Checksum your image. Fetch the signed sums from the mirror rather than trusting a hash pasted into a course page — a hash in a document you downloaded over the same channel as the image proves very little, and this one goes stale every release:
$ curl -LO https://cdimage.kali.org/current/SHA256SUMS $ sha256sum -c SHA256SUMS --ignore-missing kali-linux-2026.2-installer-arm64.iso: OK--ignore-missingchecks only the files you actually downloaded instead of complaining about the twenty other images listed. If you don’t havesha256suminstalled,shasum -a 256 -c SHA256SUMS --ignore-missingdoes the same thing, though it’s a perl script, so it takes a bit longer.For the paranoid — and this is the right instinct — Kali also publishes
SHA256SUMS.gpg. Verifying that signature against the Kali signing key is what actually establishes the image came from Kali, rather than from whoever answered your DNS query. -
Create a new VM in UTM:
-
We can create a new VM by clicking the
+button on the top of the UTM window. This one: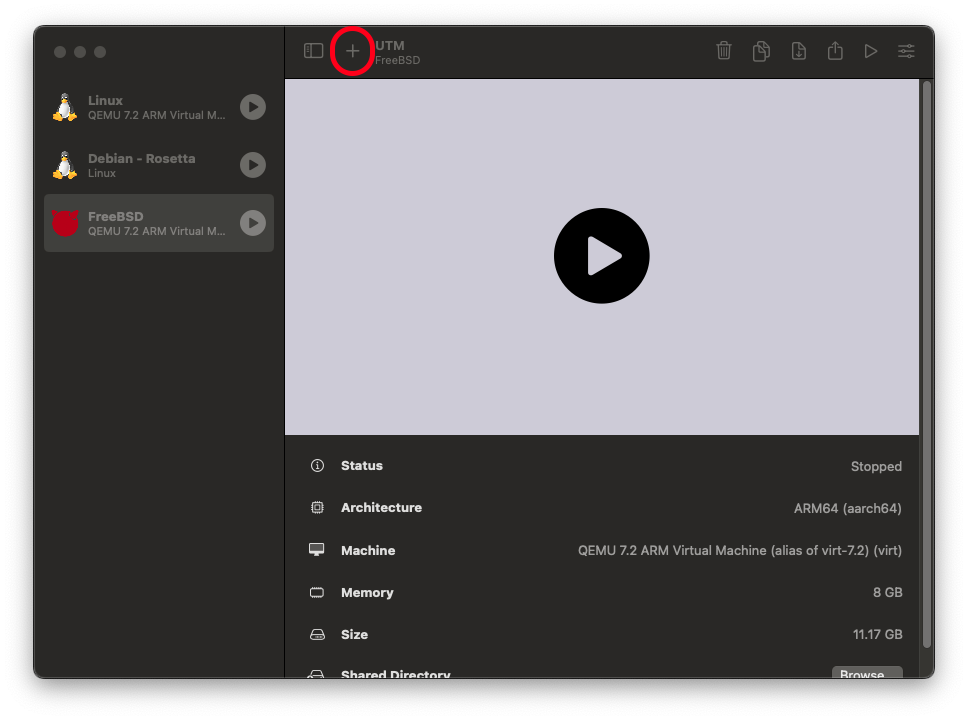
-
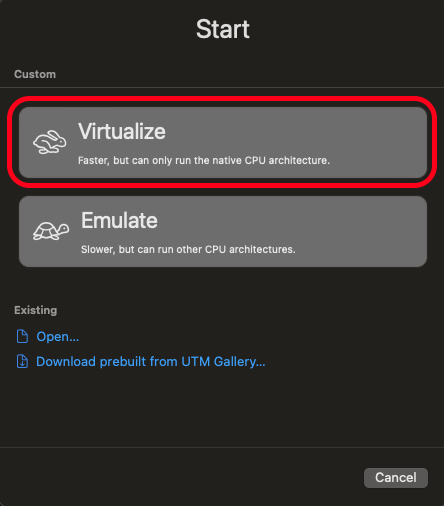
We want to virtualize, regardless of which underlying architecture we are using.
-
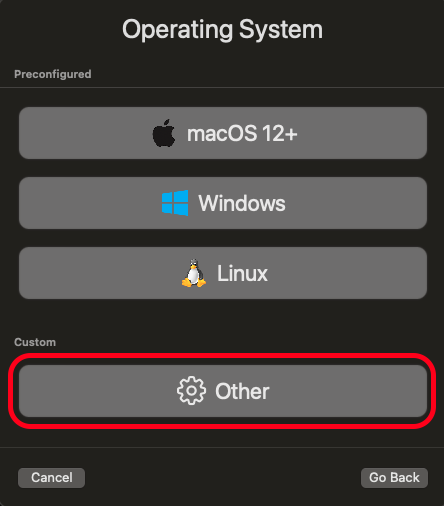
We aren’t installing macOS, Windows, or Linux, so select other:
-
Browse to wherever you downloaded the image, and select the ISO that you uncompressed.
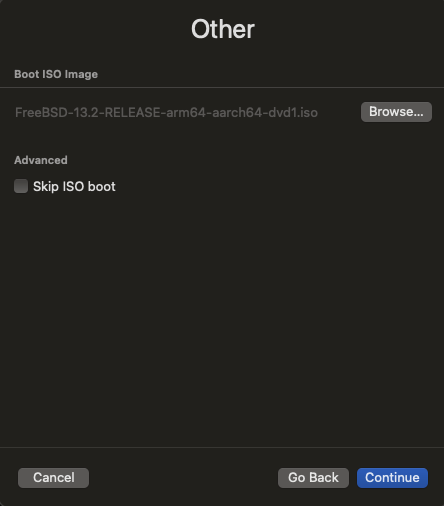
Click continue.
-
I would suggest you give your VM at least 2GB of memory, since it’s going to be the primary external interface to your work environment for this class. As for the cores, leaving it at
defaultis fine, unless you want to limit it to a specific number of cores (at least 2!). Click continue. -
For storage, 64GB should be plenty. We can resize later as needed. Click continue. It dynamically expands, so it won’t take up 64GB on your hard drive initially.
-
We won’t be using a shared directory, so just click continue.
-
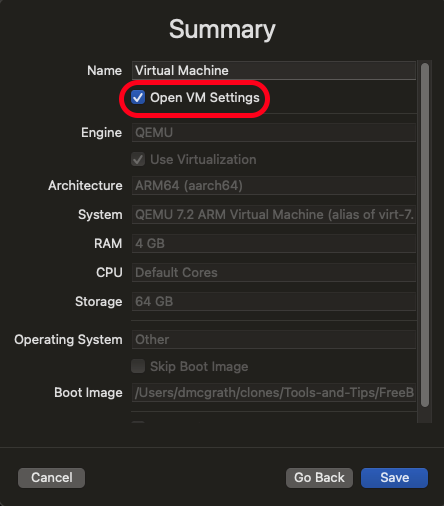
On the summary page, ensure that “Open VM Settings” is checked. Give your VM a descriptive name – I called my VM kali. Click “Create VM”.
-
You may run into an issue where the installer doesn’t look like it’s going to load. For some reason, the easiest way to fix this is to add a serial device to the VM. Click on the “Add Device” button, and select “Serial Port”. Change any settings you like (like the font), and then click “Add Device”. Then, click “Start VM”.
-
The installer is pretty self explanatory. Just follow the prompts. When you get to the disk partitioning, I would suggest you use the “Guided - use entire disk” option. This will wipe out any existing partitions on the disk, and create a new partition table. This is fine, since we’re using a virtual disk, and we don’t care about any data that might be on it. If you want to do something else, you can, but you’re on your own. I’m not going to cover it here.
-
When the installer is done, it often doesn’t ignore the disk image. So stop the VM, go into the settings, and remove the ISO from the CD-ROM drive. Then, restart the VM.
-
References
- Kali Linux — official images and download index — https://cdimage.kali.org/current/
- Kali Linux — verifying downloaded images — https://www.kali.org/docs/introduction/download-official-kali-linux-images/
- UTM — releases and documentation — https://github.com/utmapp/UTM/releases
- UTM — user guide — https://docs.getutm.app/
- VirtualBox — downloads — https://www.virtualbox.org/wiki/Downloads
Related course pages: VM Setup on Windows (Hyper-V) · Linux Setup · Software · Homework 1
🛠️ Maintenance note: the Kali release named in the download and checksum examples (currently 2026.2) changes roughly quarterly, and the UTM screenshots track UTM’s UI. The
current/URLs and theSHA256SUMSworkflow are written so they keep working across releases — if you update this page, update the example filenames but leave thecurrent/indirection in place. Re-shoot the UTM screenshots when its new-VM wizard changes.