Setting Up a Console Application in Visual Studio


This tutorial will introduce you to Visual Studio (VS) and walk you through the creation of the classic Hello World program.  There are five simple steps to this tutorial.
  1. Create a Console Project
  2. Add New Source File
  3. Add Code
  4. Build Project
  5. Run the Program
Lets get started.


Step 1:  Create a Console Project


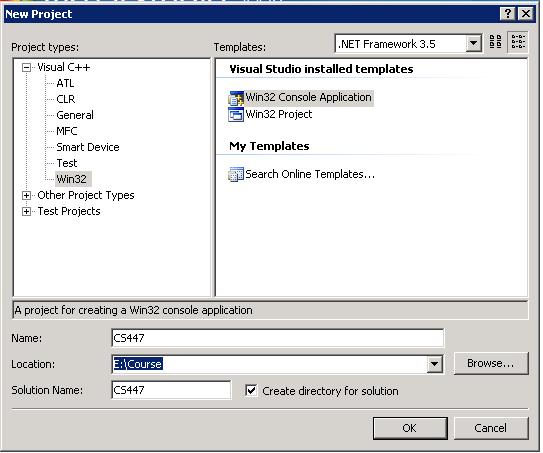
Choose File -> New -> Project from the Visual Studio menus.  You should get this dialog box.
We wish to create a Win32 Console Application Project .

Set the location to someplace on your computer and give the project a name, in this case CS447.

Click OK.


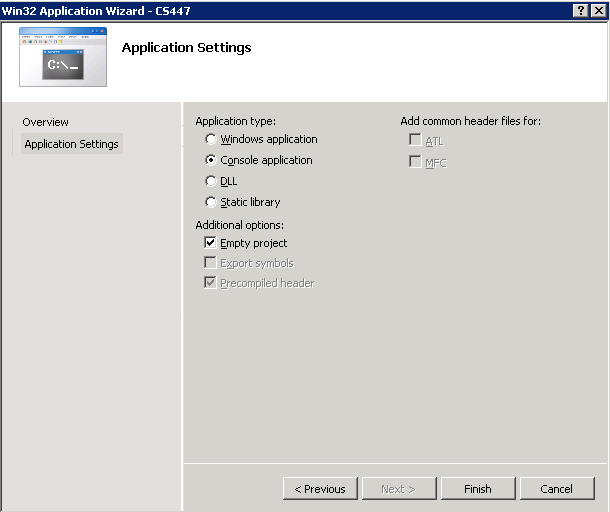
Go to the Application Settings tab.

Make sure Console application and Empty project and selected.

Click Finished.


For VS 2017 users:

1) Choose File -> New -> Project -> Installed -> Visual C++ and select Empty Project.
2) Choose Project -> Property and open a Configuration Properties panel.
 
   Go to Linker -> System and change the Subsystem option to Console.


Step 2:  Add New Source File


Lets add a window to VS to make navigating our project easier.  From the View menu choose Solution Explorer.  All windows in VS08 can be docked or hidden as you'd like so feel free to drag this new windows to a location that is accessible but does not block your view of the main source window.

The Solution Explorer shows you a tree representing your current solution.  Solutions are made of one or more projects, which in turn are composed of one or more files.  We currently have one project in our solution, namely CS447.

Right click on our project CS447 at solution explorer and choose Add->New Item.

We want a C++ source file so choose the Code category and C++ File (.cpp) from the available templates.

Enter a name for our source file,  main.cpp in our case.  The location should already be under the project you've created.

Click Add.

You should now see a blank source file in the editor titled main.cpp.


Step 3:  Add Code


We are now ready to add some actual code to our program.  Enter (or cut and paste) the following code into main.cpp which should already be open in the main source window.

#include <iostream>

using namespace std;

int main(int argc, char** args)
{
   cerr << "Hello World" << endl;
   return 0;
}


I'm not going to explain this code as you are expected to have a working understanding of C++ for this (and all future) tutorials.

Our project is very simple.  We have but a single function currently so it is easy to find the code we want.  However, the projects for CS 447 can become rather large and finding that one function you want to modify may not be so easy.  Let's take a look at another VS08 window that can help us.  Choose View -> Class View to get the Class View window.  This window is similar to the Solution Explorer so you'll probably want to place them together.  This window shows our project as a tree. However, the Class View window breaks the project up by class and function rather than by file.  Right now we have only a single function main but later your projects will grow to multiply classes each containing many functions.  The Class View window will prove invaluable when navigating such projects later in the course.


Step 4:  Build Project

We are now ready to compile and link our program.  Visual Studio calls this process building.  Before building our project we need to open another window so we can see the results of our build attempt.  Choose View -> Output from the VS08 menus.  The Ouput window shows the output from the compile and linking process.  Feel free to dock or hide this window as we will need it rather infrequently.

Choose Build -> Build Solution from the VS08 menus.  This should cause some text to be placed in the output window.  If you've copied the code above correctly, you should see the following output to the right.  If the build failed you should see some text explaining why it failed.  If the error is a compiling error, you should be able to double click on the error and the source window should update to show you the line on which the error occured.  For now we should have no errors so we've successfully built our project and we're ready to run it.


Step 5:  Run the Program


To run our program from within the VS08 enviroment we simply choose Debug -> Start Without Debugging.  You should see this console window appear.  Congratulations!  You've got your first successful VS project.


Source code for this tutorial.

Back to More Tutorials