
This page last updated: December 2018.
Fall 2018
In these exercises, we'll be modifying a version of the example-idt demo, which one of the class demos included is the code in prot.tar.gz. Once you have a copy of that file in your llp directory (i.e., the one that you share with the virtual machine, which will be ~/Documents/llp if you've followed the defaults suggested in previous labs), then you should be able to unpack and inspect it using the following commands:
  tar xvzf prot.tar.gz
  diff -r -C 2 example-idt switching
The diff command here gives us a concrete way to compare the code in the example-idt and switching folders. The -r command line flag indicates that we want to compare directories (it is a mnemonic for "recursive", specifying that diff should "recurse" in to subdirectories), while the -C 2 flag requests two lines of surrounding "context" for each change that is displayed, which can make the output a little easier to understand, even if it is also a bit longer as a result. At this point, the only differences are a change in the menu entry for the GRUB configuration file and a couple of additional files (which will be introduced later), as shown in the following output:
  diff -r -C 2 example-idt/grub.cfg switching/grub.cfg
  *** example-idt/grub.cfg        2017-10-07 10:07:13.000000000 -0700
  --- switching/grub.cfg  2017-10-07 10:07:13.000000000 -0700
  ***************
  *** 2,6 ****
    #set default=0

  ! menuentry "protected mode kernel using a simple GDT and IDT" {
      multiboot /mimgload
      module    /image.gz
  --- 2,6 ----
    #set default=0

  ! menuentry "context switching demo" {
      multiboot /mimgload
      module    /image.gz
  Only in switching/kernel: hardware.h
  Only in switching/kernel: initpic.s
Keep that diff command in mind as you proceed with the exercises described below: it might be useful if things are not working as you expect at some point and you want to get a detailed summary of exactly which parts of the code you have modified. And, of course, diff output might also be very useful when you're writing up the work you've done for this lab and want a reminder of all the changes you've made ...
To complete your preparations for the following exercises, use the following commands to ensure that all of the necessary libraries and tools are built before you run the initial version of the code in the switching folder:
  make
  cd switching
  make run
Of course, at this point in the process, other than the change in the GRUB menu, you should see exactly the same behavior as if you were running the original example-idt example, as demonstrated in class. If you're getting a different result, or if you're unable to compile and/or run the program at all, make sure you ask for help before proceeding further.
Again, keep the above commands in mind as you proceed; you'll likely be using make run quite heavily as you work through the steps below, but remember that you need to be in the switching directory for it to work correctly. And don't forget that you can always use make clean if you ever need to clear out old versions of compiled code before a recompile, or before making a tarball or zipfile containing your code.
One last note: Pay particular attention to questions that end with three question mark symbols: it will be particularly important that you are able to answer those questions as a way of checking your understanding, and it would be good to write down your answers as you proceed through each of the steps. Where is the first such question in this document???
Ok, let's get to work!
Step 1: "hlt is a privileged instruction"
In this first step, we'll demonstrate that hlt is a privileged instruction, which means that it cannot be executed in user mode. (Or, at least, you can try to execute hlt in protected mode, but it won't actually halt the system!)
Start by adding a new function called yield to the user mode program (i.e., the code in the switching/user folder). Implement this function in assembly code (in userlib.s), using a simple body that attempts to halt the machine by using a hlt instruction. You can use the implementation of kputc as a guide for this. In particular, don't forget to declare yield as a global symbol so that it will be accessible from your C code. For safety, you might also add a jmp instruction so that your program will jump back to retry the hlt if, for some reason, the program ever gets to execute any following code. You should also add a prototype for this function (extern void yield(void);) at the top of user.c, and insert a call to this function as the last statement in the body of the for loop in cmain().
Try the command make run; can you explain the results???
This might be a good time to introduce the QEMU monitor. While you are running a program in QEMU, you can hit Ctrl-Alt-2 to switch to QEMU's monitor window, or Ctrl-Alt-1 to switch back to the main QEMU display. (On a Mac host, you can use the "Option" key instead of "Alt".) The monitor is useful because it allows you to type in simple commands to control and inspect the state of the virtual machine. For example:
- "info cpus" lists current CPU status
- "info registers" displays the values of all CPU registers (Use Ctrl up arrow and Ctrl down arrow to scroll)
- "print $eax" displays the value of the eax register. More generally, you can use "print expr". (Note that "print" can be abbreviated as "p".)
- "xp /fmt addr" displays the contents of (physical) memory at the specified address (which can be a specific number or a register name, such as $eip). The fmt parameter determines how the data is displayed. For example, /5i will display the next five instructions.
- "quit" aborts the current program and terminates QEMU
Step 2: "Privileged instructions can be executed in Ring 0"
We'll start by arranging for the user mode program to ask the kernel to halt the system, instead of trying to execute the halt instruction itself. For this, you should modify your implementation of yield to use int $129 instead of hlt. (If you prefer to work in hexadecimal, remember that $129 is just another way of writing $0x81.) Don't forget to add a ret instruction after the int $129 so that your program will return to the code where yield() was called after the interrupt has been handled.
Now we'll need to make sure that the kernel can respond to this interrupt. In the kernel directory, specifically in init.s, create an interrupt handler stub for yield that will execute the hlt instruction. In addition, you'll need to make sure that the IDT will contain an appropriate entry. To a large degree, you can model your implementation on what was done for "kputc" ...
Now what happens??? How did you confirm that you got the right result??? (Make sure, in particular that there is no message indicating that an exception has occurred, and check what QEMU has to say about info cpus.)
Step 3: "A (slightly) more interesting system call"
Now let's provide a (slightly) more interesting implementation of yield by making the interrupt handler jump to a label "yield_imp". Again, you can use "kputc" as a model. We'll write the yield_imp function in C as part of the code for kernel.c:
  void yield_imp() {
      printf("Yielding ...");
      switchToUser(&user);
  }
The first line in this implementation allows us to see that the kernel is running (the output appears on the left hand side of the screen). The second line sends us back in to the user mode program. (The kernel never actually returns from yield_imp()!)
What happens if you omit the line switchToUser(&user); in the code above??? How accurately can you predict the result before you run the program???
Verify that this works in the way you would expect ... (and if you're not sure what to expect, then ask for some help and try to talk it through ...)
Step 4: "Multiple user processes"
In the user directory, create a new version of the user program called user2. You'll need to make copies of the user.c source file and the user.ld script. I would suggest modifying the two .c files so that you can tell which one is running by looking at the output messages that they produce. As for the loader script, we'll want to load both user programs in memory at the same time, so they can't both start at the same address. I suggest configuring user2 to load at address 0x500000, corresponding to 5MB. Edit the Makefile so that you can build both the user and user2 executables by using the make command. (It's ok to copy, paste, and then edit the relevant parts of the rules for building user and user.o.) While we're editing Makefiles, be sure to add user/user2 to the mimgmake command in the main Makefile (i.e., the Makefile in your switching folder). (Also, in case you're not already aware of this detail, it might be worth pointing out that all of the command lines in a Makefile must begin with at least one tab character.)
As a review, mimgload inserts three entries into the headers array for each item on the mimgmake command line in the Makefile. For example, the first item in the command line is the bootdata, and its start, end, and entry addresses will therefore be listed in entries 1, 2, and 3, respectively, of the headers array. Following the same pattern, the start, end, and entry addresses for the original user program will be in entries 7, 8, and 9, while those for user2 will be in entries 10, 11, and 12. [If you need more guidance in understanding these numbers, check out the code at the start of the kernel() function that prints out the header values, and cross reference that with the output that you see on screen.]
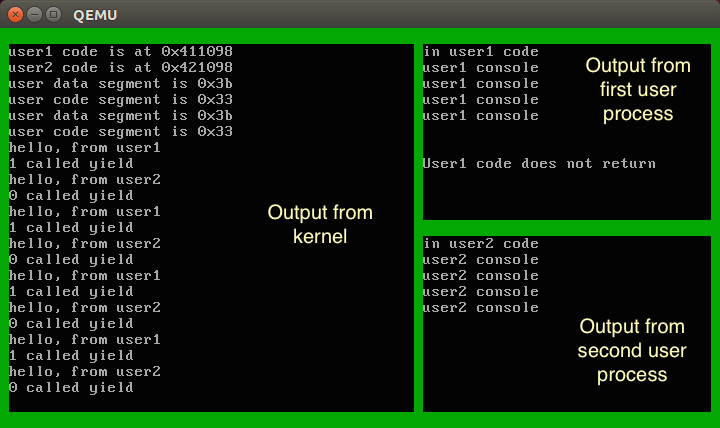
We'll also take this opportunity to clean up the display a little. I suggest modifying the start-up code for the two user programs so that they set the text windows shown below:
For user:
setWindow( 1, 11, 47, 32); // user1 process on upper right hand side
For user2:
setWindow(13, 11, 47, 32); // user2 process on lower right hand side
In addition, you can modify the code that configures the display at the start of the main kernel() function in kernel.c:
  setAttr(0x2e);               // Create a PSU Green border
  cls();
  setWindow(1, 23, 1, 45);     // kernel on left hand side
  setAttr(7);
  cls();
  printf("Protected kernel has booted!\n");
The following picture shows the corresponding regions on the screen for each of these three programs. (But note that the output that you get right now won't actually look like this in all details until we get to the end of Step 6 and have managed to get both user programs running.)
How can you verify that your program runs correctly? [Hints: Look at the memory map and header information that is displayed to confirm that both user programs have been loaded at the expected addresses, and that the entry points that are displayed make sense.]
You can (and should) experiment with modifying the kernel so that it will run the second user program instead of the first. Make sure that you are using the header information from the BootData information rather than hardwiring a specific address in to your code: those addresses might change if we do more work on the user programs later on ...
At this point in time, however, the kernel code will only be able to run one of the two user programs. Wouldn't it be nice if we could run both? At the same time?
Step 5: "Multiple contexts"
Add some new global variables to kernel.c so that we can store two Context structures, one for each of the two user programs:
   struct Context user[2];
   struct Context* current;
Replace the code that initialized the original user context with code that will initialize the two separate structures in the new user array, one for each of our two user mode programs. Note that you can use the expressions (user+0) and (user+1) to get the addresses of the two context structures. Of course, you can simplify the first of those to just user, if you prefer.
Update the rest of the program so that any remaining references to user are replaced with appropriate uses of "current" instead. Note that "current" is a pointer, so you won't have to take its address using &, but you will need to use the -> operator instead of the . operator to access its fields. What results do you expect to get when you initialize current, either to (user+0), or to (user+1), and do you see those results in practice???
Using these two Context structures, we will be able to switch back and forth between executing the two user programs. To make this work, we'll run one program for a bit, then save its registers in the associated Context structure, load the registers for the other program from its Context, and start executing the second program. We can repeat this process indefinitely until both programs are done. It should now be clear why we refer to this technique as "context switching". But this leaves a question that we haven't tackled directly so far: Why did we go to the trouble of making two distinct user programs??? For example, why can't we just use one program but run multiple copies of it at the same time by having a separate Context structure for each one???
You might be tempted to add context switching at this point, but make sure you've completed the steps above and that everything is working correctly before you move on ...
Step 6: "Context Switching"
Update your yield_imp() implementation so that it changes the value of current each time it is called to alternate between the two user contexts. Something like the following should do the trick:
current = (current==user) ? (user+1) : user;
Test to see if you get the desired behavior. [Hint: it will probably be pretty close, but not exactly perfect ... you may need to look very carefully to see what is missing.] Did this version of the program work correctly??? If so, how did you verify that??? If not, what was wrong???
Step 7: "May I interrupt you (on a regular basis)?"
Now we're going to use the hardware to force context switching at regular intervals, even if the user programs don't yield(). To get started, you can prevent yield from having any effect at all by commenting out the line we just put in to change contexts. Now that's gone, we'll know that any context switching that occurs will be the result of whatever new code we add. If you really want to be sure, you can delete the calls to yield() altogether in both user programs. (If you keep the calls to yield() in your user programs and don't comment out the context switching line in the yield_imp() function, then you might notice some significant, negative impacts on performance and functionality; by all means feel free to come back later on to experiment with this and see if you can figure out why this is happening ...)
Unfortunately, however, we are going to need a fair bit of new code to complete this step:
The code in the switching/kernel subdirectory includes an assembly code source file, initpic.s, that was not part of the original example-idt demo program. You're not expected to understand the details of how it works at this point, but the code in this file implements a function that could be declared in C as:
extern void initPIC();that initializes a standard hardware component on the PC called the PIC, or Programmable Interrupt Controller. To make this code available, you'll need to modify the Makefile so that initpic.s is compiled (strictly speaking, assembled) and linked in with the kernel executable. [Hint: You can follow the pattern that is used for init.s.] You should also add the above function prototype somewhere near the top of kernel.c.The switching/kernel subdirectory also includes an extra header file called "hardware.h". This file provides implementations of some functions for interacting with the PIC, as well as some code for configuring a second hardware device, the PIT, or Programmable Interval Timer that is also part of standard PC systems. Again, you're welcome to peruse the code, but not expected to understand all of the details. But one thing you will need to do is to #include "hardware.h" at the top of your kernel.c source file.
Add a new interrupt handler in init.s with the following code:
     timerHandler:
        sub     $4, %esp
        push    %gs
        push    %fs
        push    %es
        push    %ds
        pusha
        leal    stack, %esp
        jmp     timerInterrupt
You will also need to add an entry for this handler in the IDT; be sure to use slot 32 for this because that is the slot that the timer hardware is configured to use. Note, however, that you won't need to specify a dpl parameter this time; the default value of 0 will work just fine.
Next, add an implementation of the timerInterrupt function (which appeared as the target of the jmp instruction in the previous chunk of assembly code) in your kernel.c file. Something along the following lines should do the trick:
    static void tick() {
        static unsigned ticks = 0;
        ticks++;
        if ((ticks&15)==0) {
            current = (current==user) ? (user+1) : user;
        }
    }

    void timerInterrupt() {
      maskAckIRQ(TIMERIRQ);
      enableIRQ(TIMERIRQ);
      tick();
      switchToUser(current);
    }
I've separated this code in to two sections so that you can focus on the code in the tick() function and not worry too much about the details of interrupt handling in the main timerInterrupt() function. We'll learn more about how the latter function works in the coming weeks.
The final step is to enable interrupts. (You might want to check that all of the code above is compiling and running as expected before you do this.) There are two parts to this. First, we need to make sure that user processes can be interrupted. We do this by making sure that the IF bit is set in the eflags register for each user program. This can be done at the time we initialize the associated contexts: look at the definition of INIT_USER_FLAGS in context.h, and add in the 1 << IF_SHIFT component (or just use the #define for INIT_USER_FLAGS that has been commented out)!
Last, but not least, add the following two lines, in the kernel() function, right before the point where you start running a user mode program for the first time:
      initPIC();
      startTimer();
With all these changes in place, your kernel will configure the PIC and PIT to interrupt the system 100 times a second, executing the tick() function each time that happens. And once every 16 calls, it will automatically context switch between the two user programs, ensuring that both run to completion! (We don't need to context switch as frequently as 100 times a second—that might create unnecessary overhead. And so we choose to switch at 1/16 of that frequency instead.)
How can you tell that the program is working correctly??? For demonstration purposes, you might like to increase the number of loop iterations in the two user programs (and have the loop bodies print out the current value of i at each step so that you can see it increasing). I'd suggest trying 200 iterations in user.c and 400 in user2.c so that you can see both running together, as well as what happens when one stops. (Adjust these numbers up or down, depending on how fast your VM seems to be running; so long as there is a noticeable gap between the times that the two user processes finish doing "useful work", the exact numbers are not important.)
Step 8: "Are you sure we're really protected?"
Although we are running in "protected" mode, there is, in fact, no real protection between the code in the different programs. To illustrate this, we'll modify user.c and user2.c to see how one can "interfere" with the other.
First, in user.c, add the definition of a variable:
volatile unsigned flag = 0;
and then insert the following lines immediately after the main loop:
  printf("My flag is at 0x%x\n", &flag);
  while (flag==0) {
     /* do nothing */
  }
  printf("Somebody set my flag to %d!\n", flag);
Clearly, flag is initialized to zero, and there are no other assignments to flag in the code for user.c, so we would not expect the while loop seen here to terminate. Try building and running the program to confirm that the "Somebody set my flag ..." message does not appear.
Next, pay careful attention to the address that the user program displays in the "My flag is at ADDR" message, and then add the following lines after the body of the loop in user2.c:
  unsigned* flagAddr = (unsigned*)ADDR;
  printf("flagAddr = 0x%x\n", flagAddr);
  *flagAddr = 1234;
where ADDR is replaced with the previously observed flag address. Make and run to see what happens now. Oh dear. And what is special about addresses that are part of the user program? In other words, is there anything that might prevent user2 from interfering with (or even rewriting) the kernel code??? Oh dear indeed. We'll have to work on this some more ... :-)
[Of course, this shouldn't really be a surprise: our kernel and user programs have been happily writing in to the same video RAM ever since we got started with these exercises; it's only the careful choice of parameters to setWindow() that have prevented them from interfering with one another before now ...]
But to have just a little more fun before we get there ...
Step 9: "What time is it?"
As a stretch goal, you might like to try adding a "clock" that provides a continuous display of the current time (i.e., the number of ticks since the kernel started) on the top line of the video RAM. The fine details of how you do this are up to you: you don't need to worry about displaying the actual time of day, counting seconds, or displaying a traditional clock face. For example, I thought that showing an eight digit hexadecimal display would be a good approach, especially after I had spent some time thinking about how to generate hex output for numeric values at the end of the earlier video RAM lab ...
The end
That wraps up the context switching lab, but be sure that you understand how all this code works (and ask for help if you do not) because we'll definitely be building on this work as our foundation for studying paging and virtual memory in the next lab!