|
|
VHDL Simulation |
|
|
|
||
|
|
VHDL Simulation |
|
|
|
||
Creating the VHDL simulation is easy and fun. To initiate the simulator on one of the SUN computers in the PSU lab (Fourth Avenue Building, FAB for short), one must first have a .JED file of your system and be logged onto the computers (for an example of what the .JED and .VHD code looks like, please browse through my hyperlink that covers this topic). Once you have this file, return to the UNIX command prompt. From there, type "Nova" (withough parenthesis) at the command line. This will load up the NOVA window. Within the window, click the File button. This will pop up another window that will show you a list of files in your directory. Next, click the file you want to simulate. Your original window should reappear, except it should have your inputs and outputs specified in your .JED file. You are now ready to boogey!
Within NOVA, you can specify precisely what the input sequence needs to be. To do so, simply highlight (using your mouse) the region you want the input to be "high". This region should turn white. Then press the number '1' on the keyboard. For places you want a "low" input, do the exact same thing, except type '0' instead of '1'.
To create a clock input of a specific frequency, click the button of the clock on the far left side of the simulation. This should highlight it and its input sequence. Next, move the mouse to the edit button near the top of the simulation window. Click it and you should see a drop down menu. Move your mouse to the word "clock" and select it. This should pop up another little window that will allow you to create a clock pulse. At this point, the window will pretty much be self-explanatory and you should be able to create your clock at whatever frequency and duty-cycle you want.
To actually simulate the circuit, simply press the "simulate" button near the top of the simulation window. The simulation will then commence. The input will be in white, the output will be in red.
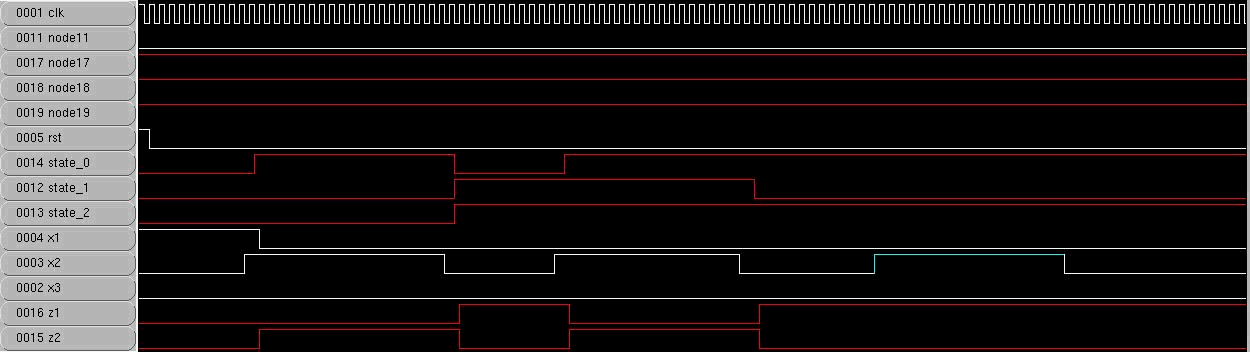
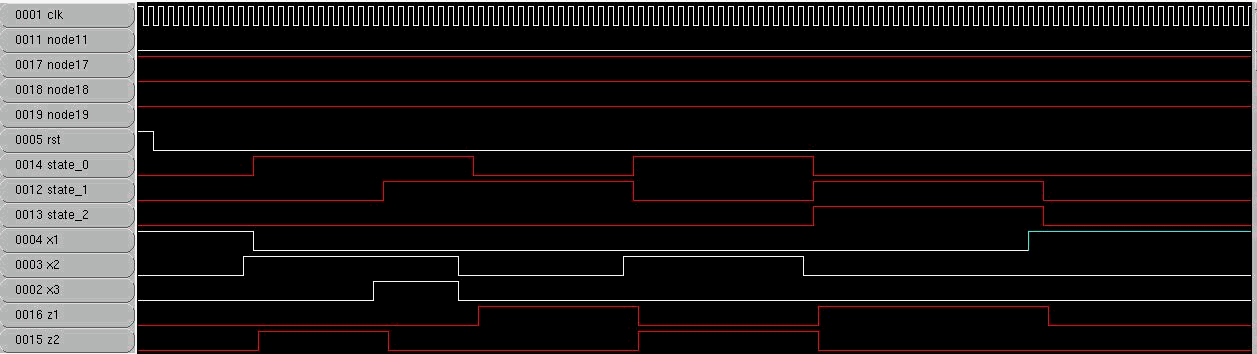
NOTE: Node 11, 17, 18 and 19 are not used in our system. Reset is set "High" for a brief period of time so as to initialize the 'D' flip-flops to state A (000). The flip-flops are sensitive to the rising edge of the clock.
There are three inputs to this system: X1, X2 and X3. X1 detects whether the claw is fully open (0 - closed, 1 - open). X2 detects whether an object is placed within the claws grasp (0 - object not detected, 1 - object detected). X3 detects pressure (claws grasp an object) (0 - no pressure, 1 - pressure felt). All three of these inputs derive from sensors (actually switches) that are located on the claw of the robot.
There are two outputs to this system, Z1 and Z2. Both of these control the motor of the claw. To open the claw, Z1Z2 = 10. To close the claw, Z1Z2 = 01. To stop the motor, Z1Z2 = 00. These two outputs would, if the circuit was actually built, be connected to two transistors (or two relays) that would interface with the motor.
The pin numbers for each of the inputs/outputs are located in the button symbol on the far left side of the simulation window.

Here is our simulation when the robot is operated such that it goes from state A (000) to state B (001) to state C (011) to state D (010) and finally back to state A (000). This means that the claws were initially fully open (X1 = 1) with no motor output (Z1Z2 = 00), then an object was placed between the claws (X2 = 1) and the claws close down on it (Z1Z2 = 01) until the claws actually grip the object (X3 = 1). The object was then removed (X2 = 0, X3 = 0) and the claw opened up (Z1Z2 = 10) until it reached its full upright position, at which time the motor stopped (Z1Z2 = 00).

Here is our simulation when the robot is operated such that it goes from state A (000) to state B (001) to state E (110) to state F (111) to state G (101) to state H (100) and back to state A (000). This means that the claws were initially open (X1 = 0) with no motor output (Z1Z2 = 00), then the object was placed between the claws (X2 = 1) and the claws attempted to clamp down on it (Z1Z2 = 01). However, the object was removed (X2 = 0) and the claws opened up (Z1Z2 = 10). Before the claws could fully open, the object was re-inserted (X1 = 1) and the claws attempted to clamp down on it again (Z1Z2 = 01). However, the object was removed (X2 = 0) and the claws opened up once again (Z1Z2 = 10). At this point, the claws will not respond to any further objects being placed between the claws, which is evident by the fact that the claws still open when another object is placed between the claws (X2 = 1). Once the claws fully open (X1 = 1), they do not respond to any other stimulus except to the pressure sensor. When the pressure sensor is tripped (X3 = 1), the claw changes from state H to state A.
Here is our simulation when the robot is operated such that it goes from state A (000) to state B (001) to state E (110) to state F (111) to state C (011) to state D (010) and back to state A (000). This means that the claws were initially open (X1 = 0) with no motor output (Z1Z2 = 00), then the object was placed between the claws (X2 = 1) and the claws attempted to clamp down on it (Z1Z2 = 01). However, the object was removed (X2 = 0) and the claws opened up (Z1Z2 = 10). Before the claws could fully open, the object was re-inserted (X1 = 1) and the claws attempted to clamp down on it again (Z1Z2 = 01). When the claws grasped down on the object (X3 =1), the claw remained closed until the object was removed (X2 = 0, X3 = 0). At this time, the claw began opening up (Z1Z2 = 10). Eventually, the claws open up to the full open position (X1 = 1), at which time the motor turns off (Z1Z2 = 00).
Here is our simulation when the robot is operated such that it goes from state A (000) to state B (001)to state C (011) to state D (010) back to state B (001) then to state E (110) and finally to state A (000). This means that the claws were initially fully open (X1 = 1) and the motors were not operating (Z1Z2 = 00), then the object was placed between the claws (X2 = 1) and the claws close down on it (Z1Z2 = 01) until they actually grip the object (X3 = 1). The object was then removed (X2 = 0) and the claws began to open up (Z1Z2 = 10), however; before the claws could open up all the way, the object was re-inserted (X2 = 1) and the claws attempted to clamp down on it again (Z1Z2 = 01). Yet, before the claws could grab the object, the object was removed (X2 = 0) and the claws opened up once again (Z1Z2 = 10), where they finally opened up all the way (X1 = 1).
|
|
Return to EE271 Main Project Page Check out our other pages Last Updated Aug. 11, 1999 |
|
|
|
||